If you have a bag of walnuts sitting in your pantry, you’re just four simple ingredients away from creating the most delightful, melt in your mouth cookies you’ve ever tasted.
These flourless walnut cookies are a revelation for anyone who loves easy baking, gluten free treats, or just incredibly delicious cookies.
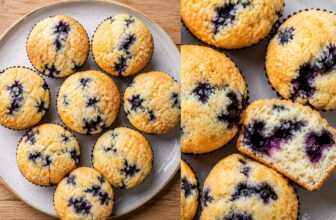
With their crispy exterior, chewy center, and rich nutty flavor, these cookies prove that the best recipes don’t need complicated ingredient lists or fancy techniques.
The Magic of Flourless Walnut Cookies
What makes these cookies truly special is their simplicity and versatility. Unlike traditional cookies that rely on flour, butter, and multiple leavening agents, this recipe uses finely ground walnuts as the base.
The walnuts provide structure, flavor, and a satisfying texture all on their own. When combined with whipped egg whites and sugar, they transform into light, airy cookies with a delicate crumb that’s somewhere between a macaroon and a traditional cookie.
The beauty of this recipe is that it’s naturally gluten free, making it perfect for anyone with celiac disease or gluten sensitivity.
But even if gluten isn’t a concern, you’ll love these cookies for their pure, uncomplicated walnut flavor. They’re sophisticated enough to serve at a dinner party yet simple enough to whip up on a weeknight when you need something sweet.
Why This Recipe Works
The science behind these cookies is fascinating. Egg whites, when beaten, create a foam structure that traps air bubbles.
This provides lift and lightness to baked goods without the need for baking powder or baking soda. The sugar stabilizes the egg white foam while adding sweetness and helping to create that desirable crispy exterior.
The finely ground walnuts act as both the flour and the flavor component, providing healthy fats and proteins that give the cookies their tender, almost melt-away texture.
The vanilla extract adds depth and enhances the natural sweetness of the walnuts and sugar. Meanwhile, the final dusting of powdered sugar not only makes these cookies look bakery beautiful but also adds an extra layer of sweetness that balances the earthy walnut flavor perfectly.
Ingredients You’ll Need
This recipe is remarkably minimal, requiring just four main ingredients plus a topping:
Main Ingredients:
- 2 large egg whites (save those yolks for another recipe!)
- Scant 1 cup granulated sugar (about ¾ cup plus 2 tablespoons)
- 3 cups finely ground walnuts (about 12 ounces whole walnuts)
- 1 teaspoon vanilla extract
For the Topping:
- Powdered sugar (confectioners’ sugar) for dusting
That’s it! Just five components create cookies that taste like you spent hours in the kitchen.
Step by Step Instructions
Step 1: Prepare the Walnuts
The first and most important step is grinding your walnuts to the right consistency. You want them finely ground but not turned into walnut butter.
Place your walnuts in a food processor and pulse in short bursts, about 10-15 times, until they reach a consistency similar to fine breadcrumbs or almond meal.
You should be able to pinch the ground walnuts between your fingers and have them hold together slightly.
If you grind them too long, the oils will release and you’ll end up with walnut paste, which won’t work for this recipe.
If you don’t have a food processor, you can use a high powered blender, but work in smaller batches and pulse carefully.
Alternatively, you can buy pre ground walnuts or walnut meal, though freshly ground nuts always provide the best flavor.
Step 2: Whip the Egg Whites
In a clean, dry mixing bowl, add your two egg whites. Make sure there’s no trace of egg yolk, as even a tiny bit of fat will prevent the whites from whipping properly.
Using an electric mixer or a whisk (though a mixer makes this much easier), begin beating the egg whites on medium speed.
At first, they’ll be liquid and bubbly. Continue beating until they begin to foam and turn white. Gradually add your sugar, about a tablespoon at a time, while continuing to beat.
This gradual addition helps create a more stable meringue. Keep beating until the egg whites form stiff, glossy peaks. When you lift the beaters, the peaks should stand straight up without drooping. This process usually takes 3-5 minutes with an electric mixer.
Step 3: Fold in the Walnuts
Once your egg whites are perfectly whipped, it’s time to add the ground walnuts and vanilla extract. Add the vanilla first and give it a quick fold to incorporate.
Then add all of your ground walnuts at once. Using a rubber spatula, gently fold the walnuts into the egg white mixture.
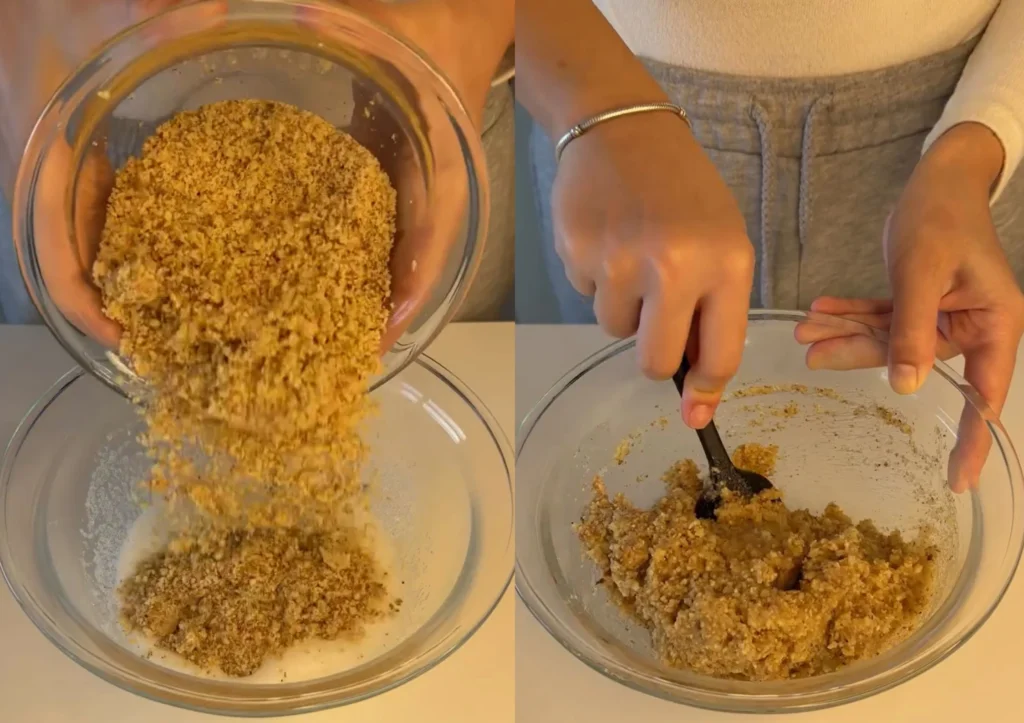
Folding is crucial here you want to incorporate the walnuts without deflating all those beautiful air bubbles you just created.
Use a motion that cuts down through the center of the mixture, sweeps along the bottom of the bowl, and brings the spatula up and over the top.
Rotate the bowl a quarter turn and repeat. Continue until the walnuts are evenly distributed and you have a thick, sticky dough. It should hold together when scooped but still be soft and pliable.
Step 4: Shape the Cookies
Line a baking sheet with parchment paper or a silicone baking mat. Using a spoon or a small cookie scoop (about 1-1.5 tablespoons), drop portions of the dough onto the prepared baking sheet, spacing them about 2 inches apart. These cookies will spread slightly during baking, but not dramatically.
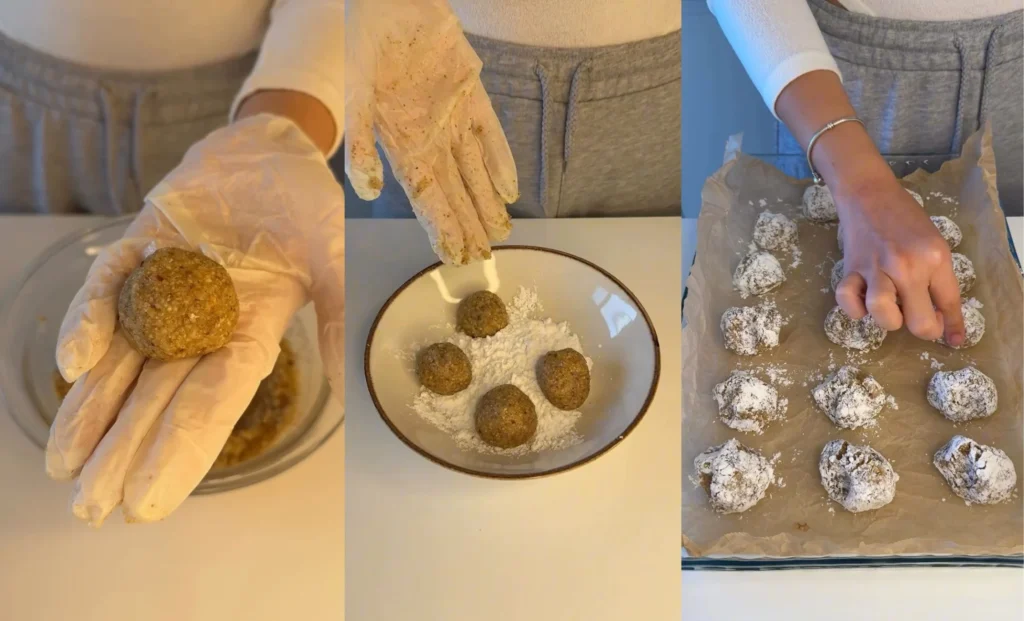
You can leave them as rustic drop cookies, or if you prefer a more uniform look, wet your fingers slightly with water and gently shape each mound into a neater round. The dough will be sticky, so keeping your fingers damp helps prevent it from sticking to your hands.
Step 5: Bake to Perfection
Preheat your oven to 350°F (180°C). Once it’s fully heated, place your baking sheet in the center of the oven. Bake for 13-15 minutes, watching carefully during the last few minutes.
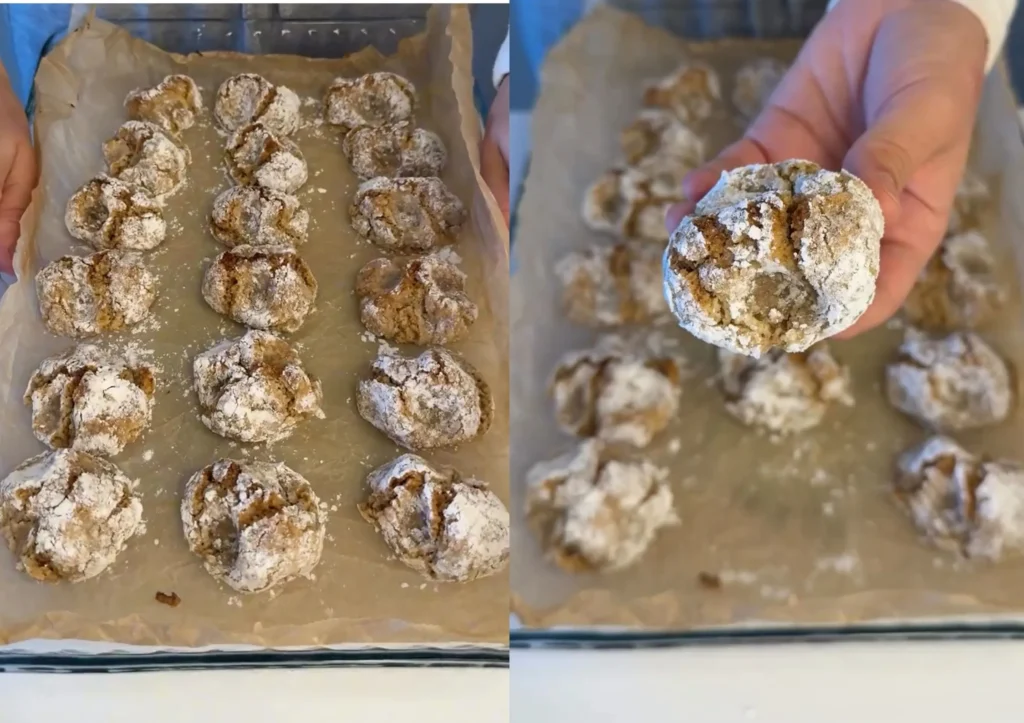
The cookies are done when they’re lightly golden around the edges and on top, with a slightly cracked surface. They should feel set when gently touched but will still be soft – they’ll firm up as they cool.
The timing is important here. At 13 minutes, check them – if they’re golden and set, they’re done. If they still look pale and wet, give them another 1-2 minutes. Overbaking will make them too hard and dry, while underbaking leaves them too soft and they may collapse.
Step 6: Cool and Finish
Remove the cookies from the oven and let them cool on the baking sheet for about 5 minutes. This cooling period is crucial the cookies need this time to set up and firm.

If you try to move them too soon, they may break. After 5 minutes, carefully transfer them to a wire cooling rack to cool completely.
Once the cookies are completely cool, place them on a serving plate and generously dust the tops with powdered sugar using a fine mesh sieve or a sugar shaker.
The powdered sugar adds a beautiful snowy finish and an extra touch of sweetness. These cookies look absolutely stunning with their rustic texture peeking through a blanket of white sugar.
Tips for Perfect Results
Egg White Success: Room temperature egg whites whip up better and achieve greater volume than cold ones. Separate your eggs while they’re cold (it’s easier), then let the whites sit at room temperature for about 30 minutes before whipping.
The Right Grind: The walnut texture is crucial. Too coarse and your cookies will be crumbly; too fine and they’ll be dense. Aim for the consistency of very fine breadcrumbs.
Don’t Overmix: When folding in the walnuts, work quickly but gently. Overmixing will deflate the egg whites and result in flat, dense cookies.
Fresh is Best: Walnuts can go rancid, especially if they’ve been sitting in your pantry for months. Taste one before using to make sure they’re still fresh. Store walnuts in the refrigerator or freezer to extend their shelf life.
Pan Preparation: Don’t skip the parchment paper or silicone mat. These cookies can stick to unlined pans, and greasing the pan can cause them to spread too much.
Storage and Shelf Life
These cookies store beautifully, making them perfect for make-ahead entertaining or holiday baking. Once completely cooled, store them in an airtight container at room temperature for up to 5 days. Layer them with parchment paper to prevent sticking.
You can also freeze these cookies for up to 3 months. Freeze them in a single layer on a baking sheet until solid, then transfer to a freezer bag. Thaw at room temperature for about 30 minutes before serving. If the powdered sugar coating gets absorbed, simply dust with more powdered sugar before serving.
Variations and Customizations
While these cookies are perfect as written, there are several fun variations you can try:
Chocolate Lovers: Add 2 tablespoons of cocoa powder to the ground walnuts for chocolate walnut cookies.
Citrus Twist: Replace the vanilla with lemon or orange zest for a bright, citrusy flavor.
Spice It Up: Add ½ teaspoon of cinnamon or a pinch of nutmeg to the walnut mixture.
Nutty Variations: Substitute half the walnuts with finely ground almonds, pecans, or hazelnuts for a different flavor profile.
Chocolate Drizzle: Once cooled, drizzle the cookies with melted dark chocolate for an elegant finish.

If You Have Walnuts, Make This: The Easiest 4 Ingredient Cookie Recipe
Ingredients
- Main Ingredients
- 2 large egg whites room temperature preferred
- Scant 1 cup granulated sugar approximately ¾ cup plus 2 tablespoons
- 3 cups finely ground walnuts about 12 oz whole walnuts
- 1 teaspoon vanilla extract
- For the Topping
- Powdered sugar confectioners’ sugar for dusting
Instructions
- Step 1: Prepare the Walnuts
- Place whole walnuts in a food processor
- Pulse in short bursts (10-15 times)
- Grind until consistency resembles fine breadcrumbs or almond meal
- Walnuts should pinch together slightly between fingers
- Do NOT over-process or they’ll turn into walnut butter
- Stop before oils are released
- Set aside ground walnuts
- Step 2: Whip the Egg Whites
- Ensure mixing bowl and beaters are completely clean and dry
- Add 2 egg whites to the bowl (no trace of yolk)
- Beat on medium speed with electric mixer
- Continue until whites begin to foam and turn white
- Gradually add sugar, 1 tablespoon at a time
- Keep beating while adding sugar
- Continue beating for 3-5 minutes total
- Beat until stiff, glossy peaks form
- Peaks should stand straight up when beaters are lifted
- Step 3: Fold in Walnuts and Vanilla
- Add 1 teaspoon vanilla extract to whipped egg whites
- Fold gently to incorporate vanilla
- Add all 3 cups ground walnuts at once
- Use rubber spatula to fold gently
- Cut down through center, sweep along bottom, bring up and over
- Rotate bowl a quarter turn and repeat
- Continue until walnuts are evenly distributed
- Work gently to avoid deflating egg whites
- Dough should be thick and sticky but hold together
- Step 4: Shape the Cookies
- Preheat oven to 350°F (180°C)
- Line baking sheet with parchment paper or silicone mat
- Use spoon or small cookie scoop (1-1.5 tablespoons)
- Drop portions of dough onto prepared sheet
- Space cookies about 2 inches apart
- Optional: Wet fingers slightly and shape into neater rounds
- Dough will be sticky – damp fingers prevent sticking
- Step 5: Bake to Perfection
- Place baking sheet in center of preheated oven
- Bake for 13-15 minutes
- Watch carefully during last few minutes
- Cookies are done when lightly golden on edges and top
- Surface should have slightly cracked appearance
- Should feel set when gently touched but still soft
- Check at 13 minutes – if golden and set, they’re done
- If pale and wet, bake 1-2 more minutes
- Do not overbake or they’ll be too hard and dry
- Step 6: Cool and Finish
- Remove cookies from oven
- Let cool on baking sheet for 5 minutes (crucial step)
- Do not move cookies before 5 minutes or they may break
- After 5 minutes, transfer to wire cooling rack
- Let cool completely
- Once cool, place on serving plate
- Dust generously with powdered sugar using fine-mesh sieve
- Serve and enjoy
Cooking Tips
- Use room temperature egg whites for better volume
- Separate eggs while cold, then let whites warm up
- Taste walnuts first to ensure they’re fresh, not rancid
- Store unused walnuts in refrigerator or freezer
- Use glass or metal bowl for whipping egg whites (not plastic)
- Don’t skip parchment paper – cookies can stick
- Work quickly but gently when folding
- Better to slightly underbake than overbake
Serving Suggestions
- Serve with coffee or tea
- Pair with fresh fruit
- Accompany with ice cream or gelato
- Include on cookie platter for parties
- Serve at afternoon tea
- Perfect for holiday cookie exchanges
- Great with hot chocolate
- Lovely with dessert wine
Customization Options
Flavor Variations
- Chocolate version: Add 2 tablespoons cocoa powder to ground walnuts
- Citrus twist: Replace vanilla with 1 teaspoon lemon or orange zest
- Spiced cookies: Add ½ teaspoon cinnamon or pinch of nutmeg
- Coffee flavor: Add 1 teaspoon instant espresso powder
- Almond extract: Replace half the vanilla with almond extract
Nut Variations
- Almonds: Use finely ground almonds instead of walnuts
- Pecans: Substitute pecans for richer, sweeter flavor
- Hazelnuts: Use ground hazelnuts for European flair
- Mixed nuts: Use 1½ cups walnuts + 1½ cups almonds
- Pistachios: Try finely ground pistachios for unique color
Topping Options
- Dust with cocoa powder instead of powdered sugar
- Drizzle with melted dark chocolate
- Drizzle with white chocolate
- Press whole walnut half on top before baking
- Sprinkle with chopped walnuts before baking
- Dip half in melted chocolate after cooling
Storage Instructions
- Room Temperature: Store in airtight container for up to 5 days
- Layer cookies with parchment paper to prevent sticking
- Freezer: Freeze for up to 3 months
- Freeze in single layer on baking sheet until solid
- Transfer to freezer bag once frozen
- Thaw at room temperature for 30 minutes
- Re-dust with powdered sugar after thawing if needed
Make-Ahead Instructions
- Grind walnuts up to 1 week ahead
- Store ground walnuts in airtight container in refrigerator
- Cookies are best baked fresh but can be made 2 days ahead
- Store baked cookies in airtight container
- Dust with powdered sugar just before serving
Troubleshooting Guide
Egg Whites Won’t Whip
- Check for any traces of egg yolk or grease
- Ensure bowl and beaters are completely clean and dry
- Use glass or metal bowl, not plastic
- Make sure egg whites are at room temperature
- Beat on medium speed, not too high or too low
Cookies Spread Too Much
- Egg whites weren’t whipped to stiff peaks
- Egg whites were deflated during folding
- Oven wasn’t fully preheated
- Too much time elapsed between shaping and baking
Cookies Are Too Hard
- Cookies were overbaked
- Bake for minimum time (13 minutes) and check
- Reduce baking time by 1-2 minutes next time
Cookies Fell Apart
- Moved cookies too soon after baking
- Must cool on baking sheet for full 5 minutes
- Egg whites may not have been beaten enough
Cookies Are Dense
- Walnuts were ground too fine (turned into paste)
- Egg whites were deflated by overmixing
- Fold gently and minimally
Equipment Needed
- Food processor or blender
- Electric mixer (handheld or stand mixer)
- Large mixing bowl (glass or metal)
- Rubber spatula
- Baking sheet
- Parchment paper or silicone baking mat
- Cookie scoop or spoon (1-1.5 tablespoon size)
- Wire cooling rack
- Fine-mesh sieve (for powdered sugar)
Nutritional Information (Approximate per cookie)
- Calories: 90-100
- Protein: 2-3g
- Carbohydrates: 9-10g
- Fat: 6-7g
- Fiber: 1g
- Sugar: 8g
- Omega-3: Good source from walnuts
Health Benefits
- Gluten-free: Naturally free from gluten
- Grain-free: No flour or grains used
- Protein: Contains protein from egg whites and walnuts
- Healthy fats: Omega-3 fatty acids from walnuts
- Antioxidants: Walnuts are rich in antioxidants
- Lower carb: Fewer carbs than traditional cookies
Why This Recipe Works
- Egg white foam: Provides structure without flour
- Sugar stabilizes: Helps egg whites hold their shape
- Ground walnuts: Act as flour replacement
- Healthy fats: From walnuts create tender texture
- Minimal ingredients: Simple but effective combination
- Quick baking: Short time prevents drying out
Perfect For
- Gluten-free diets: Completely flour-free
- Holiday baking: Beautiful and festive
- Gift giving: Package in pretty boxes or tins
- Cookie exchanges: Unique addition to variety
- Last-minute desserts: Quick and easy to make
- Tea parties: Elegant and sophisticated
- Passover: Often suitable for Passover celebrations (check specific requirements)
Dietary Information
- Gluten-Free: Yes
- Grain-Free: Yes
- Dairy-Free: Yes
- Vegetarian: Yes
- Kosher: Generally yes (check specific requirements)
- Paleo-Friendly: With honey instead of sugar
- Keto: Too high in sugar for strict keto
Pro Tips for Success
- Fresh walnuts make a huge difference in flavor
- Don’t rush the egg white whipping process
- Stiff peaks are crucial for proper structure
- Fold gently to preserve air in egg whites
- Cool fully before dusting with powdered sugar
- Store away from moisture to keep crispy
- Make uniform sizes for even baking
Common Mistakes to Avoid
- Over-processing walnuts into butter
- Not whipping egg whites to stiff peaks
- Adding sugar too quickly
- Overmixing when folding in walnuts
- Moving cookies before 5-minute cooling period
- Overbaking the cookies
- Using rancid walnuts
Serving Size Variations
- Mini cookies: Make smaller (1 teaspoon each), bake 10-12 minutes
- Large cookies: Make bigger (2 tablespoons each), bake 16-18 minutes
- Cookie sandwiches: Sandwich two cookies with frosting or jam
- Cookie crumbles: Break up and use as ice cream topping
Special Occasion Ideas
- Weddings: Package as wedding favors
- Baby showers: Dust with pink or blue colored sugar
- Christmas: Add peppermint extract, dust with powdered sugar for snowy effect
- Valentine’s Day: Drizzle with pink or red chocolate
- Birthday parties: Top with sprinkles before baking
Absolutely! Almonds, pecans, and hazelnuts all work beautifully in this recipe. Just make sure to grind them to the same fine consistency as you would the walnuts. Each nut will give the cookies a slightly different flavor and texture.
The most common culprit is fat contamination. Even a tiny bit of egg yolk or grease in your bowl will prevent egg whites from whipping. Make sure your bowl and beaters are completely clean and dry. Also, plastic bowls can retain oils, so glass or metal bowls work best.
Yes! You can use a blender to grind the walnuts in small batches, or you can buy pre-ground walnuts or walnut meal from specialty stores. In a pinch, you can even chop the walnuts very finely by hand, though the texture won’t be quite as uniform.
If your cookies spread excessively, the egg whites may not have been whipped enough, or you may have deflated them too much when folding in the walnuts. Make sure you beat the egg whites to stiff peaks and fold gently. Also, ensure your oven is fully preheated before baking.
Definitely! Just adjust the baking time accordingly. Smaller cookies may only need 10-12 minutes, while larger cookies might need 16-18 minutes. Watch for the golden color and set texture to determine doneness.
These cookies have a unique texture that’s crispy on the outside and slightly chewy on the inside when fresh. After a day or two, they become more uniformly crispy, which is also delicious. Both textures are correct!
While you can add chocolate chips, fold them in very gently after the walnuts to avoid deflating the egg whites. Mini chocolate chips work better than regular-sized chips in these delicate cookies.
Look for lightly golden edges and tops with a slightly cracked surface. They should feel set when gently touched but will still be slightly soft – they firm up as they cool. It’s better to slightly underbake than overbake these cookies.
Final Thoughts
These flourless walnut cookies are proof that extraordinary desserts don’t require extraordinary effort. With just four main ingredients and about 30 minutes of your time, you can create cookies that are elegant enough for a fancy tea party yet homey enough for an after-school snack.
The naturally gluten free nature makes them accessible to more people, while the rich walnut flavor and delicate texture make them irresistible to everyone.
Whether you’re an experienced baker or just starting out, this recipe is foolproof and forgiving. So next time you spot that bag of walnuts in your pantry, you’ll know exactly what to make. Your taste buds will thank you!