Let’s be honest about something. Fast food chicken nuggets have a hold on people that is genuinely hard to explain.
They’re crispy, they’re salty, they’re perfectly bite-sized, and they go with literally every dipping sauce ever invented.
But here’s what most people don’t think about when they’re biting into one: what’s actually inside that golden coating? The answer is usually a compressed mystery mixture that has traveled a very long, very industrial journey before landing in your hand.
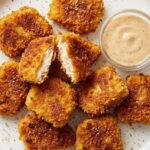
This recipe changes everything. These Crispy Homemade Chicken Nuggets are made from real, whole chicken breast blended with fresh breadcrumbs, garlic, and your favorite spices into a smooth, cohesive mixture that you shape yourself, coat in a triple-layer of flour, egg, and panko breadcrumbs, and fry to a shattering, golden crisp.
The inside is tender, juicy, and packed with seasoned flavor. The outside is everything a nugget exterior should be crunchy, golden, and absolutely irresistible.
And here’s the bonus: this recipe makes a big batch. You can set portions aside in a storage container and freeze them for later, which means the best homemade nuggets you’ve ever eaten are always just minutes away from your plate. Let’s get into it.
Why This Recipe Works So Well
The secret to these nuggets lies in the blending step and it’s a technique that most home cooks have never tried.
Instead of cutting chicken breast into chunks and breading them individually (which gives you uneven shapes, uneven cooking, and a filling that can dry out fast), this recipe blends the chicken together with fresh breadcrumbs, garlic, and spices into a smooth, uniform mixture.
The breadcrumbs inside the mixture do two things simultaneously: they act as a binder that holds everything together without needing eggs or additional fillers, and they absorb the seasoning and moisture from the chicken, keeping the interior of each nugget incredibly juicy even after frying.
The garlic blends completely into the mixture, distributing its flavor evenly through every single bite rather than appearing in occasional chunks.
The result is a nugget that has a genuinely smooth, restaurant-quality interior texture dense, moist, flavorful encased in a three layer coating of flour, seasoned egg wash, and panko breadcrumbs that fries up to a golden, shatteringly crispy shell.
These are nuggets that make you stop mid bite and reconsider every drive through decision you’ve ever made.
Ingredients
For the nugget mixture:
- 1 pound chicken breast (approximately 500 grams), cut into rough chunks
- 4 slices white sandwich bread or soft dinner rolls, torn into pieces (fresh breadcrumbs)
- 2 cloves fresh garlic, peeled
- Spices of your choice salt, black pepper, garlic powder, onion powder, and paprika are all excellent options
For the coating:
- 2 large eggs
- All-purpose flour (for dredging)
- Panko breadcrumbs (Japanese-style breadcrumbs, available at any major grocery store)
- ½ teaspoon ground turmeric (optional adds a beautiful golden color to the coating)
- Neutral oil for frying (vegetable oil, canola oil, or peanut oil)
A Note on Panko Breadcrumbs
If you’ve never cooked with panko before, it’s about to become a permanent staple in your pantry. Panko breadcrumbs are a Japanese style breadcrumb that are lighter, airier, and significantly crispier than standard American breadcrumbs.
They create a coating that shatters when you bite through it that dramatic crunch that makes a great fried food feel genuinely special.
You can find panko in the bread aisle or the international foods section of virtually every major grocery store across the U.S., including Walmart, Target, Kroger, and Whole Foods.
The Turmeric Trick
The recipe calls for adding half a teaspoon of ground turmeric to the beaten eggs and panko breadcrumbs before coating. This is entirely optional turmeric has a very mild flavor at this quantity and won’t significantly affect the taste of the finished nugget.
What it does do is give the coating a stunning, deep golden yellow color that makes these nuggets look like they came straight out of a professional kitchen.
If you want that beautiful color, add it. If you prefer a more neutral appearance or simply don’t have turmeric on hand, skip it completely the nuggets will be just as delicious either way.
Step by Step Instructions
Step 1 Blend the chicken mixture
Place the chicken breast chunks, torn bread slices, peeled garlic cloves, and all your chosen spices into a blender or food processor. Blend for 3 to 4 full minutes until the mixture is completely smooth and uniform no visible chicken chunks, no bread pieces, just a cohesive, smooth paste.
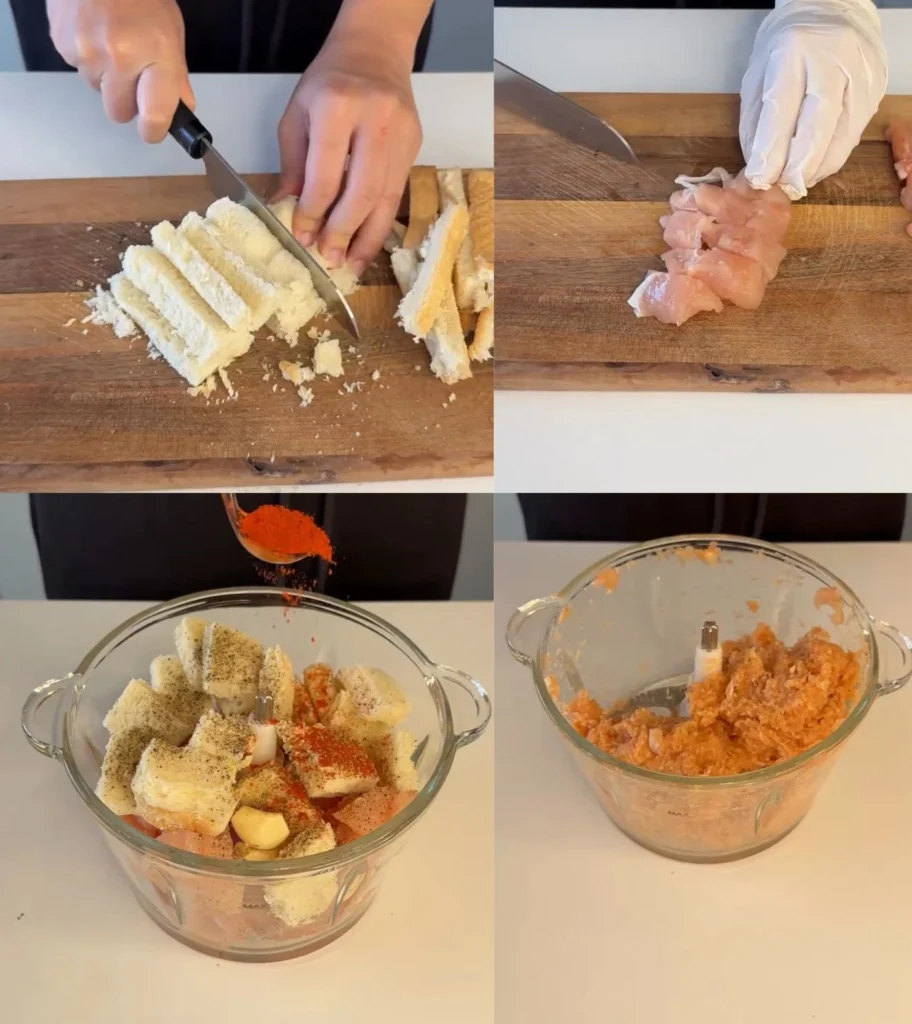
This blending time is important a shorter blend time leaves the texture uneven and the nuggets won’t hold together as well during shaping and frying.
Step 2 Transfer to a greased baking sheet and shape
Lightly grease a baking sheet or line it with plastic wrap. Transfer the blended chicken mixture onto the sheet.
Using lightly greased hands or a greased spatula, shape the mixture into an even layer roughly ½ to ¾ inch thick across the sheet. From here, use a sharp knife, cookie cutter, or simply your hands to portion and shape individual nugget pieces classic oval nugget shapes, rectangles, or rounds all work perfectly.
If you’re saving some for later, transfer those portions to a storage container at this point before coating.
Step 3 Set up your coating station
Arrange three shallow bowls in a row: the first with all purpose flour, the second with the two beaten eggs (add the turmeric here if using), and the third with panko breadcrumbs (add a pinch of turmeric here too if using). Season the flour lightly with salt and pepper.
Step 4 Coat each nugget one by one
Working one nugget at a time, dredge it first in the flour pressing gently so it sticks all over. Shake off any excess.
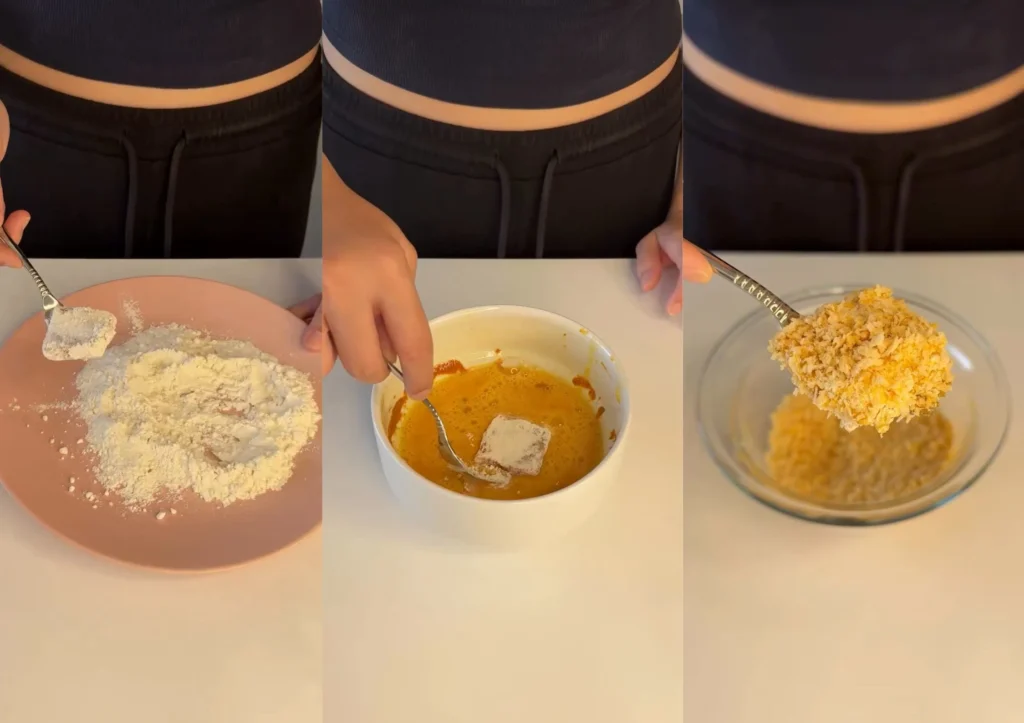
Dip it next into the beaten egg, letting any drips fall back into the bowl. Finally, press it firmly into the panko breadcrumbs, turning and pressing so the entire surface is completely coated in an even, thick layer of panko. Set each coated nugget aside on a clean plate or baking sheet while you finish the rest.
Step 5 Fry in hot oil over medium heat
Heat a generous amount of neutral oil in a deep skillet or heavy-bottomed pan over medium heat not high heat.
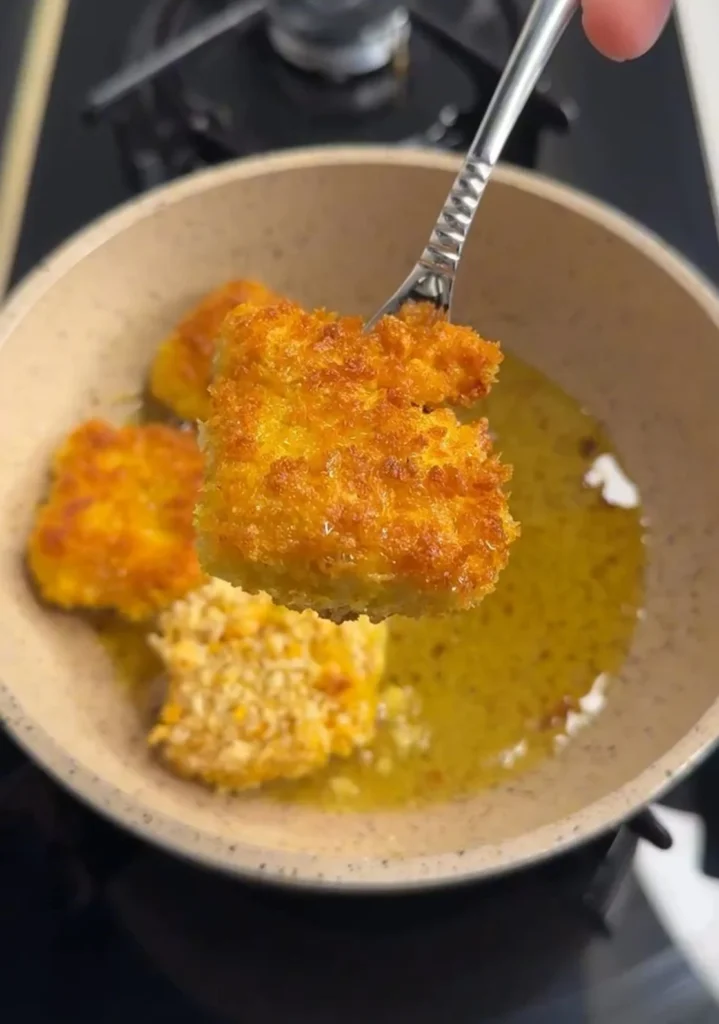
This temperature control is critical. The oil needs to be hot enough to immediately begin crisping the coating when the nugget hits the pan, but not so hot that the outside turns dark brown before the inside has time to cook through fully.
A good test: drop a small pinch of panko into the oil if it sizzles steadily and turns golden within 30 seconds, the oil is ready.
Fry the nuggets in batches, never overcrowding the pan, for approximately 3 to 4 minutes per side until deeply golden brown all over and cooked through.
Step 6 Drain and serve immediately
Remove the cooked nuggets with tongs or a slotted spoon and place on a wire rack or paper towel-lined plate to drain any excess oil. Serve immediately while the coating is at peak crunch.
Tips for Perfect Nuggets Every Time
Blend the chicken mixture for the full 3 to 4 minutes this is what creates the smooth, restaurant-quality interior texture.
Keep your hands lightly greased or dampened with water when shaping the nuggets the mixture is sticky and this prevents it from clinging to your hands.
Press the panko coating firmly onto each nugget a well-packed coating stays intact during frying and produces maximum crunch.
Never fry on high heat medium heat is the sweet spot that cooks the inside through before the outside over-browns.
Always fry in small batches overcrowding drops the oil temperature and results in soggy, greasy nuggets instead of crispy ones.
Let the oil return to temperature between batches before adding the next round.
Make Ahead and Storage
One of the best things about this recipe is how well it lends itself to meal prepping. After shaping the nuggets (before coating), you can place them in a single layer in a storage container separated by parchment paper and refrigerate for up to 24 hours or freeze for up to one month.
When ready to cook, coat them straight from the refrigerator (add 1 to 2 extra minutes of frying time) or thaw frozen nuggets overnight in the fridge before coating and frying.
You can also freeze fully cooked and cooled nuggets reheat in a 400°F oven for 10 to 12 minutes or in an air fryer at 375°F for 5 to 6 minutes to restore the crunch.
Serving Ideas
Set up a full dipping sauce spread and let everyone customize ketchup, honey mustard, ranch dressing, BBQ sauce, buffalo sauce, and sriracha mayo are all incredible pairings.
Serve alongside waffle fries, coleslaw, or a simple green salad for a complete meal. Pack cooled nuggets in school lunch boxes with a small container of dipping sauce kids go absolutely wild for these. Serve on a platter at game day parties and watch them disappear in minutes.
Crispy Nuggets from Scratch The Homemade Chicken Nugget Recipe
Ingredients
- For the Nugget Mixture:
- 1 lb chicken breast approximately 500 grams, cut into rough chunks
- 4 slices white sandwich bread or soft dinner rolls torn into pieces
- 2 cloves fresh garlic peeled
- 1 teaspoon salt
- 1 teaspoon black pepper
- 1 teaspoon garlic powder
- 1 teaspoon onion powder
- 1 teaspoon paprika
- For the Coating:
- 2 large eggs beaten
- All-purpose flour for dredging
- Panko breadcrumbs Japanese-style, available at any major grocery store
- ½ teaspoon ground turmeric optional — for deep golden color only
- Neutral oil for frying vegetable oil, canola oil, or peanut oil
Instructions
- Place chicken breast chunks, torn bread pieces, peeled garlic cloves, and all spices into a blender or food processor.
- Blend for 3–4 full minutes until the mixture is completely smooth, uniform, and paste-like with no visible chunks remaining.
- Lightly grease a baking sheet or line with plastic wrap and transfer the blended chicken mixture onto it.
- Using lightly greased hands or a greased spatula, shape the mixture into an even layer ½ to ¾ inch thick, then portion into individual nugget shapes.
- Set up a three-bowl coating station — bowl one with all-purpose flour seasoned with salt and pepper, bowl two with beaten eggs (add turmeric here if using), bowl three with panko breadcrumbs (add a pinch of turmeric here too if using).
- Coat each nugget one at a time — dredge in flour first, shake off excess, dip in beaten egg, then press firmly into panko until completely and evenly coated all over.
- Heat neutral oil in a deep skillet over medium heat — not high heat.
- Test oil readiness by dropping a pinch of panko in — if it sizzles steadily and turns golden within 30 seconds the oil is ready.
- Fry nuggets in small batches for 3–4 minutes per side until deeply golden brown all over and cooked through to an internal temperature of 165°F.
- Remove with tongs or a slotted spoon onto a wire rack or paper towel-lined plate to drain.
- Serve immediately while coating is at peak crunch.
Notes
Blend the full 3–4 minutes this is what creates the smooth, juicy, restaurant-quality interior texture.
Keep hands lightly greased or dampened when shaping nuggets to prevent sticking.
Press panko coating firmly onto each nugget for maximum crunch that stays intact during frying.
Never fry on high heat medium heat cooks the inside through before the outside over-browns.
Always fry in small batches overcrowding drops oil temperature and causes soggy greasy nuggets.
Allow oil to return to temperature between each batch before adding the next round.
For baking: place on a greased wire rack at 425°F for 18–22 minutes, flipping once, sprayed generously with cooking spray.
For air frying: spray with cooking spray and air fry at 400°F for 10–12 minutes, flipping once halfway through.
Freeze uncoated shaped nuggets in a single layer separated by parchment for up to 1 month; coat and fry straight from refrigerator after thawing overnight.
Reheat cooked frozen nuggets in oven at 400°F for 10–12 minutes or air fryer at 375°F for 5–6 minutes to restore crunch.
Use an instant-read thermometer to confirm internal temperature reaches 165°F before serving.
Yes. Place coated nuggets on a wire rack set over a greased baking sheet and bake at 425°F for 18 to 22 minutes, flipping once halfway through. Spray generously with cooking spray before baking for better browning. The baked version won’t be quite as dramatically crispy as the fried version, but it’s a solid and genuinely tasty alternative.
Absolutely. Spray coated nuggets generously with cooking spray and air fry at 400°F for 10 to 12 minutes, flipping once halfway through, until golden brown and cooked through. The air fryer produces an excellent crispy result with significantly less oil.
The mixture is wonderfully flexible. A classic American seasoning blend salt, black pepper, garlic powder, onion powder, and paprika works beautifully. For a spicier version, add cayenne pepper or chili powder. For an herb-forward flavor, add dried parsley, dried thyme, and a pinch of dried oregano. The spices blend directly into the meat mixture, so every bite is seasoned throughout.
Yes boneless, skinless chicken thighs actually produce a slightly juicier, richer-flavored nugget due to their higher fat content. The blending process works identically. Simply trim any excess fat before blending.
The most common cause is skipping or rushing the flour dredging step. The flour layer is what gives the egg wash something to grip, which then gives the panko something to stick to. Make sure each nugget is fully and evenly coated in flour before dipping in egg this three-layer system is what keeps the coating intact through frying.
The internal temperature of the cooked nugget should reach 165°F when measured with an instant-read thermometer this is the USDA-recommended safe internal temperature for cooked chicken. The exterior should be deeply golden brown all over. If you’re unsure, cut one nugget open the interior should be completely white with no pink remaining.
Yes. Substitute the bread slices in the chicken mixture with gluten-free sandwich bread, use a gluten-free all-purpose flour blend for dredging, and use gluten-free panko breadcrumbs (widely available at most major grocery stores). The recipe works well with these substitutions and produces a very similar final result.