There are summer desserts that taste good. There are summer desserts that look good. there are these Watermelon Ice Pops. Three stunning layers of real fruit and creamy yogurt, frozen into a popsicle mold, unmolded to reveal a cross section of summer that is so visually beautiful and so genuinely delicious that it is almost impossible to believe it was made at home with five ingredients and zero cooking required.
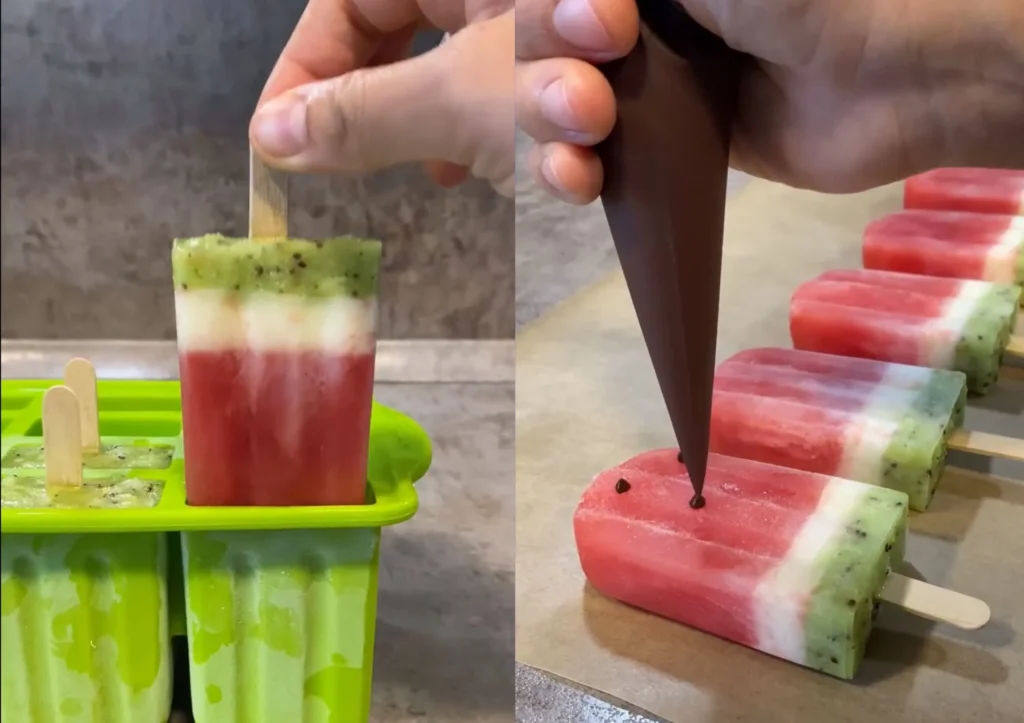
The bottom layer which becomes the top of the finished pop is a deep, jewel-toned layer of bright green kiwi puree.
The middle layer is a thin, creamy white stripe of natural yogurt. And the base is a thick, vibrant, intensely pink red layer of fresh watermelon puree that tastes exactly like biting into the sweetest slice of watermelon on the hottest day of the year.
When you unmold these pops and hold one up in the summer sun, the colors are genuinely breathtaking and the first bite delivers exactly the fresh, fruity, creamy experience that the appearance promises.
These are the pops you make when you want to impress without effort. The pops kids go absolutely wild for. The pops that disappear from the freezer faster than you can make them.
And with a chocolate garnish on top because why not they are the kind of effortless summer treat that makes you feel like a genuinely talented home cook even if this is the first frozen dessert you have ever attempted.
Let’s make them.
Why This Recipe Is Genius
The concept is deceptively simple blend fruit, layer into molds, freeze but the execution involves a level of patience and timing that is genuinely rewarded in the final result.
The key insight of this recipe is that each layer must be partially or fully frozen before the next layer is added. This is what creates those distinct, clean, beautiful color bands rather than a muddled, blended swirl.
Fresh watermelon is approximately 92% water, which means it blends into a completely smooth, pourable liquid puree without any additional liquid needed and it freezes into a clean, ice pop consistency that is firm without being rock hard.
The natural yogurt layer a thin band piped in using a piping bag for precision adds a creamy, tangy contrast that mirrors the white rind of a real watermelon slice and provides a dairy richness that bridges the two fruit layers beautifully.
The kiwi layer adds a completely different flavor profile tart, bright, slightly tropical and that vivid green color that makes the finished pop so visually striking.
Together, the three layers create a frozen treat that is more interesting, more complex, and more visually stunning than any single flavor popsicle could ever be while remaining completely natural, genuinely fruit forward, and free of any artificial colors, flavors, or preservatives.
Ingredients
- 17.6 oz fresh watermelon flesh, seeds removed (approximately 500 grams — roughly 3 to 4 cups of cubed seedless watermelon)
- 2 ripe kiwi fruits, peeled
- 3 tablespoons plain natural yogurt (whole milk plain yogurt works best — Stonyfield, Chobani plain, or Fage plain are all excellent choices)
- Sugar to taste (optional — if your watermelon or kiwi is not quite as sweet as you’d like, a small amount of granulated sugar or honey blended into either puree brightens the flavor significantly)
- Chocolate for garnish (melted dark, milk, or white chocolate — or chocolate melting wafers for easier dipping)
Equipment needed:
- Blender or food processor
- 9 ice pop molds (popsicle molds — available at Target, Walmart, Amazon, or any kitchen store)
- 9 popsicle sticks
- Piping bag (or a small zip-lock bag with a corner snipped off works perfectly as a substitute)
A Note on Choosing Your Ingredients
Watermelon: The riper and sweeter your watermelon, the better your pops will taste the watermelon layer is the most prominent flavor in the finished pop and deserves the best fruit you can find.
Seedless watermelon is ideal for the smoothest puree, but seeded watermelon works perfectly fine if you remove the seeds before blending. If your watermelon has good natural sweetness, no added sugar is necessary.
Kiwi: Ripe kiwi should give slightly when pressed gently and have a fragrant, sweet tart smell. Under ripe kiwi is too tart and slightly bitter if your kiwi needs ripening, place them in a paper bag with a banana for 24 hours to speed up the process. You can add a small pinch of sugar to the kiwi puree if needed to balance any tartness.
Yogurt: Plain natural yogurt is what creates the clean, white, creamy middle layer. Greek yogurt can be substituted for a slightly thicker, higher protein layer it pipes very well and produces a slightly tangier flavor that pairs beautifully with the sweet watermelon. Avoid flavored yogurts as they will discolor the white layer and change the flavor profile.
Step by Step Instructions
Step 1 Blend the watermelon
Cut your seedless watermelon into rough chunks, removing any seeds if present. Place in a blender and blend on high speed until completely smooth and liquid the puree will be a deep, vivid pink red and completely pourable.
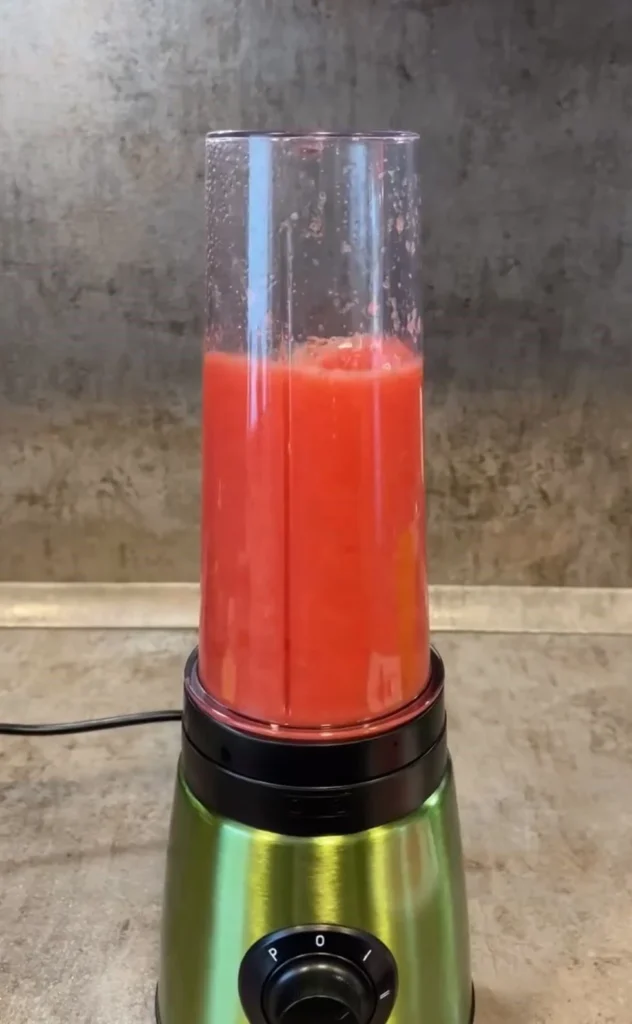
Taste and add a small amount of sugar if needed, blending again to dissolve. Set aside.
Step 2 Fill the molds two-thirds full with watermelon puree
Pour the watermelon puree into each ice pop mold, filling each one approximately two thirds of the way full. This two thirds level is important you need to leave space for the yogurt and kiwi layers on top.
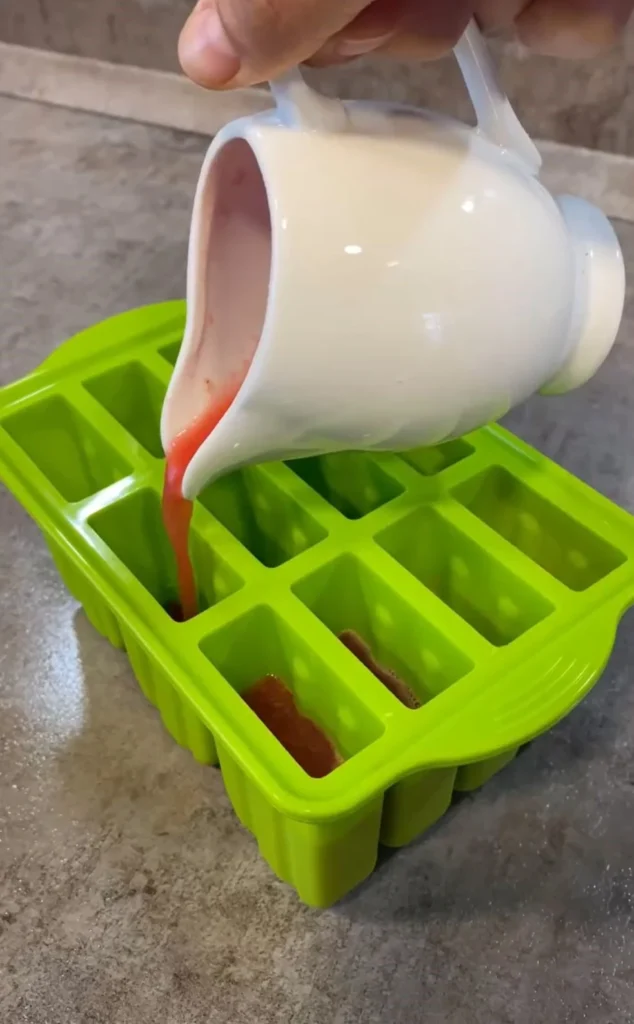
Tap the molds gently on the counter to release any air bubbles and ensure the puree settles evenly.
Step 3 Freeze until partially set and insert sticks
Place the filled molds in the freezer and allow the watermelon layer to freeze until it is partially set firm enough around the edges to hold a popsicle stick upright, but not completely frozen solid throughout.
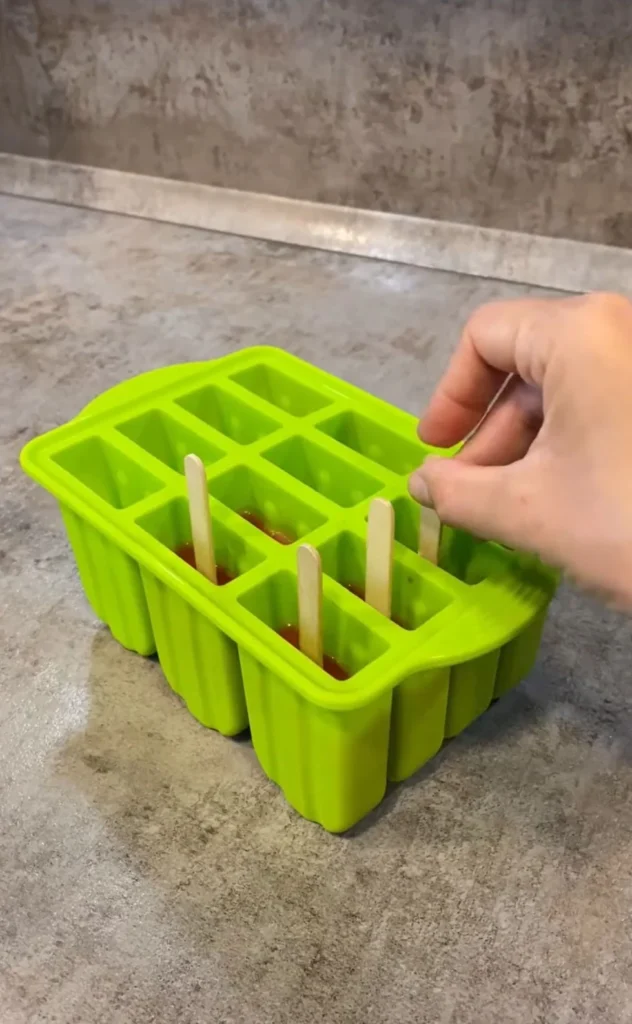
This typically takes approximately 45 minutes to 1 hour depending on your freezer temperature. Once partially set, insert a popsicle stick into the center of each mold, pressing down until it stands straight and is positioned in the center of the mold.
Return to the freezer for an additional 2 to 3 hours until the watermelon layer is completely frozen solid.
Step 4 Add the yogurt layer
Transfer the plain yogurt into a piping bag or spoon it into a small zip lock bag and snip a small corner off. Pipe a thin, even layer of yogurt onto the top of each frozen watermelon layer in each mold.
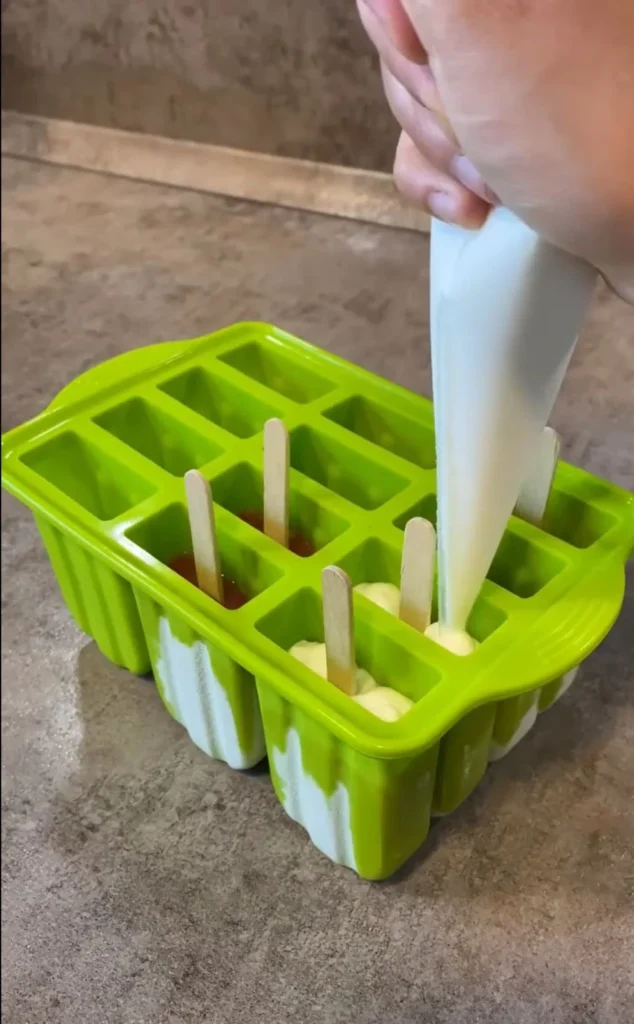
The piping bag gives you precision and control the goal is a thin, even white stripe that will show beautifully in the finished pop.
The layer should be approximately half a centimeter thick. Return the molds to the freezer for approximately 30 minutes until the yogurt layer is firm.
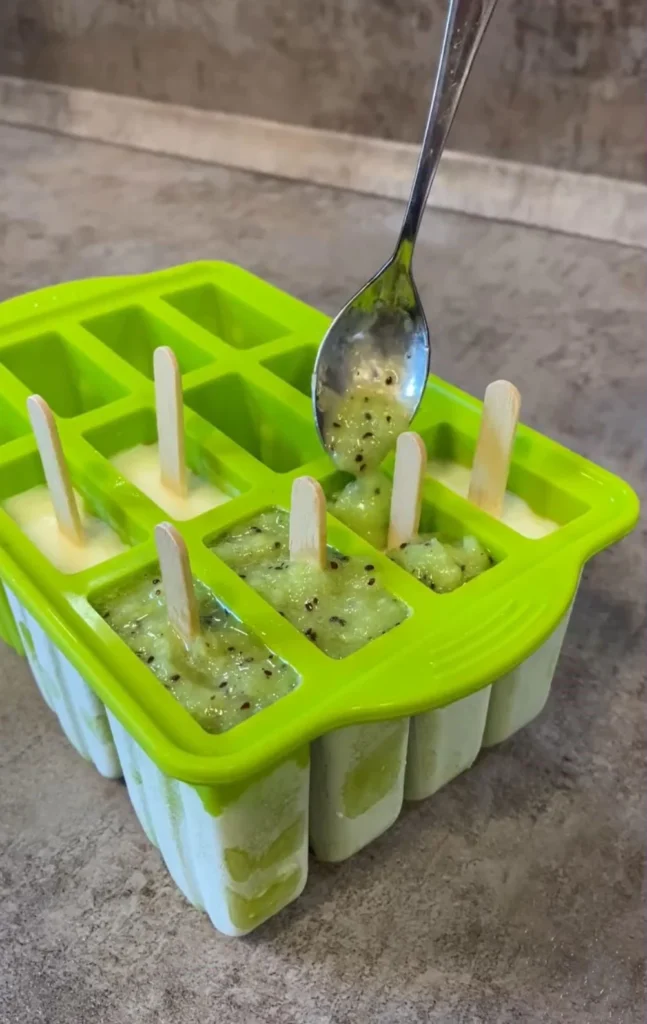
Step 5 Blend the kiwi
Peel both kiwi fruits and place in the blender. Blend until completely smooth kiwi blends easily into a bright green, slightly thick puree with a beautiful vivid color. Taste and add a small pinch of sugar if needed. Set aside.
Step 6 Add the kiwi layer and final freeze
Pour the kiwi puree into each mold, filling to the top and covering the yogurt layer completely. The kiwi puree should reach the very top of each mold.
Tap the molds gently to settle the puree and remove air bubbles. Place the molds in the freezer and freeze until completely solid at least 3 to 4 hours, or ideally overnight for the firmest, cleanest unmolding results.
Step 7 Unmold and garnish with chocolate
To unmold the pops, run warm water briefly over the outside of the molds for 10 to 15 seconds just enough to loosen the pop from the sides without beginning to melt it.
Pull gently on the stick and the pop should release cleanly. If it resists, apply a few more seconds of warm water and try again.
Once unmolded, dip the tip of each pop into melted chocolate dark chocolate is a beautiful, sophisticated pairing with the fruit flavors or drizzle melted chocolate over the pop for a more casual, homemade garnish. Allow the chocolate to set for 1 to 2 minutes before serving.
Tips for Perfect Watermelon Ice Pops Every Time
Each layer must be properly frozen before the next is added — this is the non-negotiable rule of layered popsicle making and the step most people rush that results in blended, muddy layers instead of clean, distinct bands.
Use a piping bag for the yogurt layer — a spoon will disturb the frozen watermelon surface and produce an uneven layer. The piping bag gives control and precision.
Freeze overnight for the cleanest, most satisfying unmolding experience — partially frozen pops break or crack when removed from molds.
Run warm water over molds for only 10 to 15 seconds — too long and the outer layer of the pop begins to melt and lose its vibrant color.
Work quickly once unmolded — especially in warm weather, these pops begin to melt fast. Serve immediately or return to the freezer on a parchment-lined sheet until ready to serve.
For a cleaner chocolate garnish, allow the chocolate to cool to just above room temperature before dipping — very hot chocolate melts the surface of the pop immediately on contact.
Serving Ideas
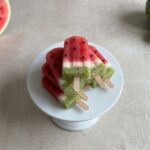
Arrange these pops on a chilled serving platter lined with fresh mint leaves for a stunning summer party dessert presentation.
Serve at outdoor barbecues, pool parties, Fourth of July celebrations, or any warm weather gathering where a beautiful, refreshing, crowd pleasing frozen treat is the order of the day.
Kids love both making and eating these the layering process is a genuinely fun kitchen activity for children old enough to handle a piping bag.
Set up a popsicle station with multiple mold options and let kids pour their own layers for an interactive summer activity that ends in dessert.
Watermelon Ice Pops The Gorgeous 3-Layer Frozen Treat
Ingredients
- 17.6 oz fresh seedless watermelon flesh seeds removed approximately 500 grams — about 3–4 cups cubed seedless watermelon
- 2 ripe kiwi fruits peeled
- 3 tablespoons plain natural whole milk yogurt Stonyfield, Chobani plain, or Fage plain recommended — Greek yogurt can substitute for thicker layer
- Sugar or honey to taste — optional only if fruit is not naturally sweet enough
- Chocolate for garnish — dark milk or white chocolate melting wafers or chocolate chips for dipping or drizzling
- Equipment:
- Blender or food processor
- 9 ice pop molds popsicle molds — available at Target, Walmart, or Amazon
- 9 popsicle sticks
- Piping bag or small zip-lock bag with corner snipped off for yogurt layer
Instructions
- Cut seedless watermelon into rough chunks removing any seeds and place in blender — blend on high speed until completely smooth and pourable deep pink-red puree forms.
- Taste watermelon puree and add small amount of sugar or honey if needed blending again to dissolve — set aside.
- Pour watermelon puree into each ice pop mold filling each one approximately two-thirds full — do not overfill as space is needed for yogurt and kiwi layers on top.
- Tap molds gently on counter to release air bubbles and ensure puree settles evenly.
- Place filled molds in freezer and freeze for approximately 45 minutes to 1 hour until watermelon layer is partially set and firm enough around edges to hold a popsicle stick upright but not completely frozen solid.
- Insert one popsicle stick into center of each mold pressing down until standing straight and centered.
- Return molds to freezer for an additional 2–3 hours until watermelon layer is completely frozen solid throughout.
- Transfer plain yogurt into piping bag or small zip-lock bag with corner snipped off.
- Pipe a thin even layer of yogurt approximately half a centimeter thick onto the top of each completely frozen watermelon layer — use piping bag for precision and control — do not use a spoon as it will disturb the frozen surface.
- Return molds to freezer for approximately 30 minutes until yogurt layer is completely firm.
- While yogurt layer freezes peel both kiwi fruits and place in blender — blend until completely smooth bright green puree forms.
- Taste kiwi puree and add a small pinch of sugar if needed to balance any tartness — set aside.
- Pour kiwi puree into each mold filling to the very top and covering yogurt layer completely.
- Tap molds gently again to settle puree and remove any air bubbles.
- Place molds in freezer and freeze until completely solid throughout — minimum 3–4 hours but ideally overnight for firmest cleanest unmolding results.
- To unmold run warm water over outside of molds for 10–15 seconds only — just enough to loosen pop from sides without beginning to melt it.
- Pull gently on stick — pop should release cleanly — if it resists apply a few more seconds of warm water and try again.
- Melt chocolate in microwave in 30-second intervals stirring between each until smooth — allow to cool to just above room temperature before dipping.
- Dip tip of each unmolded pop into melted chocolate or drizzle chocolate over the pop for garnish.
- Allow chocolate to set for 1–2 minutes then serve immediately or return to freezer on parchment-lined sheet until ready to serve.
Notes
Each layer must be properly and completely frozen before the next layer is added — this is the single most important rule of layered popsicle making — rushing this step results in blended muddy layers instead of clean distinct color bands.
Use a piping bag for the yogurt layer — a spoon disturbs the frozen watermelon surface and produces an uneven layer — piping bag gives precision and control.
Freeze overnight for the cleanest most satisfying unmolding experience — partially frozen pops crack or break when removed from molds.
Run warm water over molds for only 10–15 seconds maximum — too long and the outer layer begins to melt and lose vibrant color.
Work quickly once unmolded — especially in warm weather these pops melt fast — serve immediately or return to freezer on parchment-lined sheet until ready to serve.
Allow melted chocolate to cool to just above room temperature before dipping — very hot chocolate melts the surface of the pop immediately on contact.
Ripe in-season watermelon and ripe kiwi will produce perfectly sweet pops with zero added sugar — always taste purees before pouring into molds.
For dairy-free version substitute plain yogurt with plain unsweetened coconut yogurt or plain oat milk yogurt — avoid thin watery dairy-free yogurts as they will not create a distinct enough layer.
Paper cups work as popsicle mold substitutes — fill as directed, cover with aluminum foil, push stick through foil to hold upright during freezing, peel paper away to unmold.
Store unmolded pops in zip-lock freezer bag for up to 2 weeks — best consumed within the first week for optimal flavor and texture.
Other fruit substitutions that work beautifully: mango puree for watermelon layer, strawberry puree for watermelon layer, blueberry puree for kiwi layer.
For a fun kids kitchen activity set up a layering station and let children pour their own layers and choose their own fruit combinations.
Yes small paper cups work excellently as popsicle molds. Fill them with each layer as directed, cover with a small square of aluminum foil, and push the popsicle stick through the foil to hold it upright during freezing. To unmold, simply peel the paper cup away from the frozen pop. Silicone ice cube trays also work for mini bite-sized versions use toothpicks instead of popsicle sticks for the smaller format.
Absolutely. Coconut yogurt is the best dairy-free substitute it is thick, creamy, white in color, and has a mild flavor that works beautifully as the middle layer. Plain oat milk yogurt is another excellent option. Avoid very thin, watery dairy-free yogurts as they may not create a distinct enough layer.
Stored in their molds or in a zip-lock freezer bag once unmolded, these pops keep well in the freezer for up to 2 weeks. After this point, ice crystals can begin to form on the surface and the flavors can become slightly muted. For the best flavor and texture, consume within the first week of making.
Absolutely — this three-layer technique works with virtually any blendable fruit. Mango puree makes an extraordinary substitute for the watermelon layer and creates a beautiful golden-orange base. Strawberry puree is another wonderful option. Blueberry puree creates a deep, jewel-toned purple layer that is visually stunning. Mix and match fruit layers to create your own custom flavor and color combinations throughout the summer.
The most common cause is not freezing each layer long enough before adding the next. The watermelon layer must be completely solid not just partially set before the yogurt goes in. The yogurt layer must be firm before the kiwi goes in. If you are in a warm kitchen or your freezer runs warm, allow extra freezing time between layers. Patience is the single most important ingredient in this recipe.
Sugar is entirely optional in this recipe and is only needed if your fruit is not naturally sweet enough to your taste. A perfectly ripe, in-season watermelon and ripe kiwi will produce beautifully sweet pops with no added sugar whatsoever. Taste your purees before pouring into molds if they taste good to you at room temperature, they will taste good frozen.