We have all been there: that mid-afternoon slump where you need a serious protein hit, but the siren call of chips and dip is almost impossible to ignore.
Enter the The Ultimate Spicy Deviled Eggs. This isn’t just a snack; it’s a strategic game-changer for anyone trying to hit their protein goals without feeling like they are restricted to “diet food.”
With 6g of protein per egg, these little powerhouses deliver a party-snack vibe while actually fueling your body with high-quality nutrition.
I’ll be honest I used to avoid deviled eggs at gatherings because they often tasted like bland, rubbery cafeteria food.
But once I cracked the code by adding fresh garlic and the fiery tang of sriracha, the game changed. My teenagers started stealing them from the fridge before guests even arrived.
Now, they are my Sunday meal-prep staple, satisfying my cravings for something creamy and indulgent while keeping my macros exactly where they need to be.
Why You Need These in Your Rotation
The Protein Punch: At 6g of protein per half, a couple of these eggs make for a substantial 12g snack that keeps you full until dinner.
Bold Flavor Profile: We move far beyond the basic mayo-and-mustard combo. The fresh garlic provides a savory depth, while the sriracha adds a bright, vinegar-based heat.
Silky Texture: By following a few simple mashing techniques, you get a filling that is as smooth as velvet.
Meal-Prep Friendly: They stay fresh for up to two days, making them the perfect “grab-and-go” fuel for busy workdays.
The Essential Ingredient List
To reach that “gourmet” level of flavor, the quality of your aromatics is key. Specifically, steer clear of the pre-minced jarred garlic—freshness is what makes the spices in this recipe truly pop.
6 Large Hard-Boiled Eggs: Peeled carefully.
1/4 cup Mayonnaise: I highly recommend full-fat mayo for the creamiest, most indulgent mouthfeel.
1 tsp Dijon Mustard: Adds a sophisticated tang that regular yellow mustard lacks.
2 Cloves Garlic: Minced fresh. Fresh garlic has a sharp, spicy bite that mellows into a savory sweetness as it sits in the yolk mixture.
1 tsp Sriracha or Chili Sauce: This provides the base heat. You can always adjust upward if you are a “heat lover.”
The Spice Trio: ½ tsp Paprika, ¼ tsp Salt, and ¼ tsp Black Pepper.
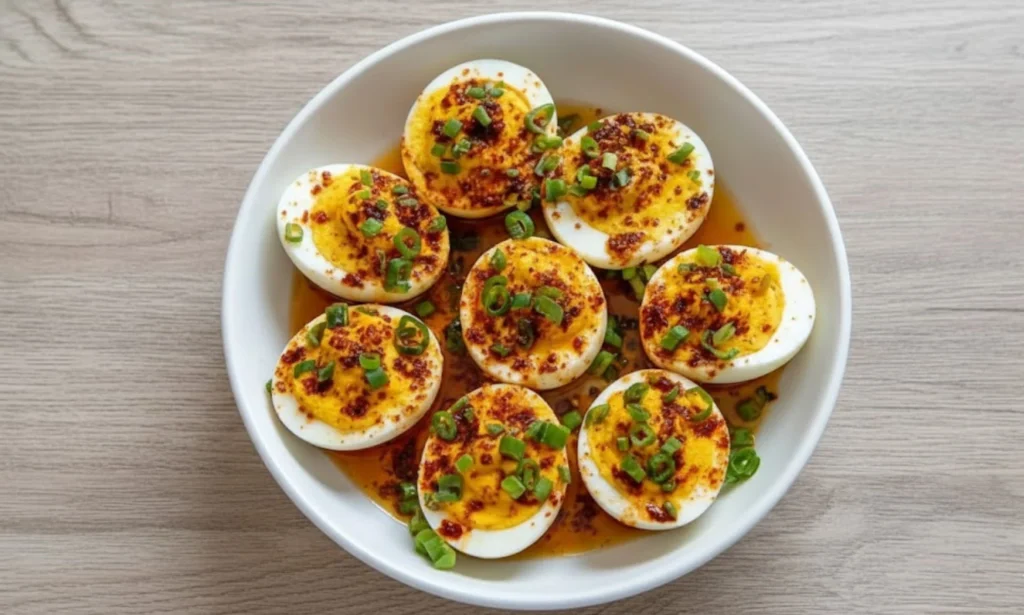
The Garnishes: 1 tbsp fresh Chives (chopped) and ½ tsp Red Pepper Flakes.
Pro Tip: Toast your red pepper flakes in a dry pan for 30 seconds before topping it adds a smoky, roasted dimension to the heat.
Step by Step Instructions: Mastering the Creamy Filling
1. The Clean Cut
Slice your hard-boiled eggs in half lengthwise. To get that “picture-perfect” look, use a very sharp knife and wipe the blade clean with a damp cloth between every single cut. This prevents yolk residue from smearing onto the pristine white edges. Carefully pop the yolks into a mixing bowl and set the whites aside on a platter.
2. The Science of the Smash
Mash the yolks with a fork for 30–45 seconds until they resemble fine, uniform crumbs.
For the Perfectionist: If you want an ultra-silky, restaurant-grade filling, press the mashed yolks through a fine-mesh sieve using the back of a spoon. This removes every possible lump and results in a cloud-like texture.
3. The Flavor Infusion
Add your mayo, Dijon, minced garlic, sriracha, and dry spices to the bowl. Mix vigorously for about 1 minute until the filling is vibrant and creamy. Taste the mixture now—my family usually prefers an extra half-teaspoon of sriracha to really make the garlic “sing.”
4. The Professional Pipe
Transfer the mixture into a piping bag (or a zip-top bag with the corner snipped off). Pipe the filling generously into the egg white hollows, finishing with a small decorative peak on top. If you don’t have a bag, a small spoon works just fine the flavor remains incredible regardless of the shape.
5. The Final Chill
Sprinkle with fresh chives and your toasted red pepper flakes. Do not skip the refrigeration. Place them in the fridge for at least 30 minutes. This resting period is crucial; it allows the garlic to infuse the mayo and helps the filling firm up so it doesn’t spill over when handled.

Perfect Pairings: Rounding Out Your Plate
While these eggs are a powerhouse on their own, pairing them with the right sides can turn a snack into a balanced mini-meal:
Crispy Vegetable Crudités: Sliced bell peppers and cucumbers provide a watery, refreshing crunch that cleanses the palate after the rich, spicy yolk filling.
Peppery Arugula Salad: A simple bed of greens with a lemon vinaigrette provides a bright acidity that cuts through the mayo and enhances the garlic notes.
Cherry Tomatoes: These offer a sweet-tart burst of flavor and a beautiful color contrast on your serving platter.
Storage & Expert Serving Tips
Fridge Life: These will last for 2 days maximum in an airtight container.
Avoid the “Fridge Smell”: Eggs are notorious for absorbing odors. Ensure your lid is tight-fitting, and consider pressing a piece of parchment paper over the eggs before sealing.
The Garnish Rule: For the most vibrant look, wait to add the chives and pepper flakes until the very moment you are ready to serve. This prevents the chives from wilting and the paprika from “bleeding” into the white.
Temperature Matters: Pull the eggs from the fridge 10 minutes before eating. Serving them slightly chilled rather than ice cold allows the garlic and sriracha flavors to be more prominent.

Protein Snack: The Ultimate Spicy Deviled Eggs
Ingredients
- 6 large hard-boiled eggs peeled see notes for boiling instructions
- 1/4 cup mayonnaise full-fat recommended
- 1 teaspoon Dijon mustard
- 2 cloves garlic minced fresh
- 1 teaspoon sriracha or chili sauce adjust to taste
- 1/2 teaspoon paprika
- 1/4 teaspoon salt
- 1/4 teaspoon black pepper
- 1 tablespoon fresh chives chopped for garnish
- 1/2 teaspoon red pepper flakes optional for extra heat
Instructions
- The Clean Cut
- Slice your hard-boiled eggs in half lengthwise. To get that “picture-perfect” look, use a very sharp knife and wipe the blade clean with a damp cloth between every single cut. This prevents yolk residue from smearing onto the pristine white edges. Carefully pop the yolks into a mixing bowl and set the whites aside on a platter.
- The Science of the Smash
- Mash the yolks with a fork for 30–45 seconds until they resemble fine, uniform crumbs.
- For the Perfectionist: If you want an ultra-silky, restaurant-grade filling, press the mashed yolks through a fine-mesh sieve using the back of a spoon. This removes every possible lump and results in a cloud-like texture.
- The Flavor Infusion
- Add your mayo, Dijon, minced garlic, sriracha, and dry spices to the bowl. Mix vigorously for about 1 minute until the filling is vibrant and creamy. Taste the mixture now—my family usually prefers an extra half-teaspoon of sriracha to really make the garlic “sing.”
- The Professional Pipe
- Transfer the mixture into a piping bag (or a zip-top bag with the corner snipped off). Pipe the filling generously into the egg white hollows, finishing with a small decorative peak on top. If you don’t have a bag, a small spoon works just fine—the flavor remains incredible regardless of the shape.
- The Final Chill
- Sprinkle with fresh chives and your toasted red pepper flakes. Do not skip the refrigeration. Place them in the fridge for at least 30 minutes. This resting period is crucial; it allows the garlic to infuse the mayo and helps the filling firm up so it doesn’t spill over when handled.
Place eggs in a single layer in a pot and cover with an inch of water. Bring to a boil, then immediately turn off the heat, cover, and let sit for 12 minutes. Move them directly into an ice bath for 5 minutes. This prevents the “green ring” around the yolk and makes peeling a breeze.
Yes! You can swap half of the mayonnaise for non-fat Greek yogurt. This will add a bit more tanginess and significantly boost the protein-to-fat ratio.
In a pinch, yes, but the flavor will be vastly different. Jarred garlic often has a “pickled” or metallic aftertaste that can overpower the delicate flavor of the egg. Fresh is always best for raw applications like this.
Unfortunately, no. The egg whites become rubbery and watery upon thawing, and the mayo-based filling will likely separate. These are best enjoyed fresh or within 48 hours.
If your eggs are wobbling, slice a tiny sliver off the bottom of the egg white “boat” to create a flat surface. They will sit perfectly still on your serving platter!