When you need a quick energy boost that doesn’t come from a candy bar or a protein shake, these Lemon Bliss Balls deliver exactly what their name promises pure bliss in bite-sized form.
These little golden spheres are packed with wholesome ingredients, naturally sweetened, and bursting with bright lemon flavor that wakes up your taste buds and gives you sustained energy without any refined sugar crash.
The magic of these bliss balls lies in their simplicity. Just seven main ingredients, a food processor, and about ten minutes of hands on time stand between you and a batch of healthy snacks that will last all week in your refrigerator.
No baking required, no complicated techniques, and no mysterious ingredients you can’t pronounce. Just real food almond flour, coconut, honey, fresh lemon, and a touch of vanilla transformed into something that tastes indulgent but actually fuels your body with good nutrition.
What Makes These Bliss Balls Special
Unlike many energy ball recipes that rely heavily on dates for sweetness and binding, these lemon bliss balls get their structure from almond flour and shredded coconut, with honey providing just enough sweetness and stickiness to hold everything together.
This creates a lighter, less dense texture than date-based balls, with a flavor profile that’s bright and citrusy rather than caramel sweet.
The fresh lemon zest and juice are what truly set these apart. Real lemon not extract, not artificial flavoring brings a vibrant, aromatic quality that makes these balls taste alive and fresh rather than overly sweet or heavy.
The combination of zest and juice gives you both the essential oils from the lemon peel (which carry intense flavor and fragrance) and the bright acidity of the juice itself.
Almond flour forms the base, contributing protein, healthy fats, and a subtle nutty flavor that pairs beautifully with lemon.
Shredded coconut adds texture, natural sweetness, and even more healthy fats. Together, these ingredients create a snack that’s satisfying and keeps you full between meals something a sugary granola bar could never accomplish.
The Health Benefits Hidden in Every Bite
These aren’t just tasty they’re genuinely good for you in ways that make them worth making part of your regular snack rotation.
Almond flour is naturally high in protein and healthy monounsaturated fats, the same kind found in olive oil that support heart health. It’s also rich in vitamin E, an antioxidant that protects your cells from damage, and magnesium, which supports healthy muscle and nerve function.
Coconut provides medium chain triglycerides (MCTs) a type of fat that your body can use quickly for energy rather than storing as body fat. Shredded coconut is also a good source of fiber, which helps keep your digestive system running smoothly.
Honey contributes natural sweetness along with trace amounts of antioxidants and antimicrobial compounds. While it’s still sugar and should be consumed in moderation, honey is a whole food that brings more to the table than refined white sugar ever could.
Fresh lemon adds vitamin C, supports digestion, and provides compounds that may have anti inflammatory properties. The bright flavor also makes you feel more satisfied with less sweetness, which is a win for anyone trying to reduce sugar intake.
Ingredients You’ll Need
Main Ingredients:
- 1¼ cups almond flour (also called almond meal available in the baking aisle or health food section)
- 1 cup unsweetened shredded coconut
- Pinch of salt
- ⅛ teaspoon turmeric (optional, for golden color)
- ¼ cup honey (or agave syrup for vegan version)
- 2 tablespoons fresh lemon zest (from about 2 medium lemons)
- 3 tablespoons fresh lemon juice
- 1 teaspoon pure vanilla extract
For Rolling:
- Extra shredded coconut (about ½ cup)
The turmeric is completely optional and only there to deepen the golden yellow color—it doesn’t contribute noticeable flavor at this small amount. If you don’t have it or don’t want to use it, the balls will still taste exactly the same, just slightly paler in color.
Step by Step Instructions
Making the Dough
Add all your main ingredients almond flour, shredded coconut, salt, turmeric (if using), honey, lemon zest, lemon juice, and vanilla extract to the bowl of a food processor.
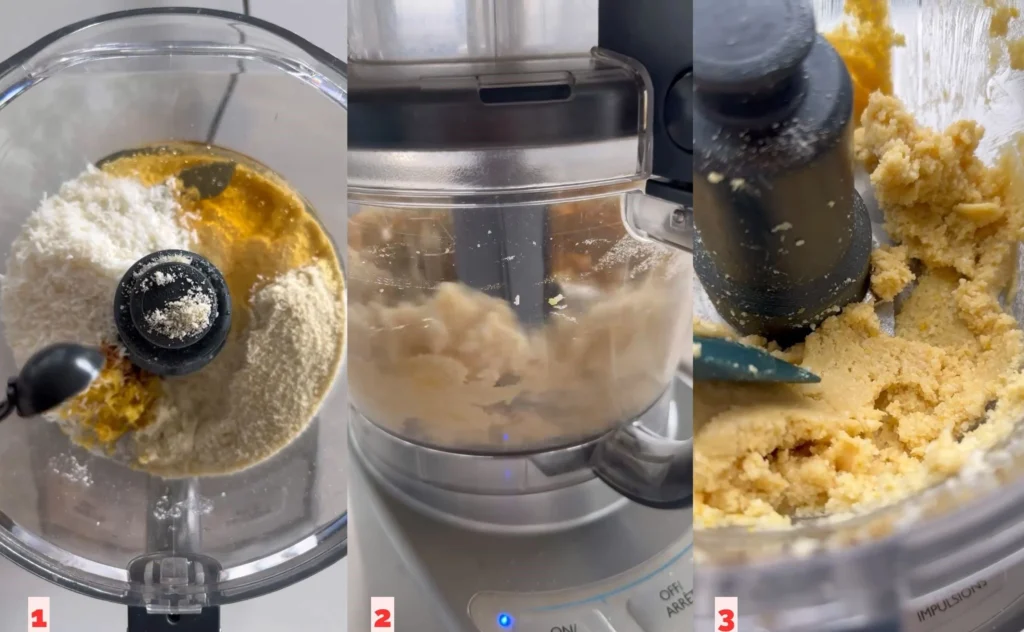
Pulse the mixture in short bursts, stopping to scrape down the sides as needed, until everything comes together into a sticky, cohesive dough. This usually takes about 15-20 pulses.
The dough should hold together when you squeeze a small amount in your hand. If it seems too dry and crumbly, add another teaspoon of lemon juice or honey. If it’s too wet and sticky to handle, add another tablespoon of almond flour or coconut.
Shaping the Balls
Scoop out about one tablespoon of dough at a time a small cookie scoop works perfectly for this, but you can also just use a regular tablespoon. Roll the dough between your palms to form smooth, round balls. The warmth of your hands will help soften the mixture slightly and make it easier to shape.
If you’re finding the dough too sticky to work with, dampen your hands slightly with water, or chill the dough in the refrigerator for 15-20 minutes before rolling.
The Coconut Coating
Pour about half a cup of shredded coconut onto a plate. Roll each ball through the coconut, pressing gently so it adheres to the surface.

The coconut coating isn’t just decorative it adds extra texture and a pleasant coconut flavor that complements the lemon beautifully. It also makes the balls less sticky and easier to handle.
If you prefer, you can skip the coconut coating entirely. The balls will still taste delicious, just without the extra layer of texture and visual appeal.
Chilling and Storage
Place your finished balls on a plate or small baking sheet lined with parchment paper. Refrigerate for at least 2 hours before eating this chilling time is important because it allows the balls to firm up properly and makes them much easier to eat without falling apart.
Once chilled, transfer the balls to an airtight container and store in the refrigerator. They’ll keep fresh for up to one week, though they rarely last that long once people discover them.
Tips for Perfect Lemon Bliss Balls
Use fresh lemon, not bottled juice. The flavor difference is dramatic. Fresh lemon brings brightness and aromatic quality that bottled juice simply cannot match.
Don’t skip the zest. The lemon zest carries essential oils that provide intense lemon flavor without adding extra liquid that could make the dough too wet.
Taste the dough before rolling. Since there are no raw eggs or other ingredients you can’t eat uncooked, you can safely taste and adjust. Need more lemon? More honey? More salt? Adjust before shaping.
Make them uniform in size. Using a cookie scoop or measuring spoon helps create balls that are all the same size, which looks more professional and helps them chill evenly.
Let them chill completely. Skipping or shortening the refrigeration time results in balls that are too soft and fall apart. Be patient they’re worth the wait.
Ways to Customize
Once you’ve mastered the basic recipe, try these variations:
Lime Bliss Balls: Replace lemon zest and juice with lime for a tropical twist.
Orange Coconut Balls: Use orange zest and juice instead of lemon for a sweeter, mellower citrus flavor.
Chocolate Chip Addition: Fold in 2 tablespoons of mini chocolate chips for a hint of chocolate with your lemon.
Ginger Lemon: Add ½ teaspoon of ground ginger or 1 teaspoon of grated fresh ginger for a spicy-citrus combination.
Poppy Seed Lemon: Mix in 1 tablespoon of poppy seeds for texture and classic lemon-poppy flavor.
Serving Suggestions
These lemon bliss balls work beautifully in so many situations:
Pre-workout fuel: Eat one or two about 30 minutes before exercise for sustained energy.
Mid-afternoon snack: When the 3pm energy slump hits, reach for these instead of coffee or candy.
Healthy dessert: Satisfy your sweet tooth with something that won’t leave you feeling guilty.
Lunchbox addition: Pack them in your lunch or your kids’ lunches for a wholesome sweet treat.
On-the-go breakfast: Pair with a piece of fruit and some yogurt for a quick breakfast you can eat in the car.
Almond flour is the base of this recipe, so substituting would significantly change the texture. Sunflower seed flour might work as an alternative, though the flavor will be different and the balls may turn slightly green due to a harmless chemical reaction between sunflower seeds and leavening agents.
Agave syrup works perfectly and makes the recipe vegan. Maple syrup can also work, though it will add its own distinct flavor. You may need slightly less maple syrup as it’s thinner than honey.
In the refrigerator in an airtight container, they’ll stay fresh for up to one week. For longer storage, freeze them in a freezer-safe container for up to 3 months. Thaw in the refrigerator before eating.
Absolutely! These are perfect for Sunday meal prep. Make a double batch and you’ll have healthy snacks ready for two weeks.
The dough might be too dry. Add another teaspoon or two of lemon juice or honey and pulse again until it holds together better.
Yes in fact, that’s what the recipe calls for. Store-bought almond flour (sometimes labeled almond meal) is finely ground and works perfectly. Making your own almond flour from whole almonds would create a coarser texture that might not hold together as well.
Most kids love them! The bright lemon flavor and slightly sweet taste appeal to young palates, and the balls are fun to eat. Plus, parents love that they’re made from wholesome ingredients.
These Lemon Bliss Balls prove that healthy snacks don’t have to taste like cardboard or require a chemistry degree to make. With simple, real ingredients and bright, sunny flavor, they’re the kind of recipe you’ll make again and again.

Lemon Bliss Balls The No Bake Energy Snack That Tastes Like Sunshine
Ingredients
- 1.3 cups almond flour also called almond meal
- 1 cups unsweetened shredded coconut
- 1 pinch salt
- 0.1 teaspoons ground turmeric optional — for golden color only
- 0.3 cups pure honey or agave syrup for vegan version
- 2 tablespoons fresh lemon zest from about 2 medium lemons
- 3 tablespoons fresh lemon juice
- 1 teaspoons pure vanilla extract
- 0.5 cups extra unsweetened shredded coconut for rolling
Instructions
- Add all ingredients to food processor: Add 1.3 cups almond flour (also called almond meal), 1 cups unsweetened shredded coconut, 1 pinch salt, and 0.1 teaspoons ground turmeric (optional — for golden color only) (if using) to the bowl of a food processor. Then add 0.3 cups pure honey (or agave syrup for vegan version), 2 tablespoons fresh lemon zest (from about 2 medium lemons), 3 tablespoons fresh lemon juice, and 1 teaspoons pure vanilla extract.
- Pulse until dough forms: Pulse the mixture in short bursts, stopping to scrape down the sides as needed, until everything comes together into a sticky, cohesive dough — about 15 to 20 pulses. Squeeze a small amount in your hand — it should hold together without crumbling.
- Scoop & chill if needed: If the dough is too sticky to handle, refrigerate for 15–20 minutes
- before rolling. Scoop out 1 tablespoon of dough at a time using a small cookie scoop or a regular tablespoon.
- Roll into balls: Roll each portion between your palms to form smooth, round balls. The warmth of your hands helps soften the dough and makes shaping easier. Dampen your hands slightly with water if the dough sticks.
- Coat in shredded coconut: Pour 0.5 cups extra unsweetened shredded coconut (for rolling) onto a flat plate. Roll each ball through the coconut, pressing gently so it sticks evenly to the surface all around.
- Chill for 2 hours: Place the coated balls on a parchment-lined plate or small baking sheet. Refrigerate for at least 120 minutes
- until fully firm do not skip this step.
- Store & serve: Once firm, transfer to an airtight container and store in the refrigerator for up to 1 week. Serve cold straight from the fridge.