When a recipe starts getting requested by teenagers three times a week, you know you’ve discovered something special.
This Sticky Garlic Chicken Noodles recipe is the “jackpot” of weeknight dinners: it’s incredibly fast, requires zero exotic ingredients, and delivers a massive 28 grams of protein per serving.
I first whipped this up on one of those chaotic Wednesdays where the clock was ticking, the family was starving, but I refused to settle for a low-protein “filler” meal.
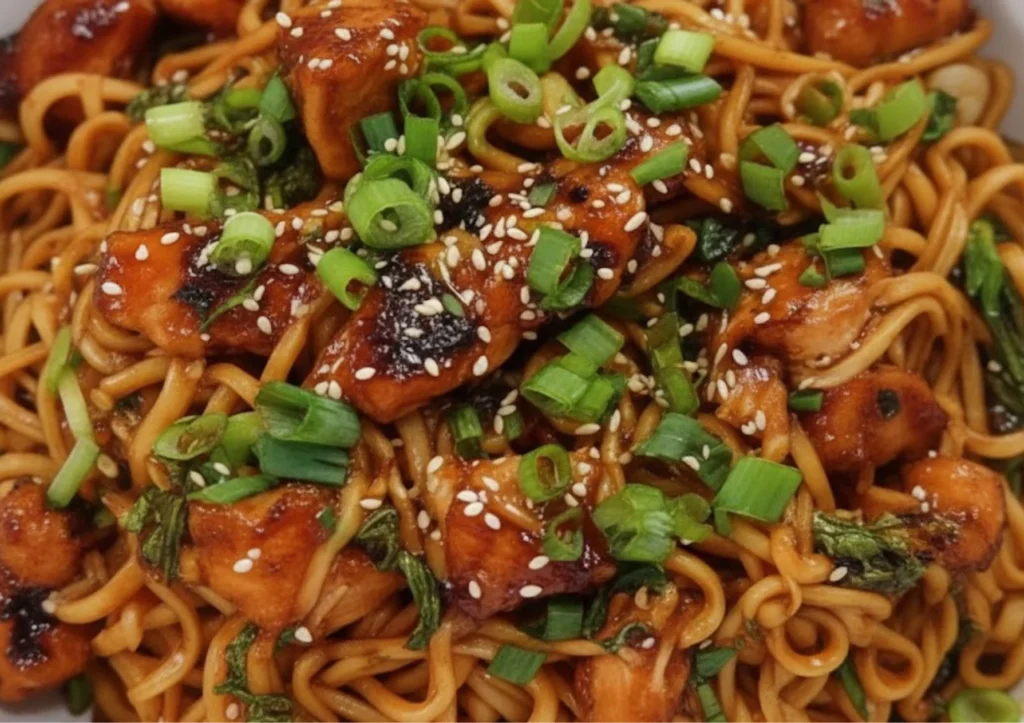
The result? A honey-soy glaze that is so addictive my son who is quite the competitive eater declared it better than any takeout he’s ever had. This dish proves once and for all that high-protein eating doesn’t have to mean dry, unseasoned chicken breasts. It’s glossy, chewy, garlicky, and absolutely “bowl-licking” good.
Why You’ll Fall in Love with This Recipe
Protein-Packed: With 28g of protein, it’s a muscle-building powerhouse disguised as comfort food.
Better Than Takeout: The cornstarch coating creates a restaurant-quality “crunch” and gloss that bottled sauces can’t replicate.
Teen-Approved: It hits all the right notes sweet, salty, and a tiny bit of heat.
Versatile: It works with whatever noodles you have in the pantry, from rice noodles to classic egg noodles.
The Essential Ingredient List
In my kitchen, I’ve found that chicken thighs are the secret to the juiciest results, but chicken breasts work perfectly fine if that’s what you have on hand. The real MVP here, however, is the cornstarch it’s the only way to get that signature sticky glaze.
The Protein & Noodles
1 lb Chicken (Breast or Thighs): Cut into 1-inch bite-sized pieces.
8 oz Noodles: Rice noodles provide a lighter feel, while egg noodles add a hearty chew.
The Sticky Garlic Glaze
¼ cup Soy Sauce: Or tamari for a gluten-free version.
3 tbsp Honey: Raw or mild honey provides the best “stick.”
4 Garlic Cloves: Minced. Please use fresh garlic; the jarred stuff just doesn’t have the same aromatic punch.
1 tsp Fresh Ginger: Grated. It adds a subtle warmth that balances the honey.
½ tsp Red Chili Flakes: Optional, but highly recommended for a tiny bit of “zing.”
2 tbsp Cornstarch: The secret to the sauce’s “cling.”
The Finishing Touches
2 tbsp Vegetable Oil: Or any neutral oil with a high smoke point.
2 Green Onions: Chopped for freshness.
1 tsp Sesame Seeds: For a professional-looking garnish and a nutty crunch.
Step by Step Instructions: From Pan to Plate
1. Boil the Noodles
Bring a pot of salted water to a rolling boil. Cook your noodles until they are al dente (usually 6–8 minutes). Drain them well and give them a tiny drizzle of oil. This prevents them from turning into a giant clump while you focus on the chicken.
2. The Cornstarch Dusting
Place your chicken pieces in a bowl and toss them with 2 tablespoons of cornstarch. Ensure every piece has a light, even dusting. This starch is what creates the crispy exterior that allows the sauce to “grab” onto the meat.
3. The Perfect Sear
Heat the oil in a large skillet or wok over medium-high heat. Once the oil shimmers, add the chicken in a single layer.
Pro Tip: Don’t overcrowd the pan! If you add too much chicken at once, it will steam instead of searing. Cook in batches if necessary. Let it sit undisturbed for 4–5 minutes until golden brown, then flip and cook for another 4–5 minutes until the internal temperature hits 165°F.
4. Aromatic Infusion
Remove the golden chicken to a clean plate. In the same skillet (which should be full of flavorful browned bits), add your minced garlic and grated ginger. Sauté for 30–60 seconds.
Warning: Garlic burns very quickly and becomes bitter. As soon as you can smell it, move to the next step!
5. Build the Glaze
Pour in the soy sauce, honey, and chili flakes. Stir constantly as it bubbles. After 2–3 minutes, the sauce will thicken and should coat the back of a spoon. If you want it even stickier, you can whisk a teaspoon of extra cornstarch with a splash of water and stir it in.
6. The Great Toss
Return the chicken to the pan and toss for 1 minute until it is glowing in that sticky glaze. Add your cooked noodles and toss again for another minute. This ensures the noodles are warmed through and fully saturated with the garlic-soy flavors.
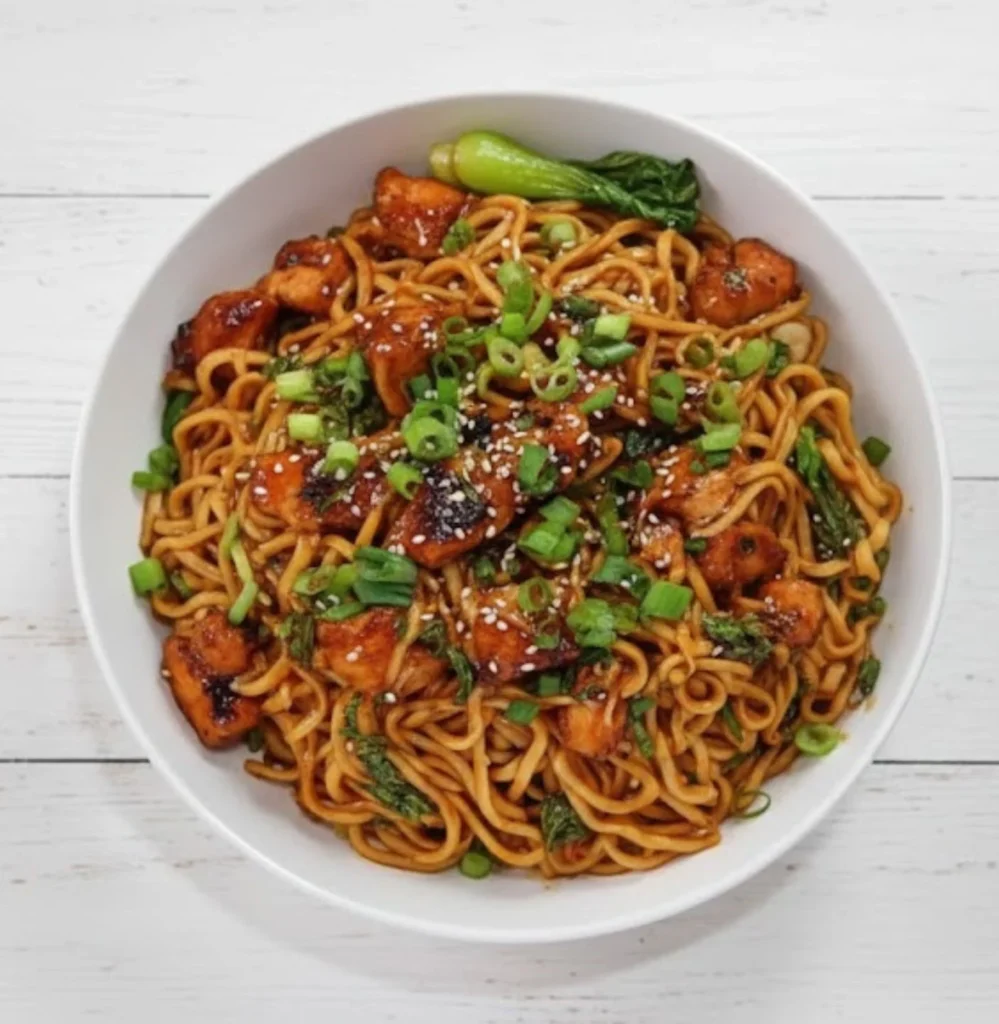
7. Garnish and Serve
Remove from the heat immediately. Sprinkle with the green onions and sesame seeds. Serve while it’s hot, fresh, and at its maximum stickiness!
What to Serve with Sticky Garlic Chicken Noodles
Because this dish is rich and savory, I recommend pairing it with sides that offer a fresh, crunchy contrast:
Steamed Greens: Broccoli or bok choy provide a mild, earthy balance to the sweet sauce.
Cool Cucumber Salad: Thinly sliced cucumbers tossed in rice vinegar and sesame oil refresh the palate between bites.
Edamame: A bowl of steamed, salted edamame adds even more plant-based protein to your meal.
Crispy Spring Rolls: If you want to lean into the “takeout at home” vibe, these add a fantastic textural crunch.
Storage & Reheating Tips
Refrigerator: Store leftovers in an airtight container for up to 3 days.
The “Separate” Secret: If you know you’ll have leftovers, try to store the chicken/sauce and the noodles in separate containers. This prevents the noodles from soaking up all the moisture and becoming mushy.
Reheating: Warm the chicken and sauce in a skillet with a splash of water or broth to bring that glossy texture back to life. Toss the noodles in at the very end just to warm them through.
Freezing: The chicken and sauce freeze beautifully for up to 2 months. Simply cook a fresh batch of noodles when you’re ready for a high-protein dinner in under 10 minutes!
High-Protein Comfort: Sticky Garlic Chicken Noodles
Ingredients
- 1 lb chicken breast or thighs cut into bite-sized pieces
- 1/4 cup soy sauce or tamari for gluten-free
- 3 tablespoons honey raw or mild-flavored
- 4 cloves garlic minced
- 1 teaspoon grated ginger fresh preferred
- 1/2 teaspoon red chili flakes optional
- 2 tablespoons cornstarch
- 2 tablespoons vegetable oil
- 8 oz noodles rice noodles or egg noodles
- 2 green onions chopped
- 1 teaspoon sesame seeds optional
Instructions
- Bring a medium pot of salted water to a rolling boil. Cook the noodles according to package instructions until al dente, usually 6-8 minutes. Drain thoroughly, toss with a little oil to prevent sticking, and set aside.
- Cut the chicken into uniform bite-sized pieces (about 1-inch chunks) if not already done. Toss the chicken pieces in a bowl with 2 tablespoons cornstarch until evenly coated with a light dusting.
- Heat 2 tablespoons vegetable oil in a large skillet or wok over medium-high heat until shimmering. Add the cornstarch-coated chicken in a single layer without overcrowding. Cook for 4-5 minutes on each side until golden brown and cooked through to 165°F internal temperature. Remove chicken to a plate and set aside.
- In the same skillet, add minced garlic and grated ginger. Sauté for 30-60 seconds until fragrant but not browned, watching closely to prevent burning.
- Stir in soy sauce, honey, and red chili flakes if using. Cook for 2-3 minutes, stirring constantly, until the sauce thickens slightly and coats the back of a spoon. For a thicker sauce, whisk 1-2 teaspoons additional cornstarch with equal parts water and stir into the bubbling sauce.
- Return the cooked chicken to the skillet and toss for about 1 minute until every piece is completely coated in the sticky sauce.
- Add the cooked noodles to the skillet. Toss thoroughly for another minute until noodles are warmed through and coated in sauce. Remove from heat.
- Sprinkle with chopped green onions and sesame seeds. Serve hot immediately.
Yes! I actually recommend keeping a knob of ginger in your freezer. It’s much easier to grate while frozen, and you won’t have to worry about it going bad in the pantry.
It can be! Simply swap the soy sauce for tamari or coconut aminos, and ensure you are using rice noodles instead of wheat-based egg noodles.
If you prefer a very heavy glaze, create a “slurry” by mixing 1 teaspoon of cornstarch with 1 teaspoon of cold water. Pour this into the bubbling sauce in Step 5 and watch it thicken instantly.
Honestly, this sauce is so versatile that almost anything works. I’ve used thick udon, thin rice vermicelli, and even linguine in a pinch. The “stick” factor remains the same!