If you’ve ever attended a vibrant celebration or a festive wedding dinner, chances are you’ve encountered a golden, crispy, and incredibly creamy appetizer that seemingly disappears the moment it hits the table.
We’re talking about the Chicken Russian Cutlet. Despite the name, this dish is a beloved staple of fusion cuisine, combining the soul of a classic Russian Kotlety with a zesty, vegetable packed flair that has made it an international sensation.
In this deep dive, we are breaking down the art of the perfect Russian Cutlet. This isn’t your average chicken patty; it is a sophisticated blend of shredded chicken, colorful garden vegetables, and a luscious “White Sauce” (Béchamel) base, all encased in a unique, crunch heavy vermicelli crust.
For those looking to elevate their snack game or find the perfect “make ahead” meal for busy weeknights, this recipe is a total game changer.
Why These Cutlets are a Global Favorite
What sets the Russian Cutlet apart from a standard chicken nugget or patty is the texture.
The Inside: Instead of ground meat that can sometimes become dry, these cutlets use shredded chicken and a creamy roux. This ensures every bite is moist, velvety, and rich.
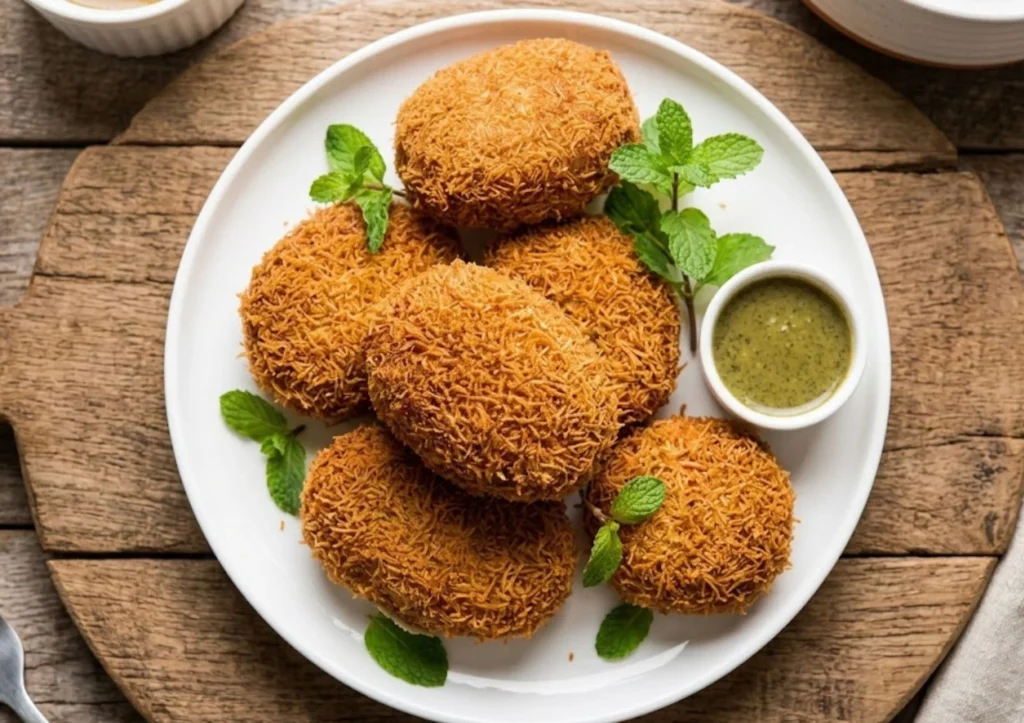
The Outside: While most fried foods use breadcrumbs or panko, the authentic Russian Cutlet is often coated in crushed vermicelli (fine pasta threads). When fried, these threads create a “nest-like” extra-crunchy exterior that looks as good as it tastes.
The Veggie Boost: Loaded with carrots, green beans, and bell peppers, it’s a great way to sneak some nutrition into a kid-friendly snack.
Ingredients You’ll Need
To make this recipe accessible for American kitchens, we’ve updated the terminology while keeping the authentic flavors intact.
For the Chicken Prep:
1 lb (500g) Boneless Chicken: Breast or thighs both work, though thighs remain juicier.
2 tsp Ginger-Garlic Paste: A standard blend of fresh minced ginger and garlic.
1/2 tsp Black Pepper: Freshly cracked for the best aroma.
Salt: To taste.
1/2 cup Water: For pressure cooking or simmering.
The Vegetable Medley:
1/2 cup Carrots: Finely shredded or diced.
1/2 cup Green Beans: Trimmed and finely chopped.
1/2 cup Bell Peppers: (Capsicum) Finely chopped.
1/4 cup Scallions: (Spring Onions) Finely chopped whites and greens.
3-4 Green Chilies: Minced (Serrano or Jalapeño work well adjust for heat).
The Creamy Binder (The Roux):
2 tbsp Unsalted Butter
2 tbsp All-Purpose Flour:
3/4 cup Whole Milk: (Boiled and cooled slightly).
The Reserved Chicken Stock: From the cooked chicken.
The Flavor Enhancers:
1 tsp Garam Masala: A warm spice blend (available in the international aisle).
1 tsp Cumin Powder: Ground cumin.
1 tsp Red Chili Powder: Use Cayenne or Paprika depending on your spice tolerance.
The Crunchy Coating:
2 Large Eggs: Beaten well with a pinch of salt.
1 cup Fine Vermicelli: Crushed into small bits. Alternatively, use Panko breadcrumbs for a more traditional Western texture.
Oil for Frying: Neutral oil like Canola, Vegetable, or Avocado oil.
Step by Step Cooking Method
1. Preparing the Shredded Chicken
Start by placing your boneless chicken in a pressure cooker or a heavy-bottomed pot. Add the ginger-garlic paste, salt, black pepper, and water.
Cook: Pressure cook for about 3 whistles (or simmer in a covered pot for 15-20 minutes) until the chicken is tender and fully cooked.
Shred: Once cooled, remove the chicken. Do not throw away the liquid! Strain the liquid and set aside the chicken stock. Shred the chicken pieces into fine strands using two forks or your hands.
2. Sautéing the Vegetables
Heat the butter in a large non-stick pan over medium heat. Add the minced green chilies and the scallion whites. Sauté for a minute until fragrant.
Add Veggies: Toss in the finely chopped carrots and green beans. Sauté for 2-3 minutes. You want the vegetables to soften slightly but retain a bit of “snap” or crunch.
Spice Infusion: Add the cumin powder, garam masala, and red chili powder. Stir well to coat the vegetables in the spices.
3. Creating the Creamy “White Sauce” Base
This is the secret to the cutlet’s melt-in-your-mouth interior.
The Flour: Sprinkle the all purpose flour directly over the sautéed vegetables. Mix continuously for 1-2 minutes until the raw smell of the flour disappears.
The Liquid: Gradually pour in the reserved chicken stock while stirring. Once absorbed, slowly add the milk.
Thicken: Keep stirring until the mixture thickens into a heavy, creamy paste that starts to leave the sides of the pan.
4. The Final Mix
Add the shredded chicken and the chopped scallion greens (and bell peppers) into the creamy vegetable base.
Combine: Mix everything thoroughly on low heat for another 2 minutes. The mixture should be thick enough to hold its shape.
Cool: Transfer the mixture to a plate and let it cool completely. For best results, refrigerate for 30 minutes; this makes shaping the cutlets much easier.
5. Shaping and Coating
Grease your palms with a little oil. Take a lemon-sized portion of the mixture and shape it into an oval or a heart-shaped patty.
Dip: Dip each patty into the beaten egg wash, ensuring it is fully submerged.
Dredge: Immediately roll the patty in the crushed vermicelli (or breadcrumbs). Press gently so the coating sticks firmly to the surface.
6. The Golden Fry
Heat about an inch of oil in a skillet over medium-high heat.
Shallow Fry: Carefully place the cutlets in the hot oil. Fry for 2-3 minutes per side until they turn a beautiful, deep golden brown.
Drain: Remove and place on paper towels to soak up any excess oil.


Crispy Chicken Russian Cutlets
Ingredients
- The Chicken Base:
- 1 lb Boneless Chicken Breast or Thighs
- 2 tsp Ginger-Garlic paste
- 1/2 tsp Black pepper
- 1/2 cup Water
- Salt to taste
- The Vegetable Medley:
- 1/2 cup Carrots shredded
- 1/2 cup Green beans finely chopped
- 1/2 cup Bell peppers finely chopped
- 1/4 cup Scallions/Spring onions chopped
- 3-4 Green chilies minced
- The Creamy Binder Roux:
- 2 tbsp Unsalted butter
- 2 tbsp All-purpose flour
- 3/4 cup Whole milk
- Reserved chicken stock from cooking
- 1 tsp Garam masala & 1 tsp Cumin powder
- 1 tsp Red chili powder or Paprika
- The Coating:
- 2 Large eggs beaten with a pinch of salt
- 1 cup Fine vermicelli crushed or Panko breadcrumbs
- Oil for shallow frying
Instructions
- Cook & Shred Chicken: Pressure cook or simmer chicken with ginger-garlic paste, salt, pepper, and water until tender. Drain and reserve the stock. Shred the chicken into fine strands.
- Sauté Aromatics: Heat butter in a large skillet. Add green chilies and scallion whites, sautéing until fragrant.
- Flash-Cook Veggies: Add carrots and green beans. Sauté for 3 minutes until slightly softened but still crisp. Stir in the cumin, garam masala, and chili powder.
- Create the Roux: Sprinkle all-purpose flour over the vegetables. Cook for 2 minutes on low heat to remove the raw flour taste.
- Thicken the Sauce: Slowly pour in the reserved chicken stock followed by the milk. Stir continuously until the mixture thickens into a heavy, creamy paste that pulls away from the pan.
- Combine: Fold in the shredded chicken, bell peppers, and scallion greens. Mix thoroughly, then spread on a plate to cool completely.
- Chill: Place the mixture in the refrigerator for 30 minutes. This is crucial for easy shaping.
- Shape: Grease your hands with oil. Take a small portion and shape into an oval or heart-shaped patty.
- Bread the Cutlets: Dip each patty into the beaten egg wash, then dredge in the crushed vermicelli or panko. Press firmly so the coating adheres.
- The Final Fry: Heat 1 inch of oil in a pan over medium-high heat. Shallow fry the cutlets for 2–3 minutes per side until deeply golden and crispy.
- Serve: Drain on paper towels and serve hot with spicy mayo or cilantro chutney.
Absolutely! Lightly spray the coated cutlets with oil. Air fry at 375°F (190°C) for 10-12 minutes, flipping halfway through, until crispy and golden.
These cutlets are perfect for meal prep. You can store the shaped, uncooked patties in an airtight container with parchment paper between layers for up to 3 days in the fridge or 1 month in the freezer. If frying from frozen, do not thaw; fry them directly on a lower heat to ensure the center warms through.
This usually happens if the “White Sauce” base didn’t thicken enough or if the mixture was too hot when you started shaping. Ensure the mixture is thick and completely chilled before frying.
In the USA, these go great with a side of spicy Mayo, Ranch dressing, or a classic Cilantro-Mint Chutney. They also make fantastic “sliders” if placed inside small brioche buns!
Final Thoughts
Whether you’re looking for a kid approved lunchbox addition or a sophisticated appetizer for your next cocktail hour, the Chicken Russian Cutlet is a versatile, flavor-packed choice.
By following this “Low and Slow” method for the creamy base and the “Hot and Fast” method for the crust, you’ll achieve a restaurant quality result every single time.