There are appetizers that people eat. And then there are appetizers that people photograph, talk about for the rest of the evening, and text you about the next morning asking for the recipe.
These Bird’s Nest appetizers are firmly, completely, without any question in the second category. A crispy, golden, vermicelli coated potato cup shaped like a tiny bird’s nest cradling a perfectly fried, melt in your mouth paneer ball, drizzled with a bold sauce and finished with fresh herbs.
They are visually stunning, texturally extraordinary, and flavored in a way that makes every single bite feel like an event.
This is a fully vegetarian appetizer that manages to look and taste like something that took a professional chef hours to create but is actually completely achievable in a home kitchen with ingredients you can find at any Indian grocery store or well stocked international foods section of a major supermarket.
If you’ve been looking for a signature party appetizer that genuinely impresses guests from the moment it hits the table, your search ends here.
What Makes This Recipe So Special
The genius of this recipe is the interplay of textures and flavors happening simultaneously in every single bite.
The outer shell the bird’s nest itself is made from a spiced, seasoned potato and green pea mixture shaped into small bowl like cups, coated in a flour slurry, rolled in thin vermicelli noodles, and deep fried until the vermicelli turns golden, shatteringly crispy, and genuinely resembles the delicate structure of a bird’s nest.
The visual effect is extraordinary and the texture contrast between the crackling vermicelli exterior and the soft, warmly spiced potato interior is exactly as satisfying as it sounds.
Nestled inside each crispy nest sits a paneer ball made from grated Indian cottage cheese mixed with black pepper, rice flour, and salt, shaped into smooth rounds, and flash fried for just 20 to 30 seconds until the exterior sets into a delicate golden crust while the inside remains completely soft, creamy, and literally melts the moment it hits your tongue.
The rice flour coating gives the paneer ball a light, barely there crunch that contrasts beautifully against its pillowy interior.
Then comes the finishing a drizzle of Schezwan sauce or tomato ketchup, a scattering of fresh cilantro and mint leaves and the entire composition comes together into something that looks like it belongs on the menu of a high end restaurant and tastes even better than it looks.
Ingredients
For the Potato Mixture (the nests):
- 4 medium russet or Yukon Gold potatoes, boiled and mashed
- 1 cup frozen green peas, boiled and roughly mashed
- 1 medium green bell pepper (capsicum), finely diced
- 3.5 to 5 oz paneer, grated (100 to 150 grams — available at Indian grocery stores, Whole Foods, or online)
- 1 tablespoon fresh garlic, finely chopped
- 1 tablespoon red chili powder (or cayenne pepper — adjust to heat preference)
- 1 teaspoon ground turmeric
- 1 teaspoon ground cumin
- 1 teaspoon chaat masala (available at Indian grocery stores or Amazon — a tangy, savory spice blend)
- 2 fresh green chilies, finely chopped (serrano peppers work great)
- Salt to taste
For the Paneer Balls:
- 7 oz paneer, grated (200 grams)
- 1 teaspoon black pepper powder
- 2 to 3 tablespoons rice flour
- Salt to taste
For the Coating:
- 1 cup all-purpose flour (for dusting the shaped nests)
- All-purpose flour slurry: 1 cup all-purpose flour mixed with water until a smooth, medium-thick batter forms
- Thin vermicelli noodles (rice vermicelli or wheat vermicelli — available at any Asian grocery store or the international foods aisle of major supermarkets)
For Assembly and Garnish:
- Schezwan sauce (available at Indian grocery stores and on Amazon) or tomato ketchup
- Fresh cilantro leaves, roughly chopped
- Fresh mint leaves
- Neutral oil for deep frying (vegetable oil or canola oil)
A Note on Paneer
Paneer is a fresh, non melting Indian cottage cheese that is mild, creamy, and dense enough to hold its shape during cooking.
It is the perfect filling for these nests because it stays soft and pillowy inside its fried exterior rather than melting away.
Find it in the refrigerated section of Indian grocery stores, Whole Foods, Trader Joe’s, or order it online. If paneer is completely unavailable, firm tofu pressed and dried as thoroughly as possible is the closest substitute it won’t have the same creamy richness but will hold its shape similarly during frying.
Step by Step Instructions
Step 1 Make the potato mixture
In a large mixing bowl, combine the boiled and mashed potatoes, boiled and roughly mashed green peas, finely diced green bell pepper, grated paneer, chopped garlic, red chili powder, ground turmeric, ground cumin, chaat masala, chopped green chilies, and salt.
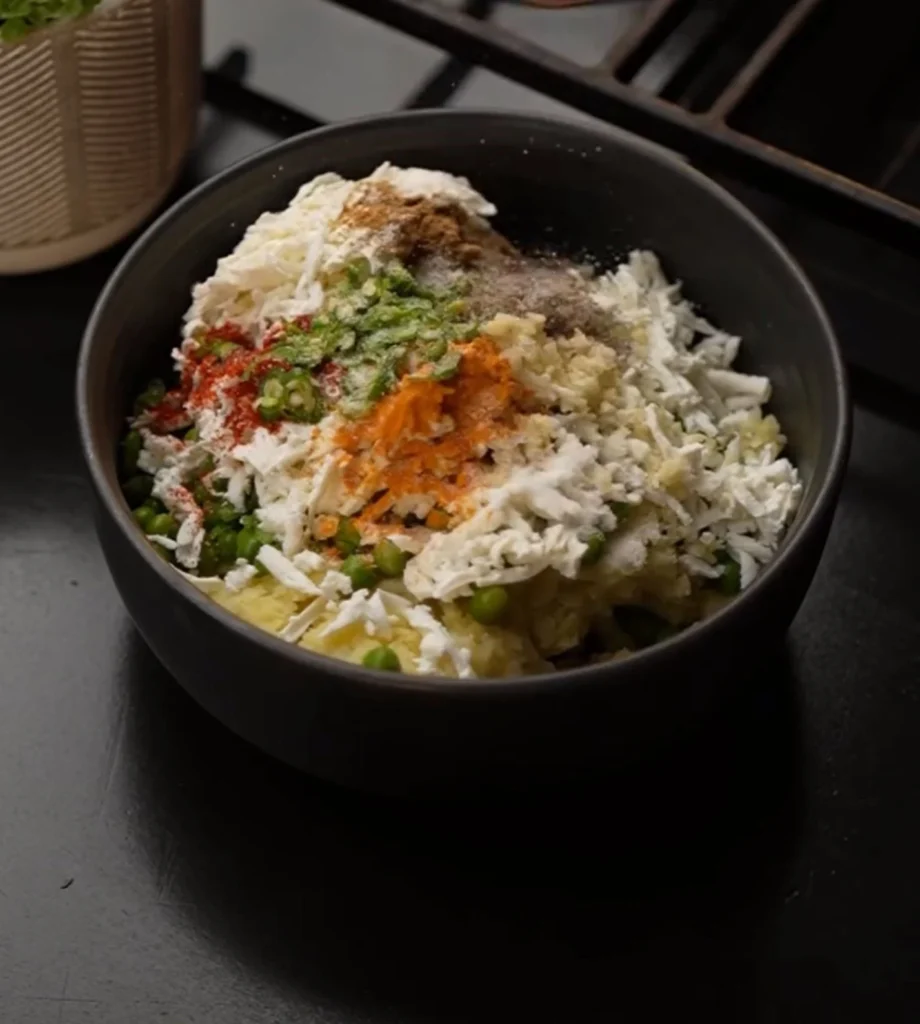
Mix everything together thoroughly until completely combined into a uniform, well seasoned mixture that holds together when pressed.
Step 2 Shape the nests
Lightly coat your palms with a small amount of neutral oil this prevents the mixture from sticking and makes shaping significantly easier.
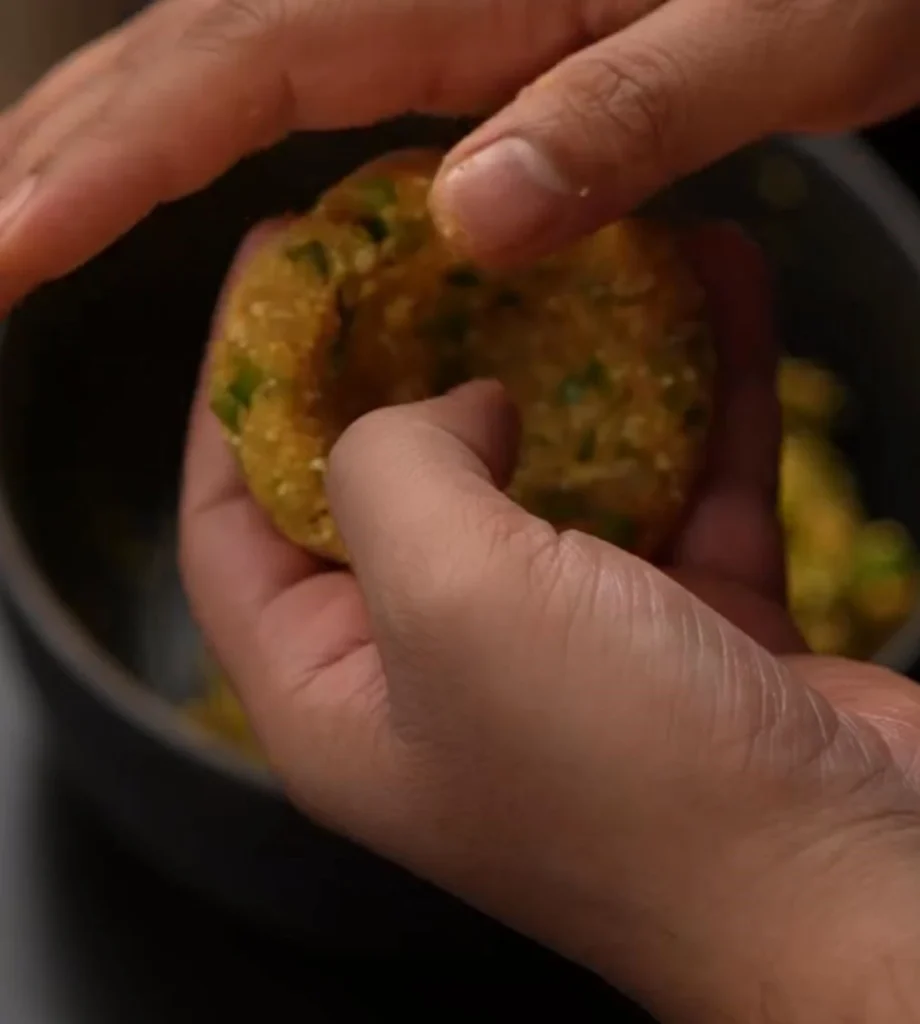
Take a portion of the potato mixture approximately the size of a large golf ball and shape it into a small bowl or cup form using your fingers and thumbs pressing the center down and building up the sides into a nest or katori shape.
The walls should be approximately half an inch thick and even all the way around. Place each shaped nest on a clean plate or baking sheet.
Repeat until all the mixture is shaped. Allow the shaped nests to rest for 10 minutes this resting time helps them firm up and hold their shape during the coating and frying process.
Step 3 Make the paneer balls
While the nests rest, make the paneer balls. In a bowl combine grated paneer, black pepper powder, rice flour, and salt. Mix well until everything is combined the rice flour helps bind the paneer and creates a light exterior during frying.
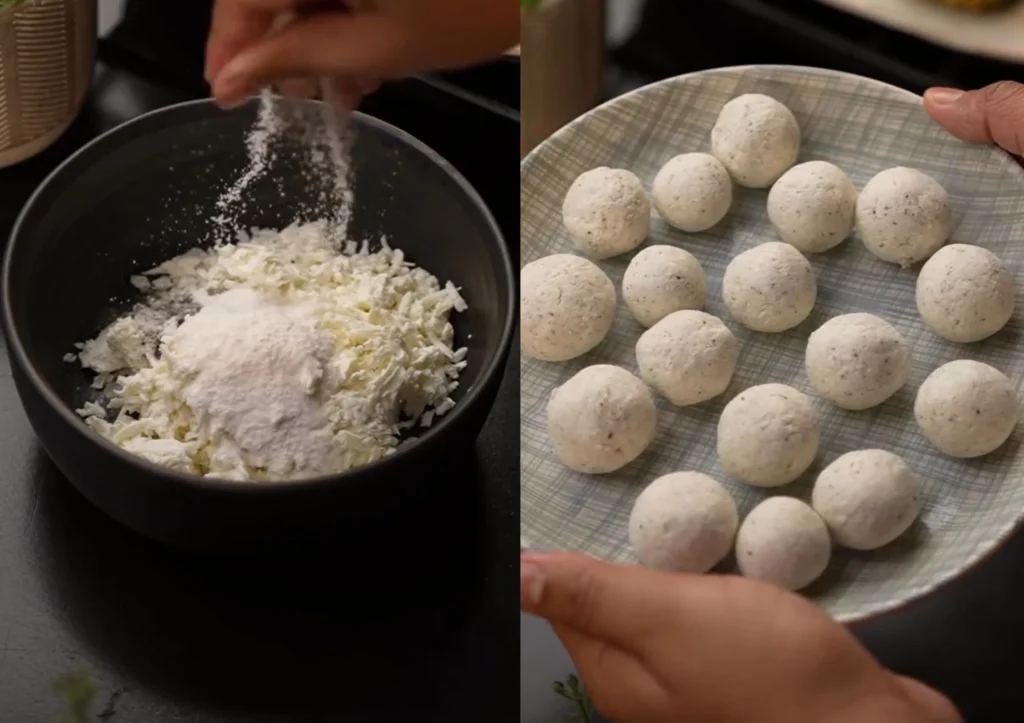
Roll the mixture into smooth, even balls approximately the size of a large marble or small grape. Set aside on a plate.
Step 4 Prepare the flour slurry and coat the nests
In a bowl, whisk together 1 cup of all purpose flour with enough water to create a smooth, medium thick slurry similar in consistency to a thin pancake batter.
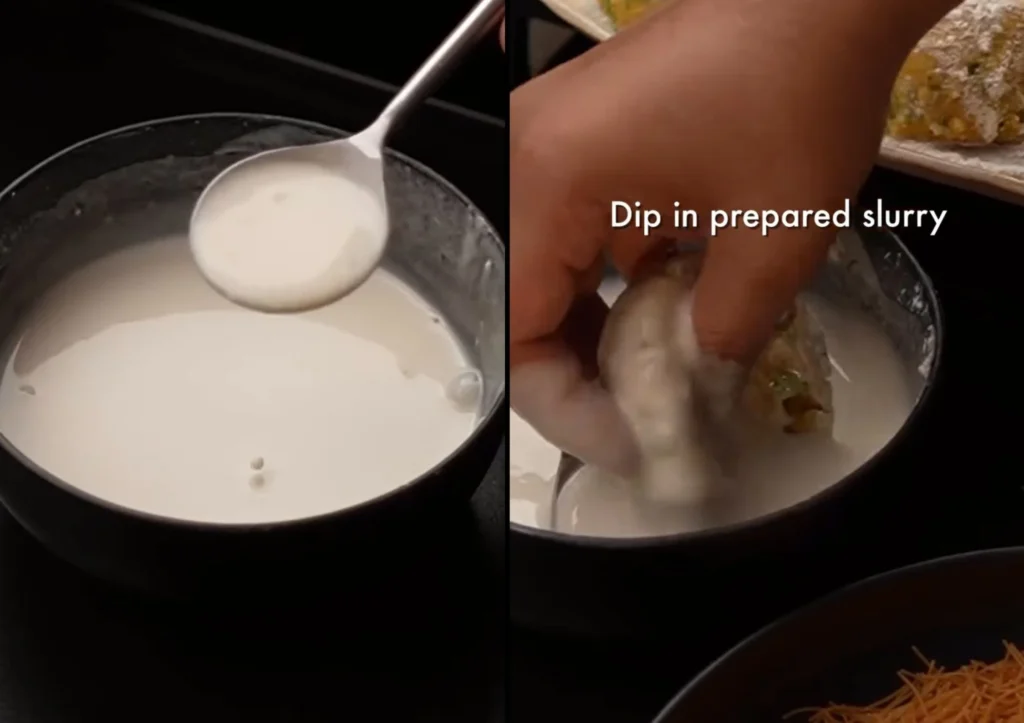
It should coat a spoon and drip off slowly. First, dust each shaped nest lightly and evenly with dry all purpose flour this gives the slurry something to grip. Then dip each dusted nest into the flour slurry, ensuring complete and even coverage inside and out.
Step 5 Roll in vermicelli
Immediately after dipping in the slurry, roll each coated nest in thin vermicelli noodles pressing gently so the vermicelli adheres firmly to the entire exterior surface of the nest, including the inside of the cup.
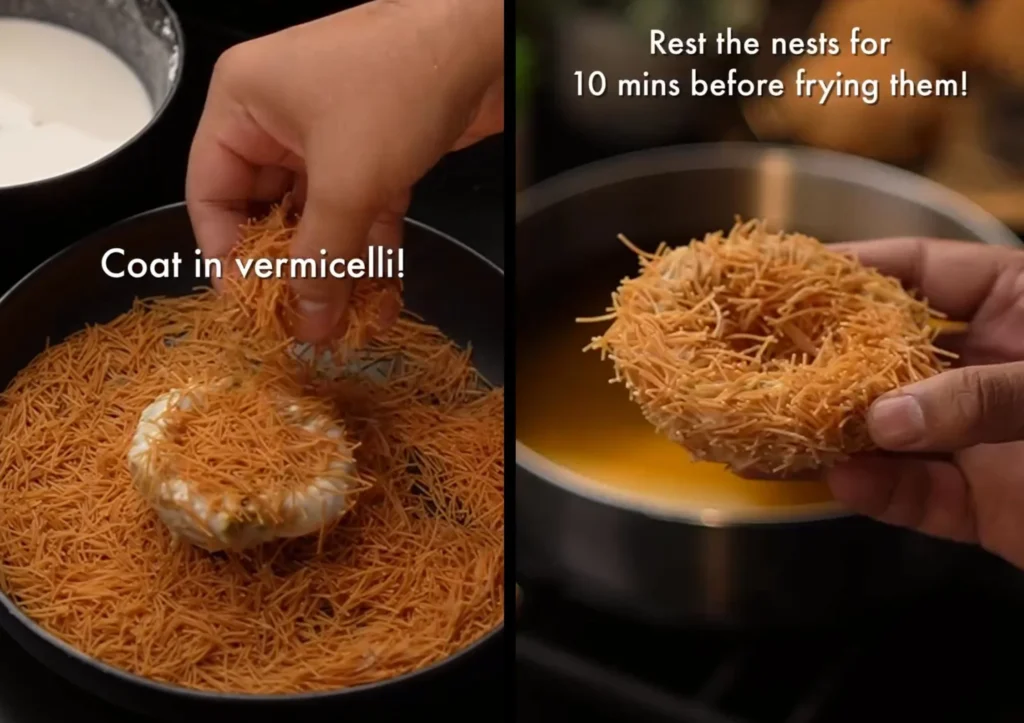
The vermicelli should cover every surface completely and evenly. Set the coated nests aside while you heat the oil.
Step 6 Fry the paneer balls first
Heat neutral oil in a deep skillet or Dutch oven to 350°F to 375°F. Add the paneer balls to the hot oil and fry for just 20 to 30 seconds no longer.

This flash fry sets the exterior into a light golden crust while keeping the interior completely soft and creamy. Remove immediately with a slotted spoon and drain on paper towels. Do not over fry paneer becomes rubbery and tough with extended frying time.
Step 7 Fry the vermicelli nests
In the same hot oil, carefully lower the vermicelli-coated potato nests one or two at a time. Fry for 3 to 4 minutes, turning carefully, until the vermicelli is deeply golden, shatteringly crispy all over, and the nest holds its shape firmly.
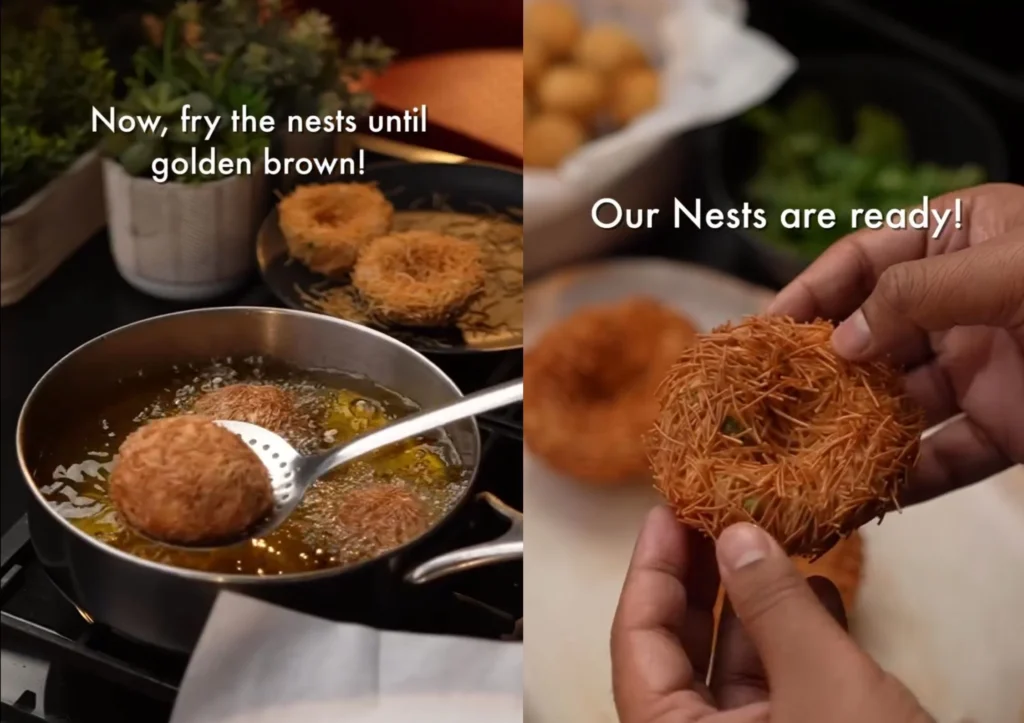
Remove with a slotted spoon and drain on a wire rack or paper towel lined plate.
Step 8 Assemble and serve
Place each crispy nest on a serving platter. Add a small drizzle of Schezwan sauce or a dot of tomato ketchup into the center of each nest.
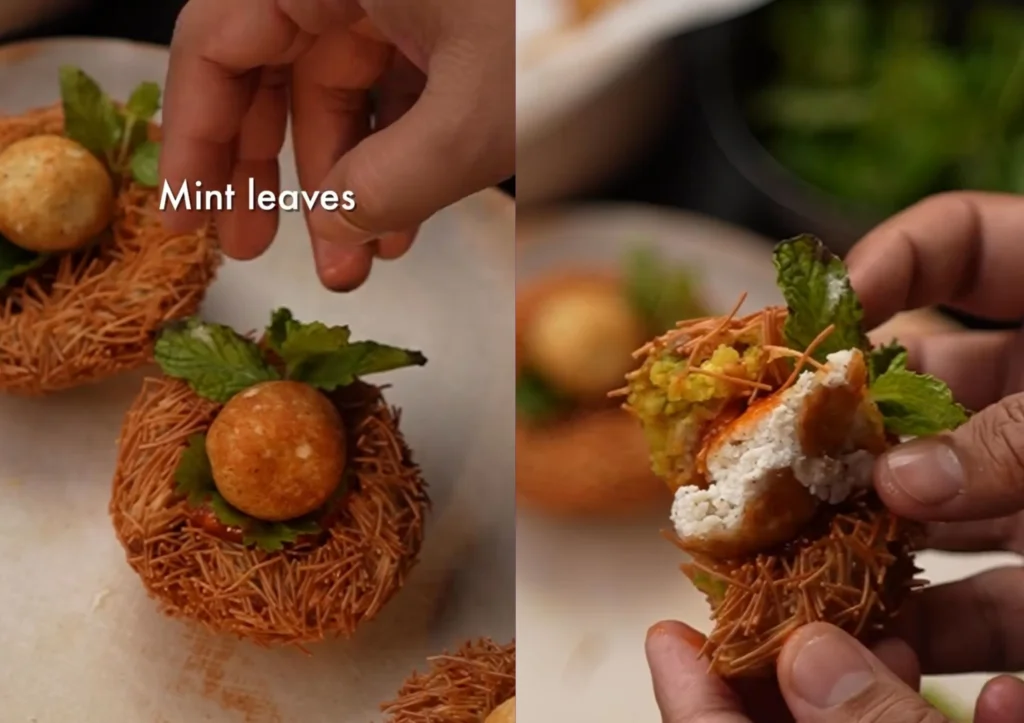
Place one fried paneer ball into each nest. Garnish with freshly chopped cilantro and a few fresh mint leaves. Serve immediately while the nests are at peak crunch and the paneer balls are still warm and soft inside.
Tips for Perfect Bird’s Nests Every Time
Oil your palms generously when shaping the nests — this is the single most important tip for getting clean, even nest shapes without the mixture sticking and tearing.
The 10-minute rest after shaping is essential — it firms the nests so they hold their shape through the coating and frying process.
Keep the flour slurry at a medium thickness — too thin and the vermicelli won’t adhere properly, too thick and it creates a heavy, doughy coating instead of a delicate one.
Press the vermicelli firmly onto the slurry-coated nest — loose vermicelli will fall off in the oil and create a mess rather than a clean, even nest exterior.
Always fry paneer balls first and for only 20 to 30 seconds — this is non-negotiable for the melt-in-mouth interior texture that makes these special.
Fry nests in small batches — overcrowding drops oil temperature and produces soggy, greasy nests rather than crispy golden ones.
Assemble immediately before serving — assembled nests lose their crunch quickly as the sauce softens the vermicelli exterior.
Serving Ideas
Arrange these Bird’s Nest appetizers on a dark slate board or white platter for maximum visual impact the golden vermicelli nest against a dark background is genuinely stunning.
Set out small bowls of Schezwan sauce and ketchup alongside so guests can add extra sauce to their preference.
Serve as a standalone cocktail party appetizer, a pre dinner starter, or as part of a larger Indian inspired appetizer spread alongside samosas, chaat, and masala chai.
These are especially impressive at holiday gatherings, birthday parties, baby showers, and dinner parties where presentation matters as much as flavor.

Bird’s Nest Recipe The Show-Stopping Crispy Potato and Paneer Appetizer
Ingredients
- For the Potato Mixture the Nests:
- 4 medium russet or Yukon Gold potatoes boiled and mashed
- 1 cup frozen green peas boiled and roughly mashed
- 1 medium green bell pepper finely diced
- 3.5 –5 oz paneer grated 100–150 grams — available at Indian grocery stores or Whole Foods
- 1 tablespoon fresh garlic finely chopped
- 1 tablespoon red chili powder or cayenne pepper adjust to heat preference
- 1 teaspoon ground turmeric
- 1 teaspoon ground cumin
- 1 teaspoon chaat masala available at Indian grocery stores, Whole Foods, or Amazon
- 2 fresh green chilies finely chopped serrano peppers recommended
- Salt to taste
- For the Paneer Balls:
- 7 oz paneer grated 200 grams
- 1 teaspoon black pepper powder
- 2 –3 tablespoons rice flour
- Salt to taste
- For the Coating:
- All-purpose flour for dusting shaped nests
- All-purpose flour slurry: 1 cup all-purpose flour whisked with water until smooth medium-thick batter forms
- Thin vermicelli noodles — rice vermicelli or wheat vermicelli broken into 1–2 inch pieces available at Asian grocery stores or international foods aisle of major supermarkets
- For Assembly and Garnish:
- Schezwan sauce available at Indian grocery stores or Amazon or tomato ketchup
- Fresh cilantro leaves roughly chopped
- Fresh mint leaves
- Neutral oil for deep frying vegetable oil or canola oil
Instructions
- In a large mixing bowl combine mashed potatoes, roughly mashed boiled peas, finely diced green bell pepper, grated paneer, chopped garlic, red chili powder, ground turmeric, ground cumin, chaat masala, chopped green chilies, and salt — mix thoroughly until completely combined into a uniform well-seasoned mixture that holds together when pressed.
- Lightly coat palms with neutral oil to prevent sticking — this is essential for clean even shaping.
- Take a golf ball-sized portion of potato mixture and shape into a small bowl or cup form using fingers and thumbs — pressing center down and building up sides into an even nest shape with walls approximately half an inch thick.
- Place each shaped nest on a clean plate or baking sheet and repeat until all mixture is shaped.
- Allow shaped nests to rest for 10 minutes to firm up and hold their shape through coating and frying.
- While nests rest make paneer balls — combine grated paneer, black pepper powder, rice flour, and salt in a bowl and mix well until combined.
- Roll paneer mixture into smooth even balls approximately the size of a large marble and set aside on a plate.
- Prepare flour slurry by whisking 1 cup all-purpose flour with enough water to create a smooth medium-thick batter similar to thin pancake batter consistency.
- Dust each rested nest lightly and evenly with dry all-purpose flour on all surfaces.
- Dip each dusted nest into the flour slurry ensuring complete and even coverage inside and out.
- Immediately roll each slurry-coated nest in broken vermicelli pieces pressing gently so vermicelli adheres firmly to the entire exterior and interior cup surface — covering completely and evenly.
- Heat neutral oil in a deep skillet or Dutch oven to 350°F–375°F.
- Add paneer balls to hot oil first and flash fry for exactly 20–30 seconds only until exterior sets to a light golden crust — remove immediately with slotted spoon and drain on paper towels — do not over-fry.
- In the same hot oil carefully lower vermicelli-coated potato nests one or two at a time.
- Fry nests for 3–4 minutes turning carefully until vermicelli is deeply golden and shatteringly crispy all over and nest holds its shape firmly.
- Remove with slotted spoon and drain on a wire rack or paper towel-lined plate.
- Allow oil to return to 350°F–375°F between each batch before frying next round.
- Place each crispy nest on serving platter and add a small drizzle of Schezwan sauce or dot of ketchup into the center.
- Place one fried paneer ball into each nest.
- Garnish with freshly chopped cilantro and fresh mint leaves and serve immediately.
Notes
Oil palms generously when shaping nests — this is the single most important tip for clean even nest shapes without mixture sticking and tearing.
The 10-minute rest after shaping is essential — it firms nests so they hold their shape through the entire coating and frying process.
Keep flour slurry at medium thickness — too thin and vermicelli won’t adhere properly, too thick and it creates a heavy doughy coating instead of a delicate crispy one.
Press vermicelli firmly onto slurry-coated nests — loose vermicelli falls off in oil and creates a mess rather than a clean even exterior.
Always fry paneer balls first and for exactly 20–30 seconds only — this is non-negotiable for the melt-in-mouth interior texture.
Never overcrowd the frying pan — fry nests one or two at a time for consistent golden crispy results.
Assemble immediately before serving — assembled nests lose crunch quickly as sauce softens the vermicelli exterior.
If potato mixture is too wet to hold shape add rice flour or breadcrumbs one tablespoon at a time until mixture holds when pressed.
For gluten-free version substitute all-purpose flour dusting and slurry with rice flour and use rice vermicelli instead of wheat vermicelli.
Shaped uncoated nests can be refrigerated covered for up to 12 hours before coating and frying.
Paneer ball mixture can be refrigerated up to 24 hours ahead — roll into balls just before frying.
Never coat nests in slurry and vermicelli ahead of time — vermicelli absorbs moisture and becomes soft rather than crispy.
Store fried nests and fried paneer balls separately in airtight containers in refrigerator for up to 2 days.
Reheat nests in oven at 400°F for 8–10 minutes or air fryer at 375°F for 4–5 minutes to restore crunch before assembling fresh.
For air frying nests spray generously with cooking spray and air fry at 400°F for 12–15 minutes checking frequently as vermicelli browns quickly.
Yes — the shaped, uncoated potato nests can be prepared and refrigerated covered for up to 12 hours before coating and frying. The paneer ball mixture can also be prepared and refrigerated up to 24 hours ahead — roll into balls just before frying. Do not coat the nests in slurry and vermicelli ahead of time — the vermicelli absorbs moisture from the slurry and becomes soft rather than crispy during frying.
Air frying works reasonably well for the vermicelli nests — spray generously with cooking spray and air fry at 400°F for 12 to 15 minutes until golden and crispy, checking frequently as vermicelli browns quickly. The paneer balls are best pan-fried in a small amount of oil for 30 seconds rather than air fried as they are too small and delicate for most air fryer baskets. Deep frying produces the most dramatic, even crunch and is strongly recommended for the best visual and textural result.
Chaat masala is available at any Indian grocery store, at Whole Foods in the international spice section, at Sprouts, and readily on Amazon. It is a tangy, savory, slightly sulfurous spice blend made with dried mango powder, black salt, cumin, and other spices — it adds a distinctive tang and complexity that regular spice blends cannot replicate. If completely unavailable, a combination of a pinch of black salt, a squeeze of lime juice, and a pinch of ground cumin provides a reasonable approximation.
Thin wheat vermicelli — the kind used in Indian sevai or Middle Eastern dishes — produces the most visually striking nest effect and fries to the crunchiest result. Rice vermicelli works equally well and is more widely available at mainstream American grocery stores in the Asian foods aisle. Both fry beautifully — choose whichever is most accessible. Break longer vermicelli strands into 1 to 2 inch pieces before rolling for more manageable, even coverage.
Yes with modifications. Substitute the all-purpose flour dusting and slurry with rice flour — rice flour produces a slightly lighter, crispier coating than all-purpose flour and works beautifully as a gluten-free alternative. Use rice vermicelli instead of wheat vermicelli. The paneer balls already use rice flour. All other ingredients in the recipe are naturally gluten-free.
The most common cause is too much moisture in the potato mixture — either from insufficiently drained boiled potatoes or excess moisture from the peas or bell pepper. Make sure boiled potatoes are thoroughly drained and allowed to steam dry for several minutes before mashing. If the mixture feels too wet after mixing, add a small amount of rice flour or breadcrumbs — one tablespoon at a time — until the mixture holds its shape when pressed. Also make sure your palms are well-oiled during shaping.
Assembled Bird’s Nests do not store or reheat well — the vermicelli loses its crunch rapidly once sauced and assembled. Store the fried nests and fried paneer balls separately in airtight containers in the refrigerator for up to 2 days. Reheat nests in an oven at 400°F for 8 to 10 minutes or in an air fryer at 375°F for 4 to 5 minutes to restore crunch before assembling fresh with sauce and garnishes.