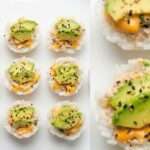
When you crave sushi flavors but want something easier to make and perfect for sharing, these mini tuna rice cups deliver all the satisfaction without the rolling, slicing, or special equipment.
These adorable portions combine seasoned sushi rice with creamy tuna salad, fresh avocado, spicy sriracha, and toasted sesame seeds all the components of great sushi transformed into grab-and-go bites that work equally well for lunch prep, party appetizers, or quick snacks.
Why These Rice Cups Stand Out
Traditional sushi requires practice, patience, and proper technique. These rice cups take all the flavors you love about sushi and simplify the preparation dramatically. Using a standard cupcake pan as a mold, you create perfectly portioned rice cups that hold their shape beautifully and look impressive on any table.
The beauty of this recipe lies in its versatility and accessibility. You don’t need bamboo mats, special knives, or years of practice. A cupcake pan you already own becomes your mold, and the assembly is straightforward enough for beginners yet appealing enough for experienced cooks looking for quick, creative meals.
From a nutritional standpoint, these cups pack protein from tuna, healthy fats from avocado, and energy from rice. They’re satisfying without being heavy, making them ideal for meal prep or entertaining. Plus, they’re customizable adjust the spice level, swap proteins, or modify toppings based on preferences or dietary needs.
The individual portions make these cups perfect for portion control and serving. Unlike a full sushi roll that requires cutting, these come pre portioned and ready to eat. Kids love the fun presentation, while adults appreciate the sophisticated flavors in a casual format.
Understanding the Ingredients
Sushi Rice The foundation of these cups, sushi rice is short-grain rice that becomes sticky when cooked, allowing it to hold its shape.
This stickiness is crucial regular long-grain rice won’t work as it doesn’t clump together. Prepare the rice according to package directions, and ideally season it with rice vinegar, sugar, and salt for authentic sushi flavor, though plain cooked sushi rice works fine too.
Canned Tuna One can of tuna (typically 5 ounces when drained) provides the protein component. Albacore tuna packed in water is a common choice, offering mild flavor and flaky texture. Drain it thoroughly before mixing to prevent watery tuna salad. Chunk light tuna is a budget-friendly alternative with slightly stronger flavor.
Mayonnaise Two tablespoons of mayo create creaminess and bind the tuna salad together. Use Japanese Kewpie mayo for authentic flavor it’s tangier and richer than American mayo or stick with regular mayo if that’s what you have. Light mayo works if you’re watching calories.
Lemon Juice One teaspoon of fresh lemon juice brightens the tuna salad with acidity that cuts through the richness. Fresh-squeezed tastes best, though bottled works in a pinch. Some people prefer lime juice for a slightly different citrus note.
Celery or Onion One tablespoon of finely chopped celery or onion adds crunch and flavor complexity. Celery provides a mild, vegetal crunch, while onion brings sharpness. Red onion is milder than white or yellow. This ingredient is optional skip it if you prefer smooth tuna salad or need to avoid raw onions.
Avocado Small slices of ripe avocado add creamy richness and healthy fats. Choose avocados that yield slightly to gentle pressure not rock-hard, not mushy. If your avocados are firm, let them ripen at room temperature for a day or two before using.
Sriracha Sauce This popular hot sauce adds spicy kick and vibrant color. Adjust the amount based on heat tolerance. Sriracha’s garlicky, slightly sweet heat complements the rich tuna and avocado perfectly. For milder versions, reduce the amount or use a squeeze of mayo mixed with a tiny bit of sriracha.
Sesame Seeds Black and/or white sesame seeds provide nutty flavor, visual appeal, and a slight crunch. Toasting them briefly in a dry pan intensifies their flavor, though pre-toasted or raw seeds both work. Mix both colors for the most attractive presentation.
Step by Step Preparation
Preparing the Sushi Rice
Cook your sushi rice according to package instructions. The rice should be sticky and slightly warm when you’re ready to assemble the cups. If you’re making authentic seasoned sushi rice, mix rice vinegar, sugar, and salt while the rice is still hot, then let it cool slightly before using.
The rice needs to be manageable not piping hot (which makes it hard to handle) but not completely cold (which makes it stiff and difficult to mold). Slightly warm rice is ideal for shaping.
Making the Tuna Salad
Open and drain your canned tuna thoroughly. Press it gently with a fork against the side of a strainer to remove excess liquid. Transfer the drained tuna to a bowl and break it up with a fork into small flakes.
Add two tablespoons of mayonnaise and one teaspoon of lemon juice. Mix well until the tuna is evenly coated and the mixture holds together. If using celery or onion, chop it very finely pieces should be small enough to distribute throughout the salad without creating large chunks. Mix it in thoroughly.
Season with salt and pepper to taste. Remember that you’ll be adding other elements later, so don’t over-salt. The tuna salad should taste good on its own but not be aggressively seasoned.
This tuna salad can be prepared ahead and refrigerated for up to 24 hours, making it convenient for meal prep or party planning.
Forming the Rice Cups
Here’s where the magic happens. Take a cupcake pan and lightly spray or brush each cup with oil to prevent sticking. Alternatively, line them with small pieces of plastic wrap, leaving enough overhang to help remove the rice cups later.
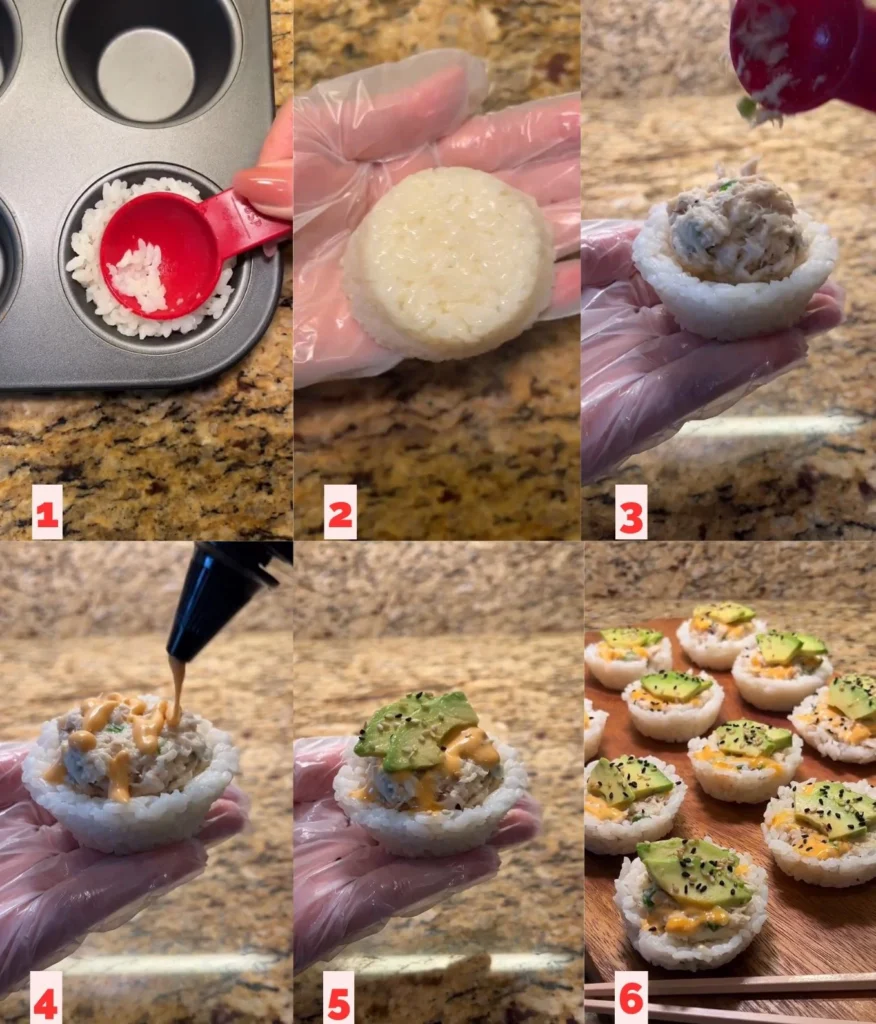
Press warm, sticky sushi rice into each cupcake cup, forming a hollow center. Use damp fingers or the back of a spoon to press the rice firmly against the bottom and sides, creating a cup shape. The rice should be thick enough to hold its shape (about 1/4 to 1/2 inch thick) but thin enough to leave room for the filling.
Pack the rice firmly but not so hard that it becomes dense and unpleasant to eat. You want it compact enough to hold together but still tender and fluffy.
Filling and Assembly
Once your rice cups are formed, spoon the tuna salad into the center of each cup. Don’t overfill leave a little space at the top for toppings. About one to two tablespoons of tuna salad per cup works well, depending on cup size.
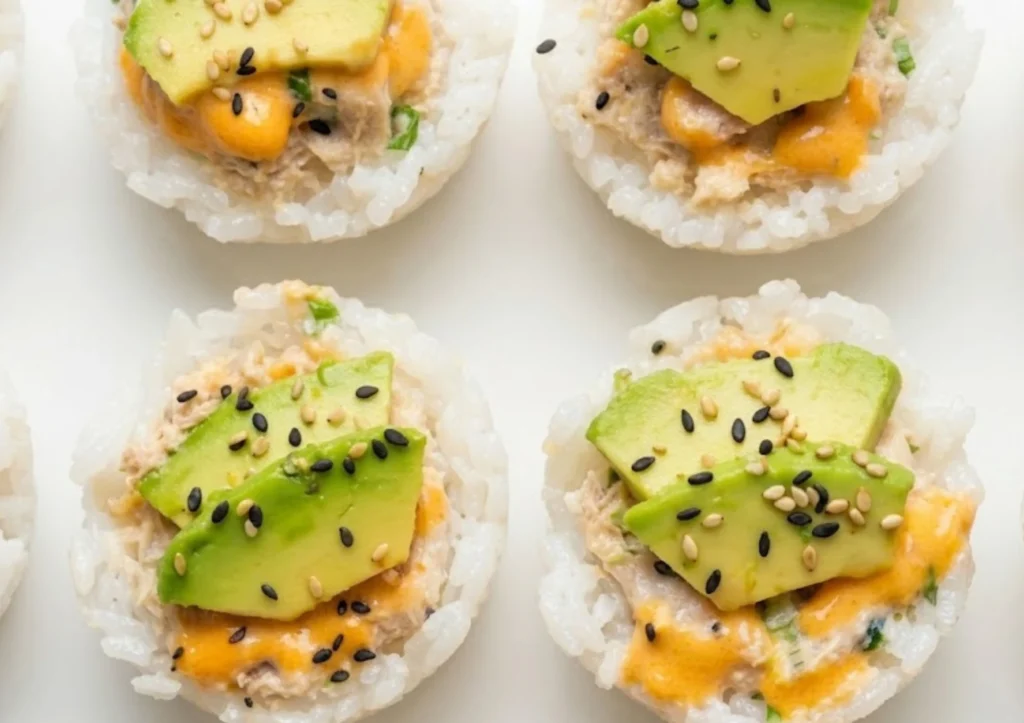
Place a small slice of avocado on top of the tuna. The avocado adds creamy contrast and beautiful color. If your avocado is very soft, you can mash it slightly before adding.
Drizzle a small amount of sriracha over each cup. Use a squeeze bottle for precise application, or carefully drizzle with a spoon. Start conservative you can always add more, but you can’t remove it.
Sprinkle sesame seeds generously over the top. Use just white, just black, or a mix of both for visual interest. The seeds should cover the surface nicely, adding texture and nutty flavor.
Removing from the Pan
If you used plastic wrap, simply lift each rice cup out using the overhanging edges. If you oiled the pan directly, run a butter knife around the edge of each cup and carefully lift it out with a spoon or small offset spatula. The rice should release relatively easily if you pressed it firmly enough during forming.
Transfer the finished cups to a serving plate. They’re ready to eat immediately or can be refrigerated for a few hours if needed.
Serving Suggestions
These mini tuna rice cups work in numerous contexts:
Lunch Prep: Make a batch on Sunday and grab them throughout the week for quick, protein-packed lunches. Store them in airtight containers with the avocado and sriracha added fresh each day to prevent browning and sogginess.
Party Appetizers: Serve them on a platter for gatherings. They’re conversation starters—guests love the creative presentation and bold flavors.
Kid-Friendly Meals: Children enjoy the individual portions and fun shape. Reduce the sriracha for younger kids or serve it on the side for them to add themselves.
Bento Box Component: Include a couple of rice cups in packed lunches alongside vegetables, fruit, and other favorites.
Tips for Success
Rice Temperature Matters Work with slightly warm rice. Too hot and it’s uncomfortable to handle; too cold and it won’t stick together properly. If your rice has cooled completely, microwave it briefly to make it pliable again.
Press Firmly The rice cups need to be compact enough to hold their shape when removed from the pan. Press firmly with damp fingers to create sturdy walls and bottoms.
Don’t Skip the Oil or Plastic Wrap Without some barrier between rice and pan, removal becomes frustrating. Even non-stick pans benefit from a light oil spray or plastic wrap lining.
Fresh Avocado Add avocado close to serving time to prevent browning. If making ahead, squeeze a little lemon or lime juice over avocado slices to slow oxidation.
Adjust Seasoning Taste your tuna salad before assembly. The rice is mild, so the filling should have enough flavor to stand out. Don’t be shy with lemon, salt, and pepper in the tuna mixture.
Yes, with some caveats. Prepare the rice cups and tuna salad separately, then assemble within a few hours of serving. Add avocado, sriracha, and sesame seeds just before serving to maintain freshness and prevent sogginess.
Small bowls, ramekins, or even silicone muffin cups work as molds. You can also shape the rice by hand into small bowls, though a mold creates more uniform results.
Absolutely! Canned salmon, imitation crab, cooked shrimp, or even chicken salad all work beautifully. For vegetarian versions, try mashed chickpeas with mayo or scrambled egg.
Keep a bowl of water nearby and dip your fingers frequently. Wet fingers prevent rice from sticking and help you shape it smoothly.
The rice cups can be frozen without fillings, then thawed and filled later. However, the tuna salad and avocado don’t freeze well. Freeze just the formed rice cups, then add fresh fillings after thawing.
Try cucumber slices, pickled ginger, scallions, furikake seasoning, crispy fried onions, spicy mayo, eel sauce, or masago (fish roe) for authentic sushi flair.
Assembled cups keep refrigerated for about 24 hours. The rice may dry slightly, but they’re still enjoyable. Store in an airtight container to maintain moisture.
Mini Tuna Rice Cups Bite Sized Sushi Inspired Perfection
Ingredients
- For the Rice Cups:
- 2-3 cups cooked sushi rice enough to fill a standard 12-cup cupcake pan
- Cooking spray or oil for greasing
- For the Tuna Salad:
- 1 can 5 oz tuna, drained
- 2 tablespoons mayonnaise
- 1 teaspoon fresh lemon juice
- 1 tablespoon finely chopped celery or onion optional
- Salt and pepper to taste
- For Toppings:
- 1 small avocado thinly sliced
- Sriracha sauce to taste
- Black and/or white sesame seeds
Instructions
- Prepare the Sushi Rice:
- Cook sushi rice according to package directions
- Let rice cool slightly until warm but not hot (easier to handle)
- Keep rice covered to prevent drying
- Make the Tuna Salad:
- Drain canned tuna thoroughly, pressing out excess liquid
- Transfer tuna to a bowl and break into small flakes with a fork
- Add mayonnaise and lemon juice
- If using, add finely chopped celery or onion
- Mix everything together until well combined
- Season with salt and pepper to taste
- Set aside
- Form the Rice Cups:
- Lightly spray or brush a 12-cup cupcake pan with oil (or line with small pieces of plastic wrap)
- Dampen your fingers with water to prevent sticking
- Press sushi rice into each cupcake cup, creating a hollow center
- Press rice firmly against bottom and sides to form a cup shape about 1/4 to 1/2 inch thick
- Make sure the rice is packed firmly enough to hold its shape
- Assemble the Cups:
- Spoon 1-2 tablespoons of tuna salad into the center of each rice cup
- Place a small slice of avocado on top of the tuna
- Drizzle a small amount of sriracha sauce over each cup
- Sprinkle generously with sesame seeds (black, white, or mixed)
- Remove and Serve:
- If using plastic wrap, lift each cup out using the overhanging edges
- If oiled directly, run a knife around edges and carefully lift out with a spoon
- Transfer to a serving plate
- Serve immediately or refrigerate for up to 2-3 hours
- Make-Ahead Tip: Prepare rice cups and tuna salad separately up to 24 hours ahead. Assemble and add toppings within a few hours of serving for best results. Add avocado just before serving to prevent browning.