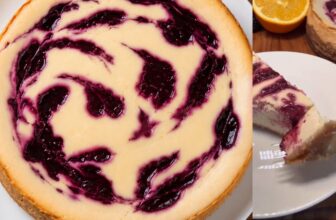
There’s something magical about the combination of creamy cheesecake and fresh, ripe mango. When these two come together in a no bake dessert that requires no oven, no complicated techniques, and minimal hands on time, you get a summer treat that’s as impressive as it is delicious.
This Mango Cheesecake is exactly that a stunning dessert with layers of buttery biscuit crust, silky mango-infused cream cheese filling, fresh mango slices, and a glossy jelly topping that looks like it came straight from a professional bakery.
The best part? You don’t need any baking experience to pull this off. Everything comes together with simple mixing, refrigeration does all the heavy lifting, and the final result is a show stopping dessert that tastes like you spent hours perfecting it.
Whether you’re making this for a birthday celebration, a summer gathering, or simply because you have beautiful ripe mangoes that need to be used, this recipe delivers every single time.
Why This Recipe Works So Well
Traditional baked cheesecakes can be intimidating they require water baths, precise oven temperatures, and careful monitoring to prevent cracks.
This no bake version sidesteps all those potential pitfalls while still delivering that rich, creamy cheesecake texture everyone loves.
The secret is in the combination of cream cheese and whipped cream. The cream cheese provides that characteristic tangy richness, while the whipped cream lightens the texture and makes the filling mousse like and incredibly smooth.
Melted white chocolate adds subtle sweetness and helps the filling set properly in the refrigerator without becoming too firm or dense.
Fresh mango puree gets folded right into the filling, creating a beautiful pale orange color and infusing every bite with tropical fruit flavor.
Then, thin slices of fresh mango arranged on top add visual impact and a burst of pure mango taste in each serving. The final layer of mango jelly creates a professional-looking glossy finish that seals in the freshness and adds another dimension of fruity sweetness.
Understanding the Ingredients
Let’s break down what you’ll need and why each component matters:
For the Crust:
Digestive biscuits (25 pieces): These lightly sweet, wheat-based cookies are the traditional choice for British-style cheesecake bases. In the U.S., you can find them in the international aisle at most major supermarkets, or substitute with graham crackers, which work just as well and are more readily available.
Butter (½ cup, melted): This binds the biscuit crumbs together and adds richness. Use real butter, not margarine, for the best flavor.
For the Filling:
Cream cheese (1½ cups or 345 grams): The foundation of any good cheesecake. Make sure it’s fully softened to room temperature before mixing, or you’ll end up with lumps. Philadelphia is the most widely available brand in the U.S.
Mango puree (1 cup): Use ripe, sweet mangoes blended until completely smooth. Strain out any fibrous bits for the smoothest texture. Alphonso, Ataulfo (honey), or Kent mangoes work particularly well for their smooth texture and intense flavor.
White chocolate (⅓ cup, melted): This adds sweetness and a subtle creamy richness. Use good quality white chocolate chips or a white chocolate bar chopped into small pieces. Ghirardelli or Lindt work beautifully.
Whipped cream (1½ cups): Made by beating ¾ cup of heavy whipping cream to stiff peaks. This lightens the filling and gives it that airy, mousse-like texture. Make sure your cream is very cold and your bowl and beaters are chilled for the best results.
For the Garnish:
Fresh mango slices: Thin slices arranged decoratively on top. Use the prettiest, ripest mangoes you can find.
Mango jelly: A packet of mango-flavored gelatin or agar powder prepared according to package instructions. This creates the shiny, professional-looking top layer.
Step by Step Instructions
Making the Crust
Start by crushing your digestive biscuits or graham crackers into fine crumbs. You can do this in a food processor, which takes just seconds, or place them in a sealed plastic bag and crush them with a rolling pin. You want fine, even crumbs with no large pieces remaining.
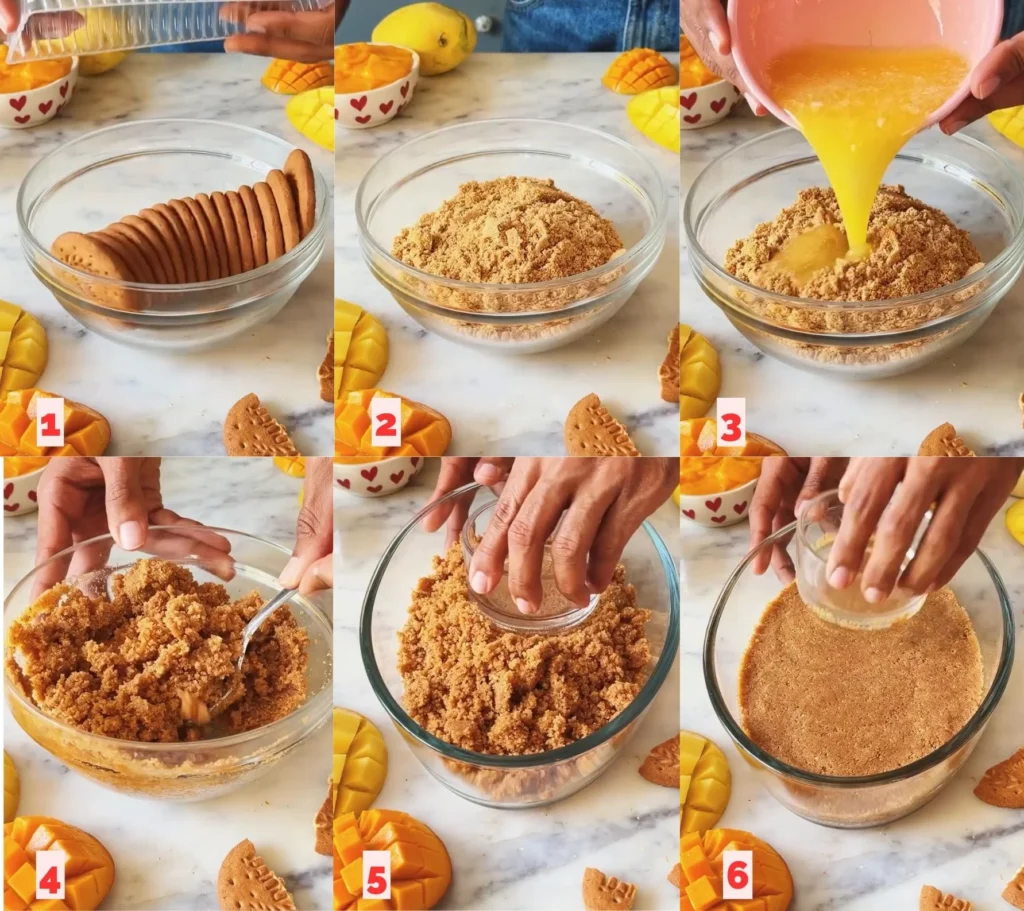
Transfer the crumbs to a bowl and pour in the melted butter. Mix thoroughly with a fork or your hands until all the crumbs are evenly moistened. The mixture should look like wet sand and hold together when squeezed.
Press this mixture firmly into the bottom of your serving dish. An oval dish works beautifully for presentation, but a round springform pan or rectangular baking dish works equally well.
Use the bottom of a measuring cup or glass to pack the crumbs down firmly and evenly. Place in the refrigerator while you prepare the filling.
Preparing the Cheesecake Filling
Make sure your cream cheese is fully softened this is crucial for a smooth, lump free filling. If you forgot to take it out ahead of time, you can microwave it in 10 second bursts, but be careful not to melt it.
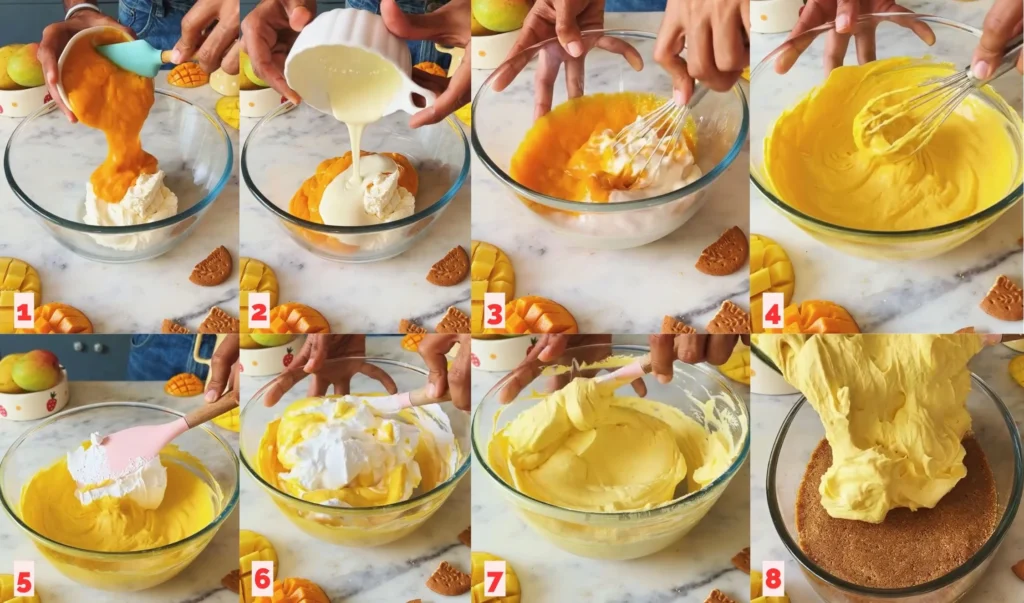
In a large mixing bowl, beat the softened cream cheese until it’s smooth and creamy. Add the mango puree and melted white chocolate (cooled to room temperature), and beat until everything is completely combined and the mixture is uniform in color.
In a separate bowl, whip your cold heavy cream to stiff peaks. This means when you lift the beaters, the cream holds its shape and doesn’t fall. Don’t overbeat, or you’ll end up with butter.
Gently fold the whipped cream into the cream cheese mixture using a large spatula. Use a folding motion rather than stirring this preserves the airiness of the whipped cream and keeps the filling light. Fold until no white streaks remain and the mixture is uniform.
Assembling the Cheesecake
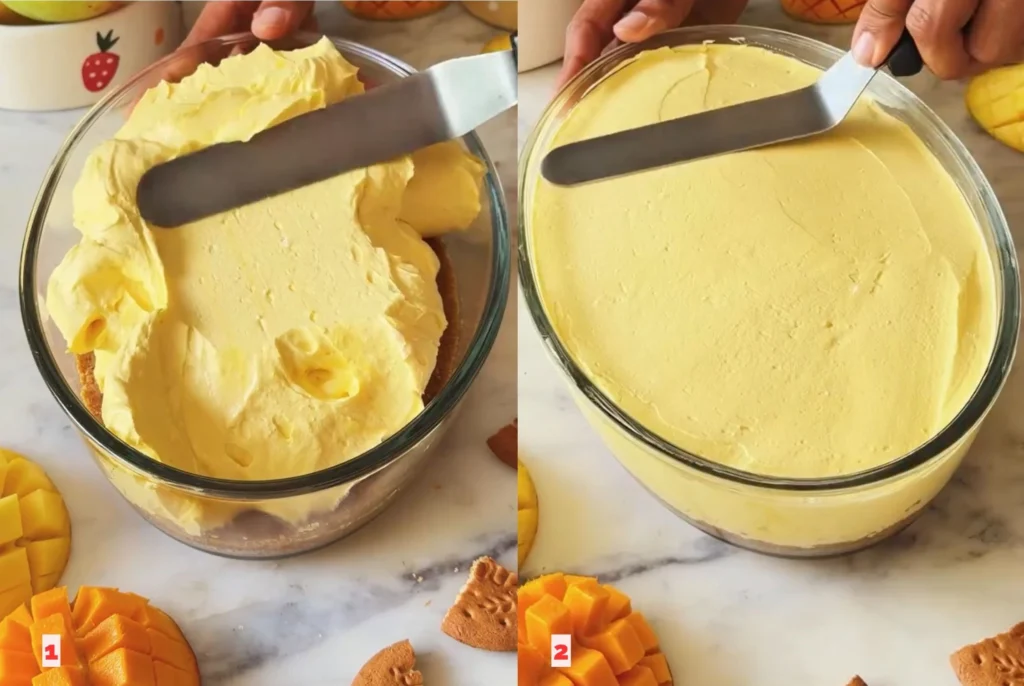
Pour the filling over your chilled biscuit crust. Use a spatula to spread it into an even layer, making sure to reach all the edges. Smooth the top as much as possible this will be covered later, but a smooth surface makes for a prettier final presentation.
Cover the dish with plastic wrap and refrigerate for at least 7-8 hours, or ideally overnight. This long chilling time is essential it allows the filling to set properly and the flavors to develop fully. Don’t try to rush this step.
Adding the Topping
Once your cheesecake is fully set, prepare your mango slices. Choose the ripest, most beautiful mangoes you have. Peel them and slice them as thinly as you can manage a sharp knife or mandoline works well for this.
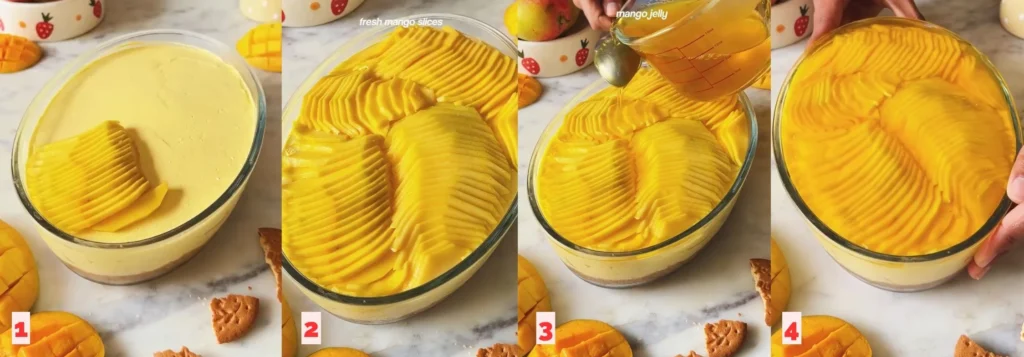
Arrange the mango slices on top of the set cheesecake in whatever pattern you like. You can create overlapping rows, a spiral pattern, or a random artistic arrangement. The choice is yours.
Prepare your mango jelly according to the package instructions. Let it cool to room temperature if it’s too hot, it will melt your cheesecake filling. Using the back of a spoon, gently pour the jelly over the arranged mango slices, working slowly to avoid disturbing them.
Return the cheesecake to the refrigerator and chill until the jelly is completely set usually 2-3 hours.
Tips for Perfect Results
Soften cream cheese completely. Cold cream cheese will create lumps that are nearly impossible to remove. Leave it at room temperature for at least an hour before starting.
Whip cream to stiff peaks. Under whipped cream won’t provide enough structure, and the filling may be too soft. Over-whipped cream will be grainy.
Don’t skip the long chill time. The cheesecake needs those 7-8 hours to set properly. If you serve it too early, it will be too soft and won’t slice cleanly.
Cool the jelly before pouring. Hot jelly will melt the cream cheese filling underneath. Room temperature or slightly warm jelly works best.
Use ripe mangoes. Underripe mangoes will be tart and fibrous. You want sweet, soft, fragrant fruit for the best flavor.
Serving Suggestions
This cheesecake is best served cold, straight from the refrigerator. Use a sharp knife dipped in hot water and wiped dry between cuts for the cleanest slices. The combination of the crunchy crust, creamy filling, fresh fruit, and glossy jelly creates a perfect bite every time.
Serve it as the finale to a special dinner, bring it to a potluck or party, or make it for a birthday celebration. It’s particularly popular during mango season when the fruit is at its peak, but you can make this year-round using frozen mango puree.
Absolutely. Thaw frozen mango chunks completely, then blend them into a smooth puree. Frozen mango often works better than fresh in the off-season because it’s picked at peak ripeness.
Stored covered in the refrigerator, it will stay fresh for 3-4 days. The jelly may start to weep slightly after the first day, but it will still taste delicious.
You can, but the white chocolate helps the filling set and adds a subtle richness. If you skip it, you might need to add a bit of gelatin to help the filling firm up properly.
Graham crackers are the perfect substitute and are much easier to find in U.S. grocery stores. You’ll need about 1½ cups of graham cracker crumbs.
Yes! This recipe works beautifully with strawberries, peaches, or mixed berries. Just substitute fruit puree for the mango puree and use matching fruit slices and jelly on top.
No, any dish works. A springform pan makes removing the cheesecake easier, but you can serve it directly from an oval dish, rectangular pan, or even individual serving glasses.
It would be challenging since cream cheese is the main ingredient. You could try using dairy-free cream cheese and coconut cream, but the texture and flavor will be quite different.
Make sure you whipped the cream to stiff peaks and gave the cheesecake enough time to chill. If it’s still too soft after 8 hours, it may need more time or your cream wasn’t whipped enough.
This Mango Cheesecake proves that impressive desserts don’t have to be complicated. With simple ingredients, basic techniques, and patience while it chills, you can create something truly special that will have everyone asking for the recipe.

Mango Cheesecake: The No Bake Summer Dessert That Tastes Like Tropical Paradise
Ingredients
- For the Biscuit Base
- 25 digestive biscuits or 1½ cups graham cracker crumbs
- ½ cup butter melted
- For the Cheesecake Filling
- 1½ cups cream cheese 345g, softened to room temperature
- 1 cup mango puree from fresh ripe mangoes
- ⅓ cup white chocolate melted and cooled
- 1½ cups whipped cream made from ¾ cup heavy whipping cream beaten to stiff peaks
- For the Garnish
- Fresh mango slices thinly sliced
- Mango jelly 1 packet, prepared according to package instructions
Instructions
- Step 1: Make the Biscuit Crust
- Grind digestive biscuits in food processor until fine crumbs
- Alternatively, crush in sealed plastic bag with rolling pin
- Transfer crumbs to mixing bowl
- Add melted butter and mix until mixture resembles wet sand
- Press mixture firmly into bottom of oval dish or springform pan
- Use bottom of glass to pack down evenly
- Place in refrigerator to set while preparing filling
- Step 2: Prepare Whipped Cream
- Chill mixing bowl and beaters in freezer for 10 minutes
- Pour ¾ cup cold heavy whipping cream into chilled bowl
- Beat on high speed until stiff peaks form
- When beaters are lifted, cream should hold its shape
- Set aside
- Step 3: Make Cheesecake Filling
- Beat softened cream cheese in large bowl until smooth and creamy
- Add mango puree and beat until combined
- Add melted, cooled white chocolate
- Mix until completely smooth and uniform in color
- Gently fold in whipped cream using spatula
- Use folding motion (not stirring) to preserve airiness
- Fold until no white streaks remain
- Step 4: Assemble Cheesecake
- Remove crust from refrigerator
- Pour filling over set biscuit crust
- Spread into even layer with spatula
- Smooth top surface
- Cover with plastic wrap
- Refrigerate for 7-8 hours or overnight
- Step 5: Prepare Mango Topping
- Once cheesecake is fully set, peel ripe mangoes
- Slice mangoes as thinly as possible
- Arrange slices decoratively on top of set cheesecake
- Create overlapping rows, spiral pattern, or artistic design
- Step 6: Add Jelly Layer
- Prepare mango jelly according to package instructions
- Let jelly cool to room temperature
- Using back of spoon, gently pour jelly over mango slices
- Work slowly to avoid disturbing arrangement
- Refrigerate until jelly sets completely (2-3 hours)
- Step 7: Serve
- Once jelly is set, cheesecake is ready to serve
- Dip sharp knife in hot water and wipe dry between cuts
- Cut into slices and serve cold
Equipment Needed
- Food processor or rolling pin and plastic bag
- Mixing bowls
- Electric mixer or whisk
- Spatula
- Oval dish, springform pan, or rectangular baking dish
- Plastic wrap
- Sharp knife
Tips for Success
- Soften cream cheese to room temperature (leave out 1 hour)
- Whip cream to stiff peaks (not under or over-whipped)
- Don’t skip 7-8 hour chill time for filling to set properly
- Cool jelly to room temperature before pouring
- Use ripe, sweet mangoes for best flavor
- Wipe knife clean between cuts for neat slices
Storage Instructions
- Store covered in refrigerator
- Keeps fresh for 3-4 days
- Jelly may weep slightly after first day
- Do not freeze (texture will be affected)
Ingredient Substitutions
- Digestive biscuits: Use graham crackers (1½ cups crumbs)
- Fresh mango: Use thawed frozen mango, blended smooth
- White chocolate: Can use good quality chips or chopped bar
- Heavy cream: Must be at least 35% fat for proper whipping
Variations
- Strawberry Cheesecake: Replace mango with strawberry puree and slices
- Mixed Berry: Use berry puree and top with mixed berries
- Peach: Substitute peach puree and fresh peach slices
- Chocolate Base: Use chocolate cookies instead of digestive biscuits
Serving Suggestions
- Serve chilled straight from refrigerator
- Perfect for summer gatherings and parties
- Great for birthday celebrations
- Ideal dessert for mango season
- Pairs well with cold beverages
Troubleshooting
- Filling too runny: Cream wasn’t whipped to stiff peaks or needs more chill time
- Lumpy filling: Cream cheese wasn’t fully softened before mixing
- Crumbly crust: Not enough butter or not pressed firmly enough
- Melted filling: Jelly was too hot when poured
- Jelly won’t set: Didn’t follow package instructions or refrigerator not cold enough
Make-Ahead Instructions
- Can be made 1-2 days in advance
- Keep covered in refrigerator until serving
- Add jelly layer on day of serving for best appearance
- Prepare crust day before if desired
Dietary Information
- Vegetarian: Yes (if using vegetarian gelatin)
- Gluten-Free: Use gluten-free biscuits/cookies for crust
- Contains: Dairy, eggs (in some biscuits)
- No-Bake: Yes, completely oven-free
- Eggless: Yes