When you’re craving something sweet, creamy, and absolutely stunning to look at, mini raspberry cheesecakes deliver on all fronts.
These individual sized treats combine the rich decadence of classic cheesecake with the bright, tangy burst of fresh raspberries, creating a dessert that’s both sophisticated and incredibly satisfying.
Best of all, they require no oven just a freezer and a little patience while the layers set to perfection.
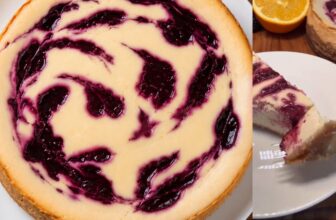
What makes these mini cheesecakes particularly special is their beautiful presentation. Each layer tells its own story: a crunchy biscuit base provides the foundation, followed by a silky vanilla cream cheese layer, then a vibrant raspberry swirled cream cheese middle, and finally topped with a glossy raspberry coating.
When you slice into one of these beauties, you’re rewarded with distinct, gorgeous layers that look like they came straight from a high end pastry shop.
Why You’ll Love This Recipe
These mini raspberry cheesecakes check all the boxes for an ideal dessert. They’re make ahead friendly, which means you can prepare them the day before your gathering and simply pull them from the freezer when it’s time to serve.
The individual portions mean no messy slicing and everyone gets their own perfectly portioned treat. Plus, the combination of sweet and tart flavors creates a balanced dessert that isn’t overly heavy or cloying.
The recipe also offers flexibility. While raspberries are the star here, you could easily adapt this technique to other berries or fruit combinations.
The cream cheese base is forgiving and works beautifully with whatever flavors you want to incorporate. However, there’s something particularly magical about raspberries with cream cheese the tartness of the berries cuts through the richness of the cheese, creating a harmony that’s hard to beat.
Ingredients You’ll Need
For the Biscuit Base:
- 75 grams (about 2.6 ounces) of your favorite cookies, crushed into fine crumbs
- 40 grams (about 3 tablespoons) melted butter
For the Cream Cheese Filling:
- 250 grams (about 8 ounces) cream cheese, softened to room temperature
- 60 grams (about ¼ cup) plain yogurt
- 60 grams (about 2 ounces) white chocolate, melted and slightly cooled
- 45 grams (about 3 tablespoons) sugar of your choice
- 1 teaspoon pure vanilla extract
- ⅛ teaspoon salt
- 70 grams (about ½ cup) fresh raspberries, mashed
For the Raspberry Topping:
- 50 grams (about ⅓ cup) fresh raspberries
- 1 tablespoon granulated sugar
- 1 tablespoon fresh lemon juice
- ⅛ teaspoon agar agar powder
For Decoration:
- Additional fresh raspberries
The ingredient list is straightforward and uses items you can find at any grocery store. The most unusual ingredient might be agar agar powder, which acts as a plant-based thickening agent for the raspberry topping. You can find it in health food stores or the baking aisle of well-stocked supermarkets.
Step by Step Instructions
Preparing the Biscuit Base
Start by selecting your favorite cookies for the base. Graham crackers are traditional and always reliable, but digestive biscuits, vanilla wafers, or even chocolate cookies work wonderfully.
Place them in a food processor and pulse until you have fine, uniform crumbs. Alternatively, place the cookies in a sealed plastic bag and crush them with a rolling pin this method is just as effective and requires less cleanup.
Transfer your cookie crumbs to a bowl and add the melted butter. Stir everything together until the crumbs are evenly moistened and resemble wet sand.
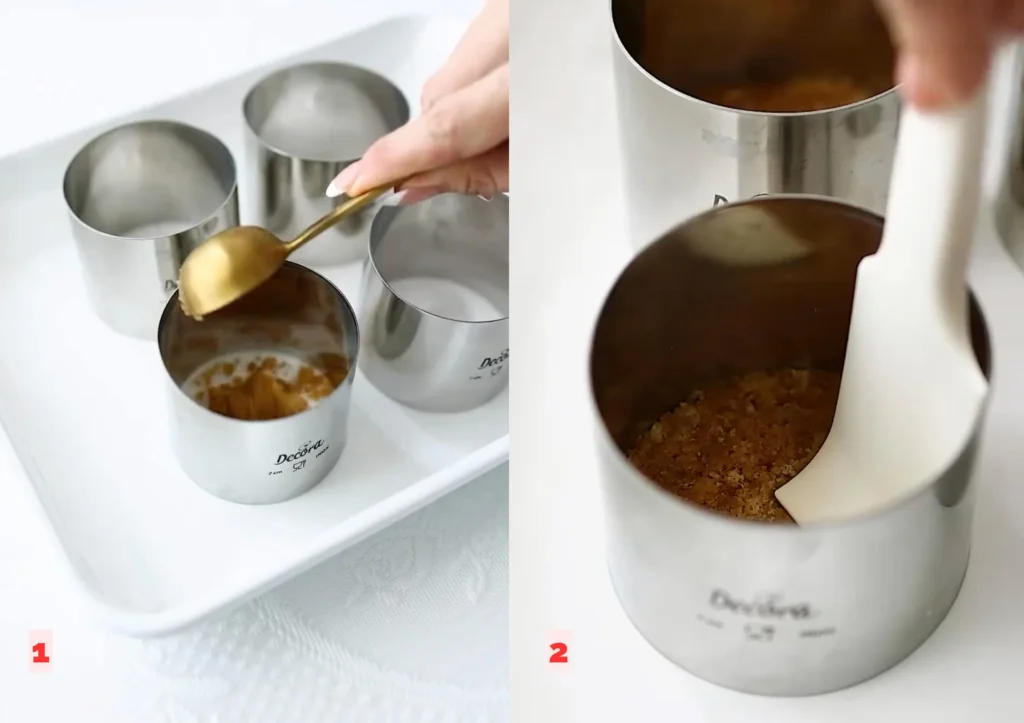
The mixture should hold together when you press it between your fingers. Divide this mixture evenly among your molds silicone muffin cups or small springform pans work perfectly for this recipe.
Press the mixture firmly into the bottom of each mold, using the back of a spoon or the bottom of a small glass to create an even, compact layer.
This step is important because a firmly packed base won’t crumble when you remove the cheesecakes from their molds.
Place the molds in the freezer while you prepare the filling. This initial freeze helps the base set and makes it easier to add the cream cheese layers without disturbing it.
Creating the Cream Cheese Filling
This is where the magic happens. Make sure your cream cheese is truly softened it should be at room temperature and yield easily when you press it with your finger.
Cold cream cheese will create lumps that are difficult to smooth out, so don’t skip this step. Place the cream cheese in a mixing bowl along with the sugar, vanilla extract, and salt.
Using an electric mixer on medium speed, beat these ingredients together until the mixture is perfectly smooth and creamy.
This usually takes about 2-3 minutes. Stop periodically to scrape down the sides and bottom of the bowl with a rubber spatula, making sure no pockets of unmixed cream cheese remain hiding at the bottom.
Once your base is smooth, add the melted white chocolate and yogurt. The white chocolate should be melted and cooled slightly if it’s too hot, it could cause the cream cheese to separate.
Beat everything together until the mixture is silky smooth with no lumps visible. The yogurt adds a subtle tang that balances the sweetness while also creating a lighter, more mousse like texture.
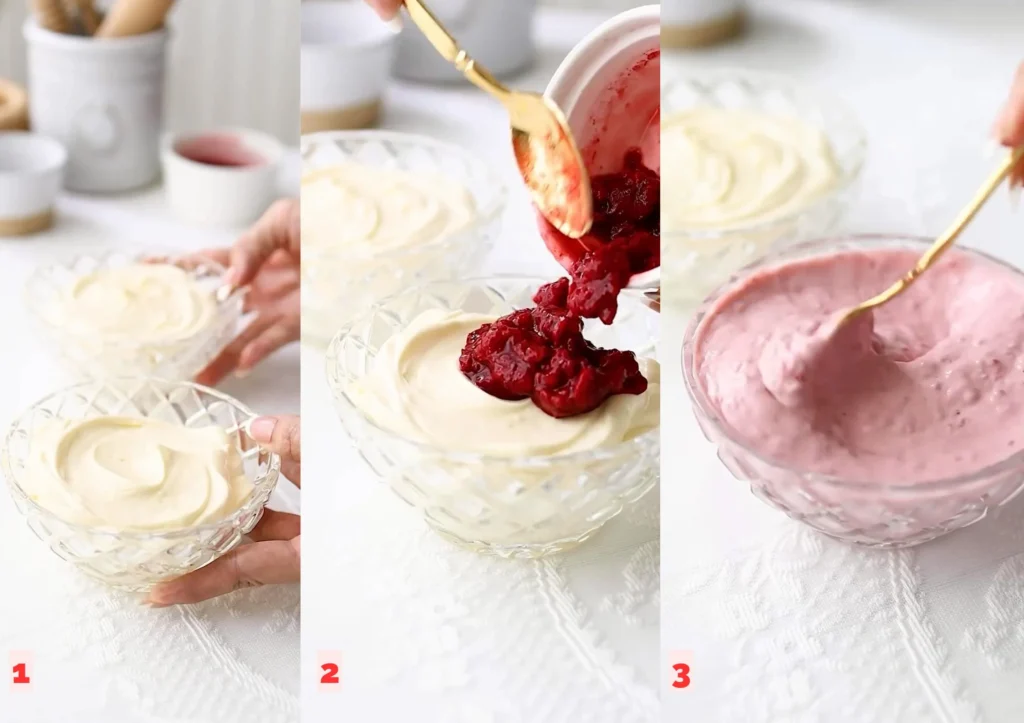
Now divide this mixture into two equal portions. In one portion, fold in your mashed raspberries, mixing until you have a beautiful pink hued filling.
The raspberries should be well mashed but you can leave a few small chunks for texture if you prefer.
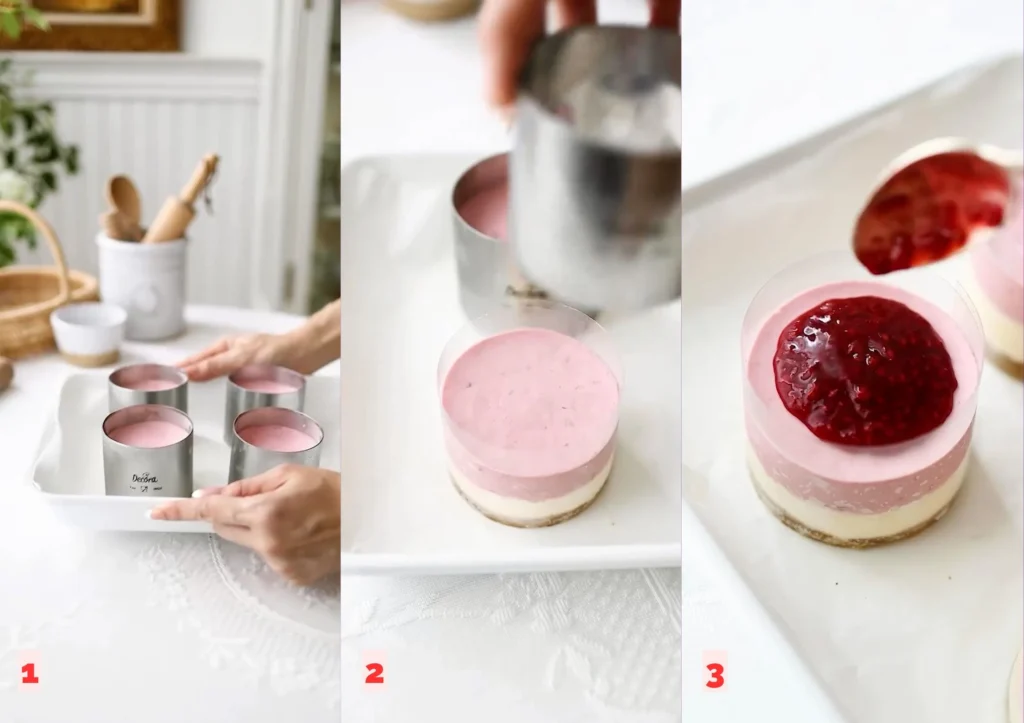
Assembling the Layers
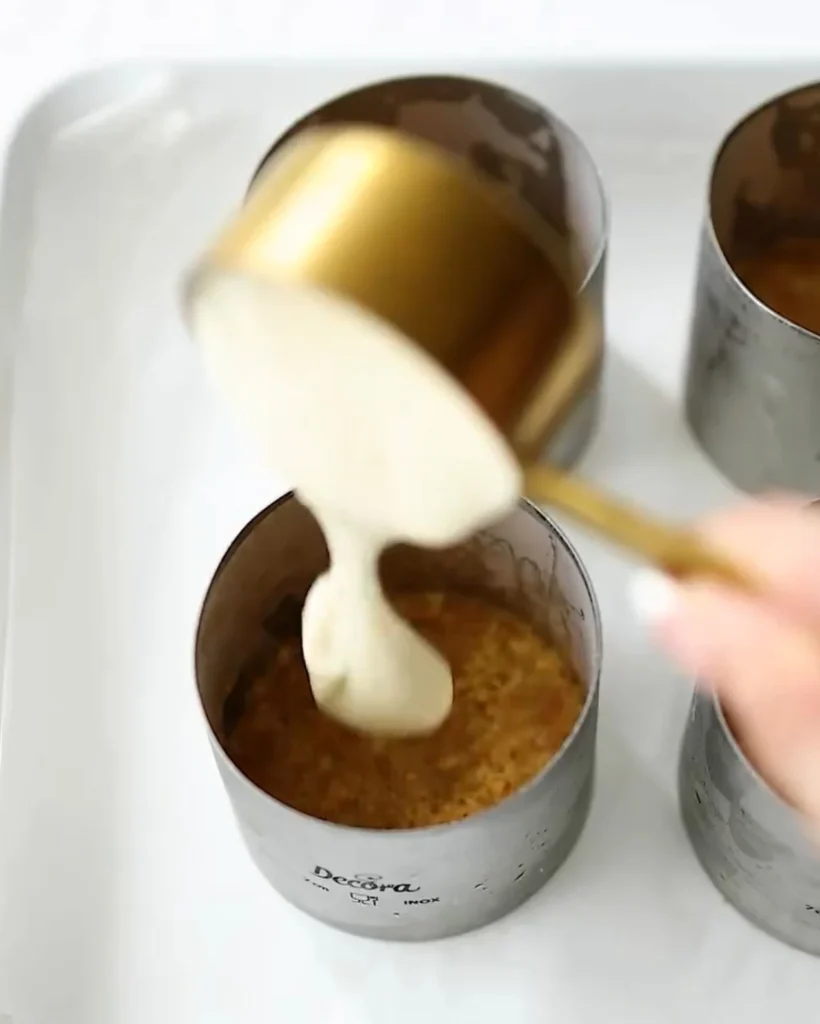
Remove your molds from the freezer. Divide the plain vanilla cream cheese mixture evenly among all the molds, spreading it carefully over the frozen biscuit base.
You want an even layer, so take your time to smooth it out. Return the molds to the freezer and let this layer set for at least 30 minutes.
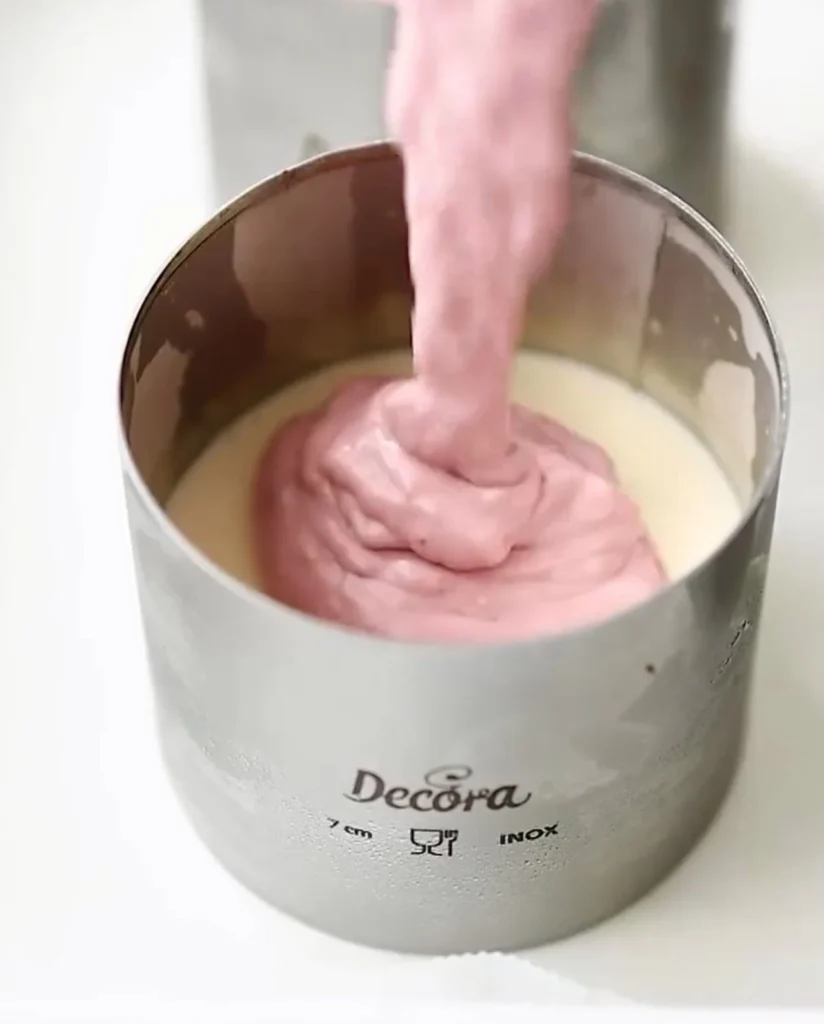
Once the vanilla layer is firm, it’s time to add the raspberry cream cheese mixture. Spread this pink layer over the set vanilla layer, again taking care to create an even surface. Return everything to the freezer for another 30 minutes to set firm.
Making the Raspberry Topping
While your cheesecakes are setting, prepare the glossy raspberry topping. Place the raspberries and sugar in a small saucepan over medium heat. As the mixture warms, use the back of a spoon or a potato masher to break down the raspberries. You want them completely broken down and juicy.
Add the agar agar powder and lemon juice to the raspberry mixture, whisking constantly. The agar agar needs to dissolve completely and be evenly distributed throughout the mixture.
Keep stirring as the mixture comes to a gentle simmer. Let it bubble gently for about 30 seconds this activates the agar agar and allows it to work its thickening magic.
Remove the pan from heat and allow the raspberry mixture to cool to room temperature. As it cools, it will begin to thicken. Don’t refrigerate it at this stage or it will set too quickly and become difficult to spread.
Final Assembly
Remove your cheesecakes from the freezer. The layers should be firm and set. Carefully spoon or pour the cooled raspberry topping over each cheesecake, spreading it gently to create an even layer across the top.
Return the cheesecakes to the freezer one final time, allowing the raspberry topping to set completely. This usually takes about 20-30 minutes.
When you’re ready to serve, remove the cheesecakes from the freezer about 10-15 minutes beforehand.
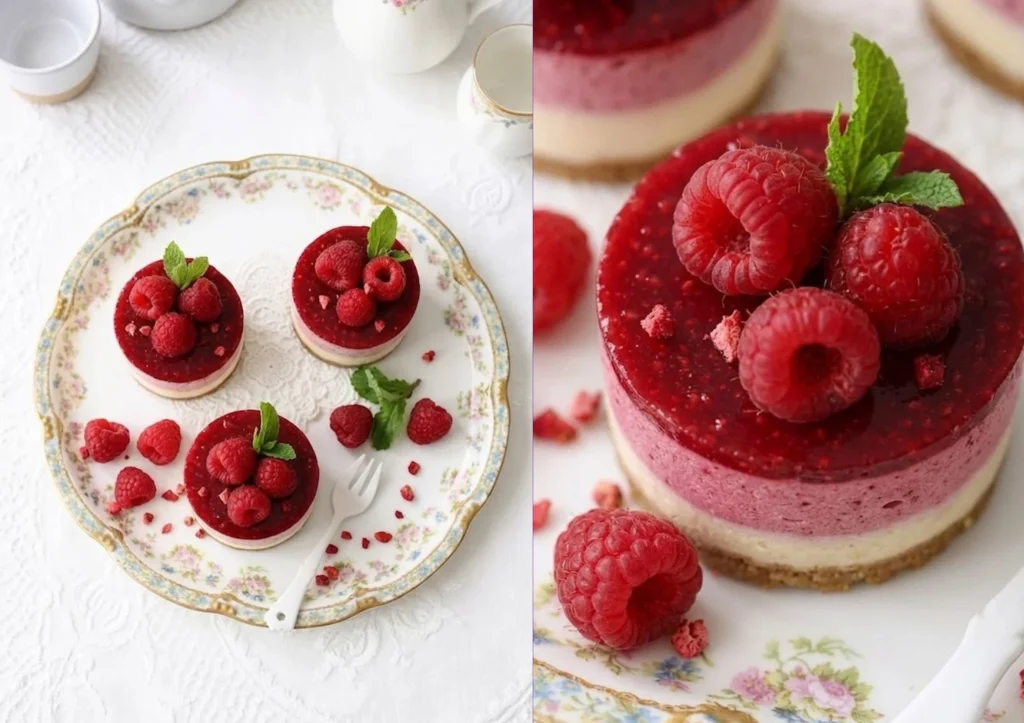
This allows them to soften just slightly, making them easier to remove from the molds and giving them a perfect, creamy texture when you bite into them. Top each cheesecake with a few fresh raspberries for a beautiful finishing touch.
Tips for Success
The success of this recipe hinges on a few key points. First, patience is crucial. Each layer needs adequate time to set in the freezer before you add the next one. If you rush this process, the layers will blend together instead of remaining distinct.
Temperature control is also important. Make sure your cream cheese is truly softened before you begin. Cold cream cheese creates lumps that are nearly impossible to smooth out. Similarly, your white chocolate should be melted and slightly cooled if it’s too hot, it can cause the cream cheese mixture to separate and become grainy.
When mashing your raspberries, you can leave them slightly chunky if you prefer more texture, or mash them completely smooth for a more uniform appearance. Both approaches work well, so choose based on your preference.
If you’re having trouble removing the cheesecakes from their molds, try running a thin knife around the edges or dipping the bottom of the mold briefly in warm water. The slight warmth will loosen the base without melting the cheesecake.

Mini Raspberry Cheesecakes The Perfect No-Bake Dessert for Every Occasion
Ingredients
- 75 grams favorite biscuits crushed
- 40 grams melted butter
- 250 grams cream cheese softened
- 60 grams yogurt
- 60 grams melted white chocolate
- 45 grams sugar of choice
- 1 teaspoons vanilla extract
- 0.1 teaspoons salt
- 70 grams raspberries mashed
- 50 grams raspberries topping
- 1 tablespoons sugar topping
- 1 tablespoons lemon juice
- 0.1 teaspoons agar agar powder
Instructions
- Make the base: Mix 75 grams favorite biscuits, crushed with 40 grams melted butter. Press firmly into the base of molds. Freeze to set.
- Make the filling: Beat 250 grams cream cheese, softened, 45 grams sugar of choice, 1 teaspoons vanilla extract, and 0.1 teaspoons salt on medium speed until smooth. Add 60 grams melted white chocolate and 60 grams yogurt, whisk until lump-free.
- Add raspberry layer: Divide filling in two. Mix 70 grams raspberries, mashed into one half. Spread raspberry filling over the crust. Freeze to set.
- Add plain layer: Spread the plain cream cheese filling on top. Return to freezer to set.
- Make raspberry topping: Heat 50 grams raspberries (topping) and 1 tablespoons sugar (topping) in a saucepan over medium heat, mashing as they warm. Add 0.1 teaspoons agar agar powder and 1 tablespoons lemon juice, whisk until dissolved. Simmer on low for 30 seconds
- , then allow to cool.
- Top & serve: Remove cheesecakes from freezer. Spoon raspberry topping over each. Freeze until set. Decorate with fresh raspberries and serve.
Notes
Prep time: 20 mins | Freeze/set time: ~1.5–2 hours | Servings: 6 mini cheesecakes. Keep stored in the freezer and thaw briefly before serving.
Absolutely! These mini cheesecakes are actually better when made ahead. You can prepare them up to three days in advance and keep them stored in the freezer. Just remember to let them sit at room temperature for 10-15 minutes before serving.
Agar agar is a plant-based thickener that works beautifully for the raspberry topping. If you can’t find it, you can use gelatin instead. Use about half a teaspoon of powdered gelatin bloomed in the lemon juice before adding it to the warm raspberry mixture.
Yes, frozen raspberries work well in this recipe. Make sure to thaw them completely and drain any excess liquid before using them. Frozen raspberries are often more affordable and available year-round, making them a practical choice.
Graham crackers are traditional, but any crisp cookie will work. Try vanilla wafers, digestive biscuits, or even chocolate cookies for a different flavor profile. Avoid soft cookies as they won’t create the right texture for the base.
These cheesecakes are best served slightly frozen or very cold. They can sit at room temperature for about 30 minutes before they start to soften too much. If you’re serving them at a party, keep them refrigerated until just before serving.
Definitely! This recipe works wonderfully with strawberries, blueberries, blackberries, or even a combination of berries. You could also try mango, passion fruit, or other fruits that pair well with cream cheese.
The key to distinct layers is making sure each layer is completely set before adding the next one. Don’t rush the freezing time between layers. Also, when adding a new layer, pour or spoon it gently over the previous layer rather than dropping it forcefully.
While the freezer method is recommended for the best results and quickest setting time, you could use refrigeration instead. However, you’ll need to allow much more time for each layer to set – probably 2-3 hours per layer in the refrigerator instead of 30 minutes in the freezer.
Final Thoughts
These mini raspberry cheesecakes are proof that impressive desserts don’t have to be complicated or require advanced baking skills.
With just a freezer and some simple ingredients, you can create stunning individual desserts that taste as incredible as they look.
Whether you’re hosting a dinner party, celebrating a special occasion, or simply treating yourself to something special, these little gems are sure to delight. The combination of creamy, tangy, sweet, and fruity creates a dessert experience that’s truly memorable.