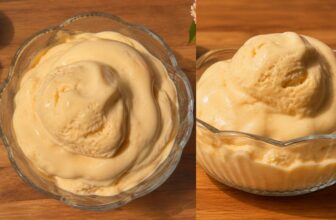
There’s something magical about the combination of delicate, crispy wafers and luxurious cream cheese frosting.
When you add the stunning visual appeal of red velvet to the mix, you get a dessert that’s not just delicious but absolutely show-stopping.
These Red Velvet Wafer Rolls are the perfect blend of elegance and indulgence, creating a treat that looks like it came straight from a high end bakery but is surprisingly achievable in your own kitchen.
Why Red Velvet Wafer Rolls Are Special
Red velvet has always held a special place in the world of desserts. Its distinctive deep red color, subtle cocoa flavor, and velvety texture make it instantly recognizable and universally beloved.
Transforming this classic flavor profile into delicate wafer rolls takes the concept to an entirely new level. These aren’t your ordinary store bought wafer cookies these are homemade gems that combine a crispy, slightly tangy wafer shell with a rich, creamy filling that melts in your mouth.
What makes these wafer rolls particularly special is their versatility. They’re elegant enough for holiday gatherings, festive enough for Christmas celebrations, yet simple enough to make for a weekend baking project.
The vibrant red color makes them perfect for Valentine’s Day, Christmas, or any celebration where you want to make a visual impact alongside delivering incredible taste.
The Science Behind the Perfect Wafer
The secret to achieving that perfect wafer texture lies in the careful balance of ingredients and technique. The addition of vinegar to warm milk creates a buttermilk like mixture that gives the wafers their characteristic slight tang, which beautifully complements the sweetness of the cream cheese frosting.
This reaction, where the milk begins to curdle when mixed with vinegar, is essential for developing the right flavor profile and texture.
The red food coloring isn’t just for aesthetics it’s what gives these wafers their signature red velvet appearance.
When combined with cocoa powder, it creates that distinctive red velvet flavor and color that makes these treats so visually striking. The small amount of cocoa powder provides a subtle chocolate undertone without overwhelming the delicate wafer, maintaining that perfect balance that red velvet is known for.
Ingredients You’ll Need
For the Wafer Rolls:
- ½ cup plus 2 tablespoons whole milk
- ¼ teaspoon white vinegar
- ½ teaspoon red food coloring
- ¼ cup unsalted butter
- ¼ cup granulated sugar
- ½ cup all-purpose flour
- 1 tablespoon unsweetened cocoa powder
For the Cream Cheese Frosting:
- ½ cup cream cheese, softened
- ¼ cup unsalted butter, softened
- ¼ cup granulated sugar
- ½ cup whipped cream (made from ¼ cup heavy whipping cream whipped to stiff peaks)
The beauty of this recipe is its simplicity. You likely have most of these ingredients in your pantry already, and none require specialty shopping.
The most important thing is ensuring your butter and cream cheese are properly softened for the frosting this makes all the difference in achieving that smooth, pipeable consistency.
Step by Step Instructions
Making the Wafer Batter:
Begin by warming your milk slightly it should be warm to the touch but not hot. Combine it with the vinegar in a bowl and whisk together.
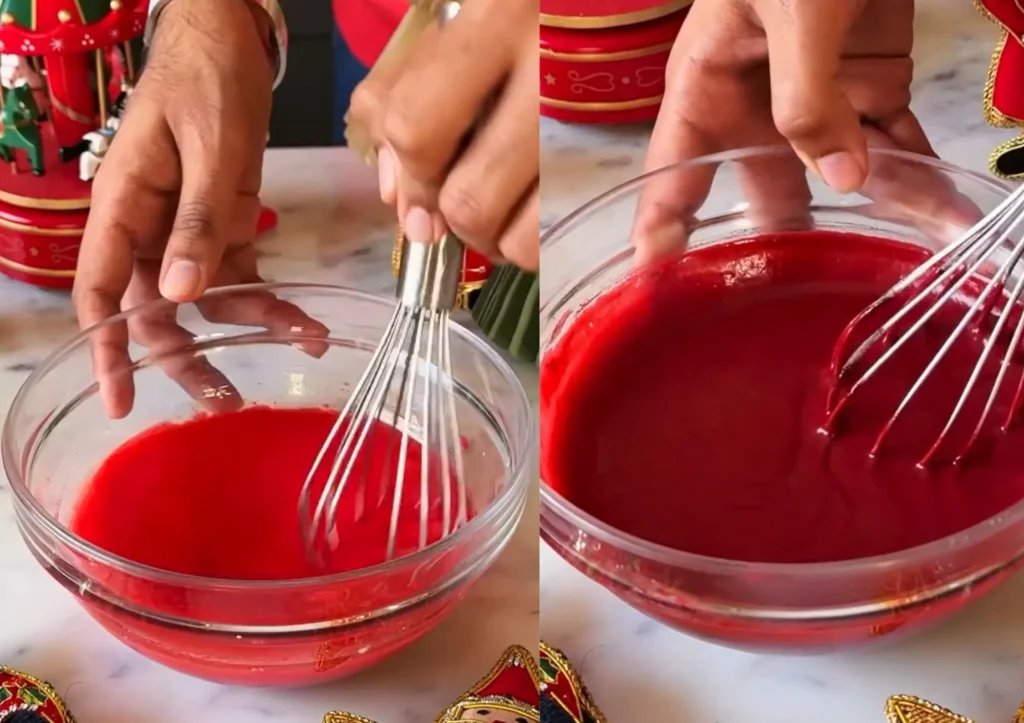
You’ll notice the milk starting to curdle within a minute or two. This is exactly what you want. Add the red food coloring and mix thoroughly using a whisk until the color is evenly distributed throughout the mixture.
Next, add your butter (melted and slightly cooled), sugar, flour, and cocoa powder to the colored milk mixture.
Whisk everything together until you achieve a completely smooth batter with no lumps. The consistency should be similar to thin pancake batter pourable but not too watery. If you notice any lumps, keep whisking or strain the batter through a fine mesh sieve.
Cooking the Wafers:
This is where the magic happens, but it also requires attention and practice. Heat your waffle cone maker over medium flame.
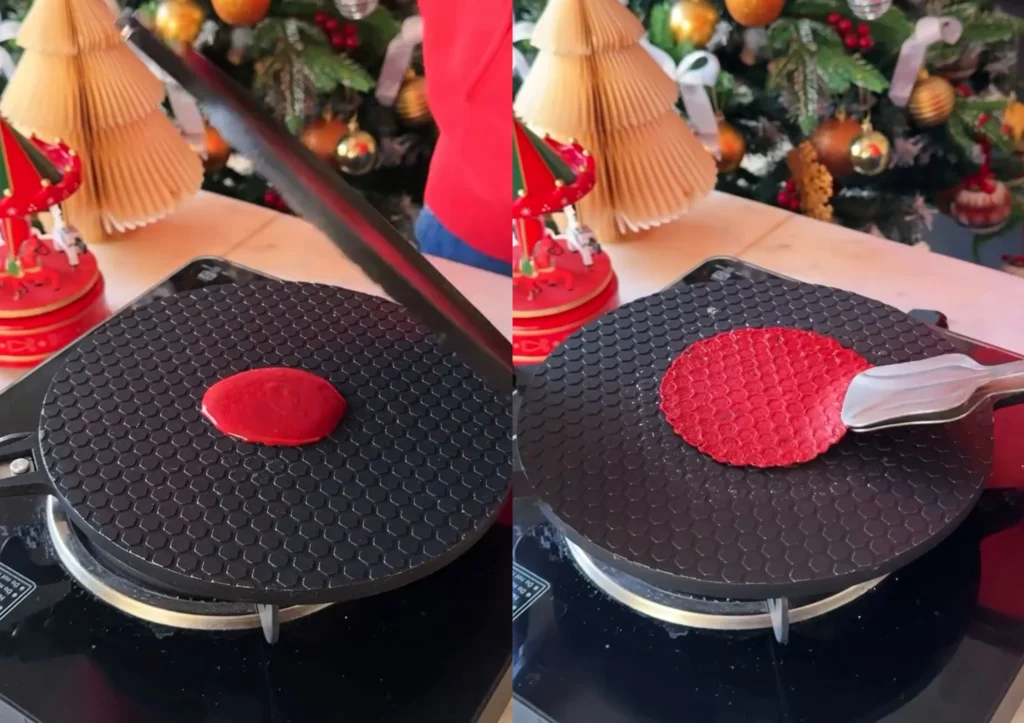
If you’re using an electric cone maker, preheat it according to the manufacturer’s instructions. The temperature is crucial too hot and your wafers will burn before cooking through; too cool and they’ll be tough instead of crispy.
Pour approximately one tablespoon of batter onto the center of the heated cone maker. Close the lid and let it cook for about 30-45 seconds, then flip the entire maker over to cook the other side for another 30-45 seconds.
The exact timing will depend on your specific cone maker and heat level, so watch the first few carefully to get a feel for the right timing.
Shaping the Rolls:
This step requires speed and caution. The wafers are extremely hot when they first come off the maker, but they also harden quickly as they cool. Using a spatula, carefully remove the wafer from the maker.
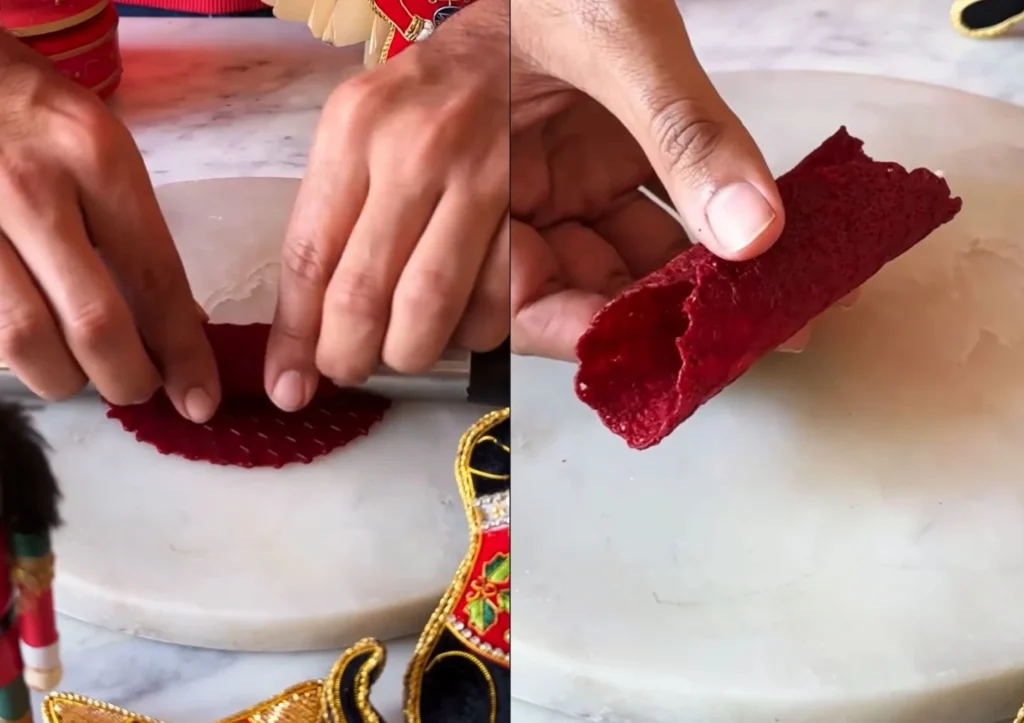
Immediately place it on a clean surface and use a cylindrical object a thick wooden spoon handle, a clean dowel, or a specialty wafer rolling stick to roll it into a tube shape.
Work quickly but carefully to avoid burning your fingers. Some bakers like to use clean kitchen towels or oven mitts to protect their hands while shaping.
Roll the wafer tightly around your chosen cylinder, hold it for a few seconds until it begins to set, then carefully slide it off. Let it cool completely on a wire rack. The wafer will continue to crisp up as it cools.
Making the Cream Cheese Frosting:
While your wafer rolls are cooling, prepare the frosting. In a mixing bowl, combine the softened butter and sugar.
Using an electric mixer or a whisk, beat them together vigorously until the mixture is light, fluffy, and completely smooth with no sugar granules remaining. This usually takes about 2-3 minutes with an electric mixer.
Add the softened cream cheese and continue mixing until everything is well combined and smooth. The mixture should be creamy and uniform in color.
Finally, gently fold in your whipped cream using a spatula. Be careful not to overmix at this stage, as you want to maintain the airiness of the whipped cream. The final frosting should be smooth, pipeable, and hold its shape.
Transfer the frosting to a piping bag fitted with your favorite tip. A star tip creates beautiful rosettes, while a round tip gives a cleaner, more minimalist look. Both work wonderfully.
Assembly:

Once your wafer rolls have cooled completely and crisped up, it’s time for the best part filling them. Insert the piping tip into one end of the wafer roll and gently squeeze the piping bag, filling the roll from one end.
You can fill them completely or leave the ends hollow it’s a matter of personal preference. Some people like to pipe frosting at both ends, creating a beautiful presentation with cream visible on each side.
Tips for Success
Temperature Control: The temperature of your waffle cone maker is critical. Too hot results in burnt wafers; too cool creates tough, chewy ones. Medium heat with careful monitoring is key.
Work Quickly: Wafers harden fast. Have your rolling tool ready and work swiftly to shape them while they’re still pliable.
Consistent Thickness: Try to spread or pour the same amount of batter for each wafer to ensure uniform cooking and size.
Proper Softening: Both the butter and cream cheese for the frosting must be at room temperature. Cold ingredients will result in lumpy frosting.
Storage: Unfilled wafer rolls can be stored in an airtight container for several days. However, once filled, they should be consumed within a few hours as the moisture from the frosting will soften the wafers.

Red Velvet Wafer Rolls: The Ultimate Festive Treat That Will Steal the Show
Ingredients
- For the Red Velvet Wafer Rolls:
- ½ cup plus 2 tablespoons whole milk warmed to room temperature
- ¼ teaspoon white vinegar
- ½ teaspoon red food coloring
- ¼ cup unsalted butter melted and cooled
- ¼ cup granulated white sugar
- ½ cup all-purpose flour
- 1 tablespoon unsweetened cocoa powder
- For the Cream Cheese Frosting:
- ½ cup full-fat cream cheese fully softened to room temperature Philadelphia recommended
- ¼ cup unsalted butter fully softened to room temperature
- ¼ cup granulated white sugar
- ½ cup whipped cream made by whipping ¼ cup heavy whipping cream to stiff peaks before folding in
- Equipment:
- Waffle cone maker available at Target, Walmart, Amazon, or kitchen specialty stores
- Thick cylindrical stick or wooden dowel for shaping rolls while warm
- Piping bag for filling finished rolls with frosting
- Hand mixer or stand mixer for frosting
Instructions
- Combine warm milk and white vinegar together in a mixing bowl and stir until milk begins to curdle slightly — allow to sit for 1 minute to develop.
- Add red food coloring to the curdled milk mixture and whisk until color is fully and evenly incorporated throughout.
- Add melted cooled butter, granulated sugar, all-purpose flour, and cocoa powder to the red milk mixture and whisk continuously until a completely smooth lump-free batter forms.
- Heat waffle cone maker on medium heat until fully preheated.
- Pour exactly 1 tablespoon of batter onto the center of the preheated waffle cone maker and close the lid firmly.
- Cook from both sides by flipping the cone maker — cook for approximately 1–2 minutes per side until wafer is set and lightly crisped.
- Open the cone maker carefully and remove the cooked wafer immediately while still hot and pliable.
- Quickly wrap the hot wafer around a thick cylindrical stick or wooden dowel and hold in shape for 20–30 seconds until it sets into a firm roll — work quickly as it hardens fast as it cools.
- Slide the shaped roll off the stick and set aside to cool completely — repeat with remaining batter until all rolls are made.
- Make the cream cheese frosting — in a mixing bowl add fully softened butter and granulated sugar and whisk vigorously until all sugar is fully combined and no lumps remain.
- Add fully softened cream cheese to the butter and sugar mixture and mix together until completely smooth and combined.
- In a separate chilled bowl whip the heavy whipping cream using a hand mixer on high speed until stiff peaks form.
- Gently fold the whipped cream into the cream cheese and butter mixture using a spatula — fold until just combined and no white streaks remain — do not over-mix or whipped cream will deflate.
- Transfer the completed cream cheese frosting into a piping bag fitted with a tip of your choice.
- Pipe cream cheese frosting generously into each cooled red velvet wafer roll filling from one end to the other.
- Serve immediately or refrigerate until ready to serve.
Notes
Warm milk to room temperature before adding vinegar — cold milk does not curdle properly and the batter will not develop the correct buttermilk-style acidity that gives red velvet its characteristic flavor.
Whisk batter until completely smooth and lump-free — any lumps in the batter create uneven texture in the finished wafer rolls.
Use exactly 1 tablespoon of batter per roll — too much batter produces a wafer that is too thick to roll and too little produces a fragile wafer that cracks during shaping.
Work extremely quickly when shaping the wafers — they harden within seconds of being removed from the waffle cone maker and cannot be reshaped once set.
Have the cylindrical shaping stick ready and within arm’s reach before opening the waffle cone maker for each roll.
If the wafer cracks while shaping the heat was too high or the wafer was left too long before shaping — reduce heat slightly and work faster.
Both butter and cream cheese must be fully softened to room temperature before making frosting — cold ingredients produce a lumpy frosting that does not pipe smoothly.
Fold whipped cream gently into frosting — vigorous stirring deflates the whipped cream and produces a dense heavy frosting rather than the light fluffy texture this recipe achieves.
Fill rolls just before serving for the crispiest wafer texture — filled rolls soften as the frosting moisture is absorbed over time.
Store unfilled wafer rolls in an airtight container at room temperature for up to 2 days.
Store prepared frosting in an airtight container in refrigerator for up to 3 days — re-whip briefly before piping if it has stiffened.
For a festive holiday presentation dust filled rolls lightly with powdered sugar or garnish with red sprinkles, crushed candy cane pieces, or a light dusting of cocoa powder.
Gel food coloring produces a more vivid intense red color than liquid food coloring and requires a smaller amount — adjust quantity if substituting.
While a waffle cone maker is ideal, you can use a pizzelle maker or even a thin crepe pan. The key is achieving very thin, pliable wafers that can be rolled while still warm.
Make sure your cone maker is properly heated and lightly greased if needed. The butter in the batter usually provides enough fat to prevent sticking, but a light spray of cooking oil can help.
Yes! Unfilled wafer rolls can be made a day or two in advance and stored in an airtight container at room temperature. Fill them just before serving to maintain crispness.
You’re likely using too much batter. Try reducing the amount to about one tablespoon or less, and make sure to spread it thin on the maker.
Absolutely! Beet powder or natural red food coloring can be used, though you may need more to achieve that vibrant red color.
This usually happens if the cream cheese or butter wasn’t cold enough, or if you overmixed after adding the whipped cream. Try refrigerating the mixture for 15-20 minutes to firm it up.
Unfilled wafer rolls can be frozen for up to a month in an airtight container. However, filled wafers don’t freeze well due to the cream cheese frosting.
Depending on the size of your cone maker and how thin you spread the batter, you should get approximately 12-15 wafer rolls from this recipe.
Final Thoughts
Red Velvet Wafer Rolls are more than just a dessert they’re an experience. The combination of crispy, delicate wafers with their subtle tang and cocoa notes, paired with the rich, creamy frosting, creates a perfect balance of textures and flavors.
Whether you’re making them for a special occasion or just to treat yourself, these wafer rolls are guaranteed to impress.
The process might seem intimidating at first, but with a little practice, you’ll be rolling out perfect wafers like a pro. So gather your ingredients, heat up that cone maker, and get ready to create something truly special!