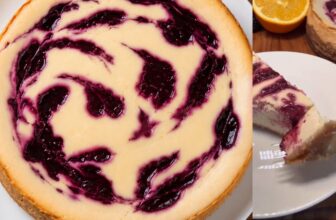
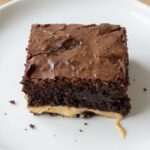
There are brownies. And then there are these brownies. The kind that come out of the oven looking deceptively simple dark, glossy, slightly crackled on top and then reveal, when you cut into them, a hidden layer of melted white chocolate running through the center like a ribbon of pure, sweet cream.
The kind that are so fudgy, so rich, and so deeply satisfying that you find yourself standing at the kitchen counter eating a second square before the first one has fully cooled.
These White Chocolate Brownies are built on a classic dark chocolate and butter base, whipped with eggs and sugar into a glossy, airy batter, and then assembled with a genius two layer technique that buries a full layer of white chocolate chunks in the middle of the brownie so that when they bake, those chunks melt completely into soft, creamy pockets of white chocolate that contrast beautifully against the deep, bittersweet dark chocolate surrounding them.
Every single bite has both chocolates in it. Every single bite is extraordinary.
This is not a complicated recipe. It is not a fussy recipe. But it is a recipe that will make everyone who tries these brownies ask you for it immediately and feel slightly amazed when you tell them how simple it actually is.
Why Two Chocolates Are Better Than One
The standard brownie is built entirely on dark or semi sweet chocolate. That’s a wonderful thing deep, intense, slightly bitter, rich.
But this recipe takes that classic foundation and introduces white chocolate as a contrasting element, and the result is something genuinely special that neither chocolate could achieve alone.
Dark chocolate especially when melted with butter creates the base of the batter. It gives the brownie its characteristic density, its deep color, its complex bittersweet backbone.
White chocolate, on the other hand, is sweeter, creamier, and almost milky in flavor. When white chocolate chunks are layered into the middle of the brownie batter and baked, they melt completely not into the batter itself, but into distinct pools and streaks of creamy sweetness that interrupt the dark chocolate fudginess in the most delightful way possible.
The contrast isn’t just flavor it’s textural too. The dark chocolate batter bakes into a dense, fudgy, slightly chewy brownie.
The melted white chocolate pockets within it are softer, creamier, and almost liquid in texture when the brownies are warm. Together, they create a brownie experience that is layered, complex, and completely addictive.
Ingredients
Here’s everything you need all straightforward, all available at any major grocery store in the U.S.:
For the brownie batter:
- 3 large eggs
- 1 cup granulated white sugar
- 6.3 oz good quality dark chocolate bar, roughly chopped (180 grams — Ghirardelli 60% or 72% cacao, Lindt Excellence, or Baker’s Unsweetened all work beautifully)
- 10.5 tablespoons unsalted butter (150 grams — approximately 1 stick plus 2.5 tablespoons)
- Scant 1 cup all-purpose flour (1 cup minus approximately 2 tablespoons — this is what “1 cup minus 1 finger” translates to in practical measuring terms)
- 1 teaspoon pure vanilla extract (or 1 packet vanilla sugar if available)
For the white chocolate layer:
- 4.2 oz good quality white chocolate bar, broken or chopped into chunks (120 grams — Ghirardelli White Chocolate, Lindt White, or Baker’s Premium White Chocolate work well)
A Note on Chocolate Quality
In a recipe this simple where chocolate is genuinely the star ingredient the quality of your chocolate matters more than in almost any other baked good.
Use a chocolate bar rather than chocolate chips for both the dark and white chocolate components. Chocolate bars contain more cocoa butter and less stabilizer than chips, which means they melt more smoothly, incorporate more evenly into the batter, and produce a richer, more complex final flavor.
For the dark chocolate, aim for 55% to 72% cacao content for the best balance of richness and sweetness. For the white chocolate, avoid anything labeled “white baking chips” or “white candy melts” these often contain little to no cocoa butter and will not melt or taste the same as real white chocolate.
Step by Step Instructions
Step 1 Preheat your oven
Preheat your oven to 340°F (170°C) and allow it to fully preheat before the brownies go in. Line an 8×8 inch or 9×9 inch square baking pan with parchment paper, leaving an overhang on two sides for easy lifting after baking.
Step 2 Melt the dark chocolate and butter together
Place the chopped dark chocolate and butter together in a heatproof bowl set over a saucepan of barely simmering water making sure the bottom of the bowl doesn’t touch the water.
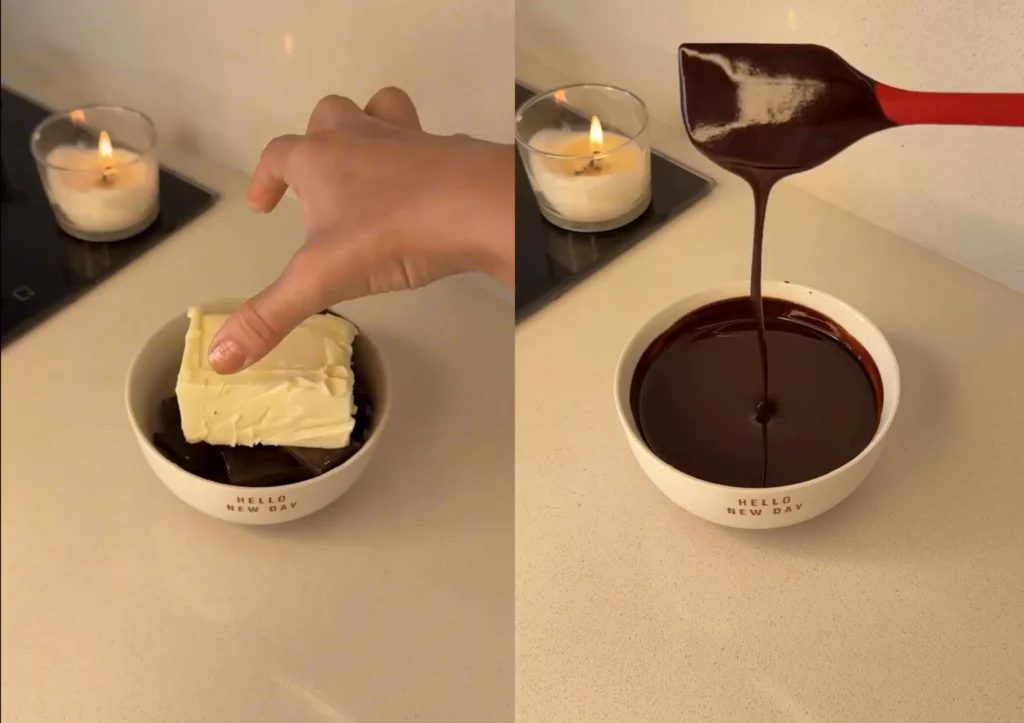
Stir gently and continuously until both are fully melted and combined into a smooth, glossy mixture. Alternatively, melt in a microwave in 30-second intervals, stirring between each, until smooth. Once melted, remove from heat and set aside to cool to room temperature.
This cooling step is critical adding hot chocolate directly to beaten eggs will scramble them.
Step 3 Beat the eggs and sugar thoroughly
In a large mixing bowl, combine the eggs and granulated sugar. Using a hand mixer or stand mixer, beat on medium high speed for 3 to 4 minutes until the mixture is pale, thick, and has significantly increased in volume.
The mixture should fall from the beaters in thick ribbons and hold its shape briefly before dissolving back in. This aeration step is what gives the brownies their characteristic slightly crackled, glossy top and their fudgy rather than cakey interior texture.
Step 4 Add the cooled chocolate mixture
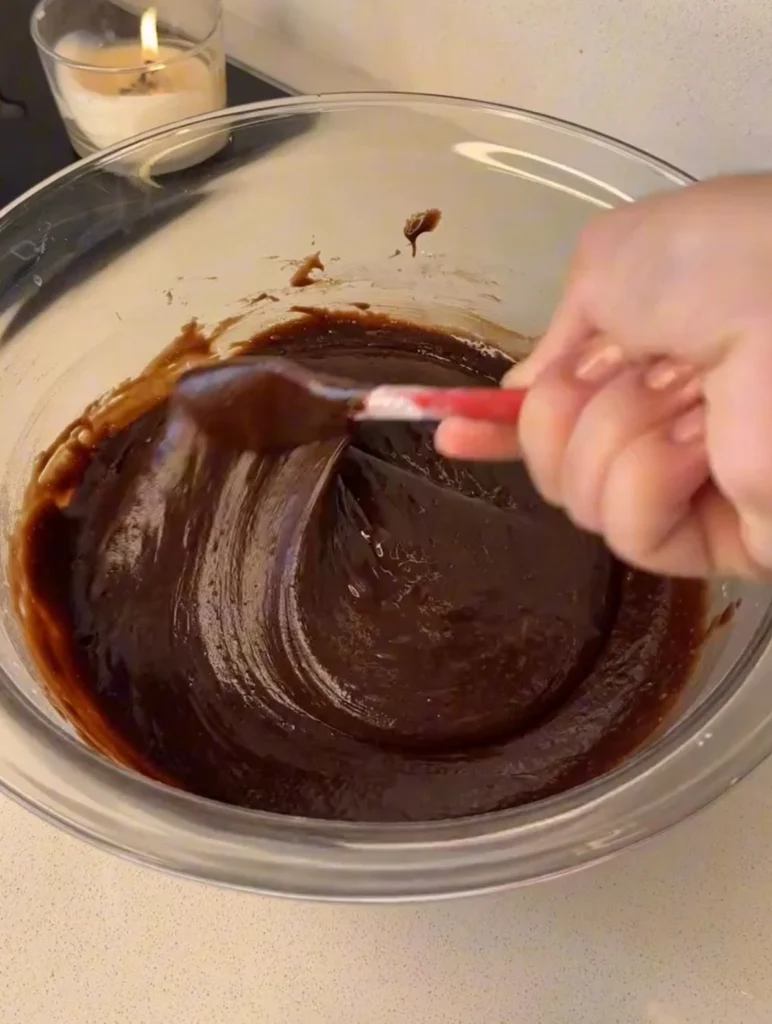
With the mixer on low speed or using a large spatula, gently fold the cooled dark chocolate and butter mixture into the beaten eggs and sugar.
The key word here is gently you want to combine them without deflating the air you just beat into the eggs. Use slow, deliberate folding motions rather than vigorous stirring. The batter should remain thick, glossy, and voluminous.
Step 5 Add the flour and vanilla
Sift the scant cup of flour directly into the chocolate batter. Add the vanilla extract. Fold again gently with a spatula until no dry flour streaks remain but stop folding the moment the flour is incorporated. Overmixing at this stage develops gluten and produces a tough, cakey brownie rather than a fudgy one.
Step 6 Layer the batter and white chocolate
Pour approximately half of the brownie batter into your prepared pan and spread it into an even layer. Break or roughly chop the white chocolate bar into pieces and arrange them in a single, even layer across the entire surface of the batter covering it as thoroughly as possible.
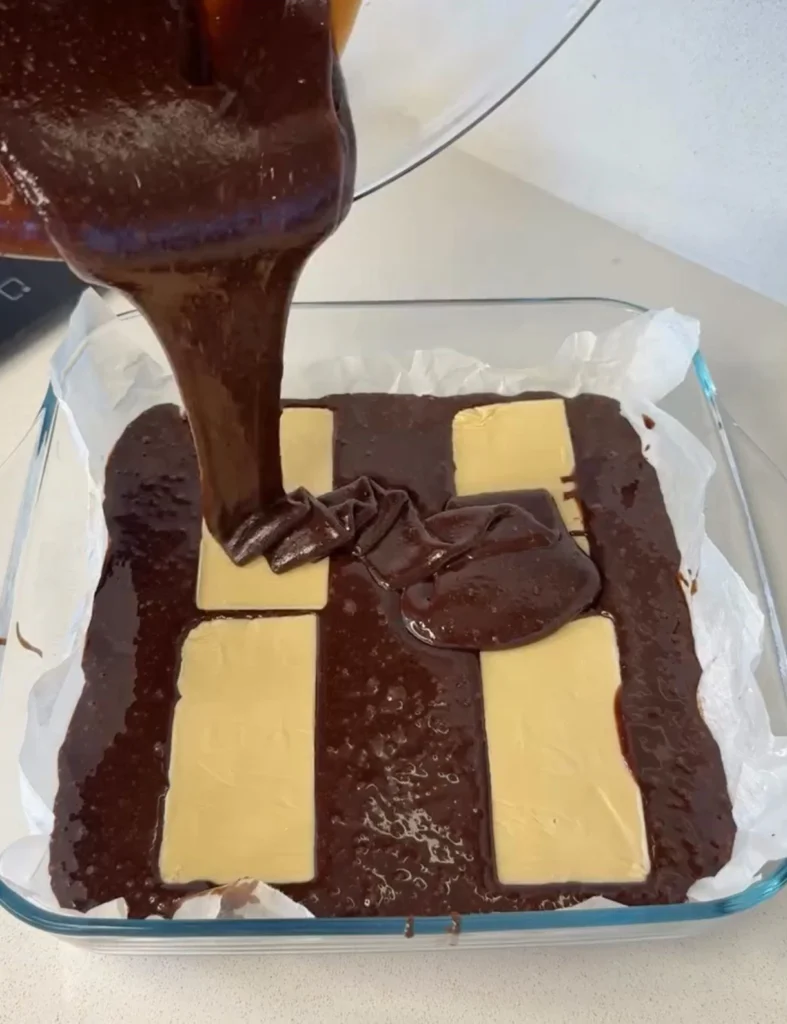
Pour the remaining half of the brownie batter over the white chocolate layer and spread carefully and evenly to cover all the white chocolate completely.
Step 7 Bake at 340°F for 25 to 30 minutes
Place the pan on the center rack of your preheated oven and bake for 25 to 30 minutes. Begin checking at the 25-minute mark.
The brownies are done when the top is set and slightly crackled, the edges are firm and beginning to pull away from the sides of the pan, and a toothpick inserted into the center comes out with moist, fudgy crumbs not wet batter, but not clean either. A clean toothpick means overbaked brownies. Aim for moist crumbs.
Step 8 Cool completely before cutting
Remove from the oven and allow the brownies to cool completely in the pan at least 45 minutes to 1 hour. This cooling time is essential for the white chocolate layer inside to re set from fully melted back to a soft, creamy consistency, and for the brownie itself to firm up enough to cut into clean squares.
Cutting warm brownies results in messy, falling-apart squares. Patience here is genuinely rewarded.
Step 9 Lift, slice, and serve
Use the parchment paper overhang to lift the entire brownie slab out of the pan. Place on a cutting board and use a sharp knife to cut into squares wiping the blade clean between cuts for the neatest edges.
Serve at room temperature or slightly warmed for 10 seconds in the microwave for that melted white chocolate center experience at its absolute best.
Tips for Perfect White Chocolate Brownies Every Time
Cool the melted chocolate and butter mixture fully before adding to beaten eggs — even slightly warm chocolate can deflate or scramble the egg mixture.
Don’t rush the egg and sugar beating step — proper aeration is what creates the glossy crackled top that makes these brownies visually stunning.
Fold gently at every stage — deflating the batter produces a dense, flat brownie rather than the slightly lifted, crackled, fudgy result you’re aiming for.
Use real white chocolate bars, not white chocolate chips or candy melts — real white chocolate melts into genuine creamy pools while chips hold their shape and don’t integrate properly.
Don’t overbake — moist crumbs on the toothpick is the target, not a clean toothpick.
Always cool completely before cutting — the white chocolate layer inside needs time to set from fully molten back to its soft, creamy final texture.
For ultra-clean cuts, refrigerate the fully cooled brownie slab for 30 minutes before slicing and wipe the knife blade between each cut.
Serving Ideas
Serve these brownies at room temperature as a standalone dessert they need absolutely nothing added. For a more indulgent presentation, warm individual squares for 10 seconds in the microwave and serve alongside a scoop of vanilla bean ice cream the contrast of warm, fudgy brownie and cold ice cream against pools of re melted white chocolate is extraordinary.
Dust lightly with powdered sugar just before serving for a simple, elegant visual finish. These brownies also make exceptional gifts stack them in a parchment-lined box or tin and they travel and keep beautifully.
White Chocolate Brownie The Fudgy, Two-Chocolate Brownie Recipe That Ruins Every Other Brownie for You Forever
Ingredients
- For the Brownie Batter:
- 3 large eggs
- 1 cup granulated white sugar
- 6.3 oz good quality dark chocolate bar roughly chopped (180 grams — Ghirardelli 60% or 72% cacao, Lindt Excellence, or Baker’s recommended)
- 10.5 tablespoons unsalted butter 150 grams — approximately 1 stick plus 2.5 tablespoons
- Scant 1 cup all-purpose flour 1 cup minus approximately 2 tablespoons
- 1 teaspoon pure vanilla extract
- For the White Chocolate Layer:
- 4.2 oz good quality white chocolate bar broken or roughly chopped into chunks (120 grams — Ghirardelli White, Lindt White, or Baker’s Premium White Chocolate recommended)
Instructions
- Preheat oven to 340°F (170°C) and line an 8×8 or 9×9 inch square baking pan with parchment paper leaving an overhang on two sides for easy lifting.
- Melt chopped dark chocolate and butter together in a heatproof bowl over barely simmering water, stirring gently until completely smooth and glossy.
- Remove melted chocolate mixture from heat and set aside to cool fully to room temperature — do not skip this cooling step.
- In a large mixing bowl beat eggs and granulated sugar together on medium-high speed for 3–4 minutes until pale, thick, significantly increased in volume, and falling in thick ribbons from the beaters.
- With mixer on low or using a spatula gently fold the fully cooled chocolate and butter mixture into the beaten eggs — use slow deliberate folding motions to avoid deflating the batter.
- Sift scant 1 cup of flour directly into the chocolate batter, add vanilla extract, and fold gently until no dry flour streaks remain — stop folding immediately once flour is fully incorporated.
- Pour approximately half of the brownie batter into the prepared pan and spread into an even layer.
- Arrange white chocolate bar pieces in a single even layer across the entire surface of the batter covering it as thoroughly as possible.
- Pour remaining half of brownie batter over the white chocolate layer and spread carefully and evenly to cover all white chocolate completely.
- Bake on center rack at 340°F for 25–30 minutes — begin checking at 25 minutes.
- Brownies are done when top is set and slightly crackled, edges are firm and pulling from pan sides, and a toothpick inserted in center comes out with moist fudgy crumbs — not wet batter and not clean.
- Remove from oven and cool completely in the pan for 45–60 minutes before cutting — do not cut while warm.
- Use parchment overhang to lift brownie slab onto a cutting board, slice into squares with a sharp knife wiping blade clean between each cut, and serve.
Notes
Always cool melted chocolate and butter fully to room temperature before adding to beaten eggs — even slightly warm chocolate deflates or scrambles the egg mixture.
Do not rush the egg and sugar beating step — proper aeration creates the signature glossy crackled top.
Fold gently at every stage — aggressive stirring deflates the batter and produces flat dense brownies without the crackled top.
Use real white chocolate bars only — not white chocolate chips or candy melts which contain little cocoa butter and will not melt into proper creamy pockets.
Target moist fudgy crumbs on the toothpick — never a clean toothpick — to avoid overbaking.
Cool completely before cutting — white chocolate layer inside needs time to re-set from fully molten to soft creamy texture.
For ultra clean cuts refrigerate fully cooled brownie slab 30 minutes before slicing and wipe knife blade between every cut.
Store in an airtight container at room temperature for up to 4 days.
Freeze individual squares wrapped tightly in plastic wrap for up to 1 month — thaw at room temperature 20–30 minutes or warm briefly in microwave before serving.
For a 9×13 inch pan double all ingredients and begin checking for doneness at 22 minutes.
Optional additions: fold ½ cup roughly chopped walnuts, pecans, or macadamia nuts into batter after flour is incorporated — macadamia nuts pair especially well with the white chocolate layer.
This is correct and intentional. These are fudgy brownies not cakey ones and they are meant to come out of the oven with moist, fudgy crumbs on the toothpick rather than baking all the way through to a clean toothpick. They will continue to set as they cool. If you wait for a clean toothpick before pulling them from the oven, they will overbake and lose their fudgy texture entirely.
You can, though the result will be noticeably sweeter and less complex in flavor. The contrast between dark chocolate batter and white chocolate center is a big part of what makes this recipe special — milk chocolate narrows that contrast significantly. If using milk chocolate, consider reducing the granulated sugar by 2 tablespoons to balance the increased sweetness.
Absolutely. Roughly chopped walnuts, pecans, or macadamia nuts fold beautifully into the batter after the flour is incorporated. Add approximately ½ cup of chopped nuts and fold in gently with the final strokes before layering into the pan. Macadamia nuts pair especially well with the white chocolate layer.
Store in an airtight container at room temperature for up to 4 days. For longer storage, wrap individual squares tightly in plastic wrap and freeze for up to one month — thaw at room temperature for 20 to 30 minutes or warm briefly in the microwave for the best texture restoration.
Yes — double all ingredients and bake in a 9×13 inch pan. The brownie layer will be slightly thinner and may bake faster — begin checking at the 22-minute mark and watch closely from there.
This is a traditional home-baking measurement that refers to filling a measuring cup to approximately 2 tablespoons below the rim — resulting in a scant cup of flour. Using slightly less flour than a full cup keeps the brownies on the fudgy side of the texture spectrum rather than leaning cakey. In practical terms, fill your measuring cup and remove approximately 2 tablespoons before adding to the batter.
Yes — salted butter works fine and actually enhances the chocolate flavor slightly. If using salted butter, skip any additional salt you might otherwise consider adding to the recipe.