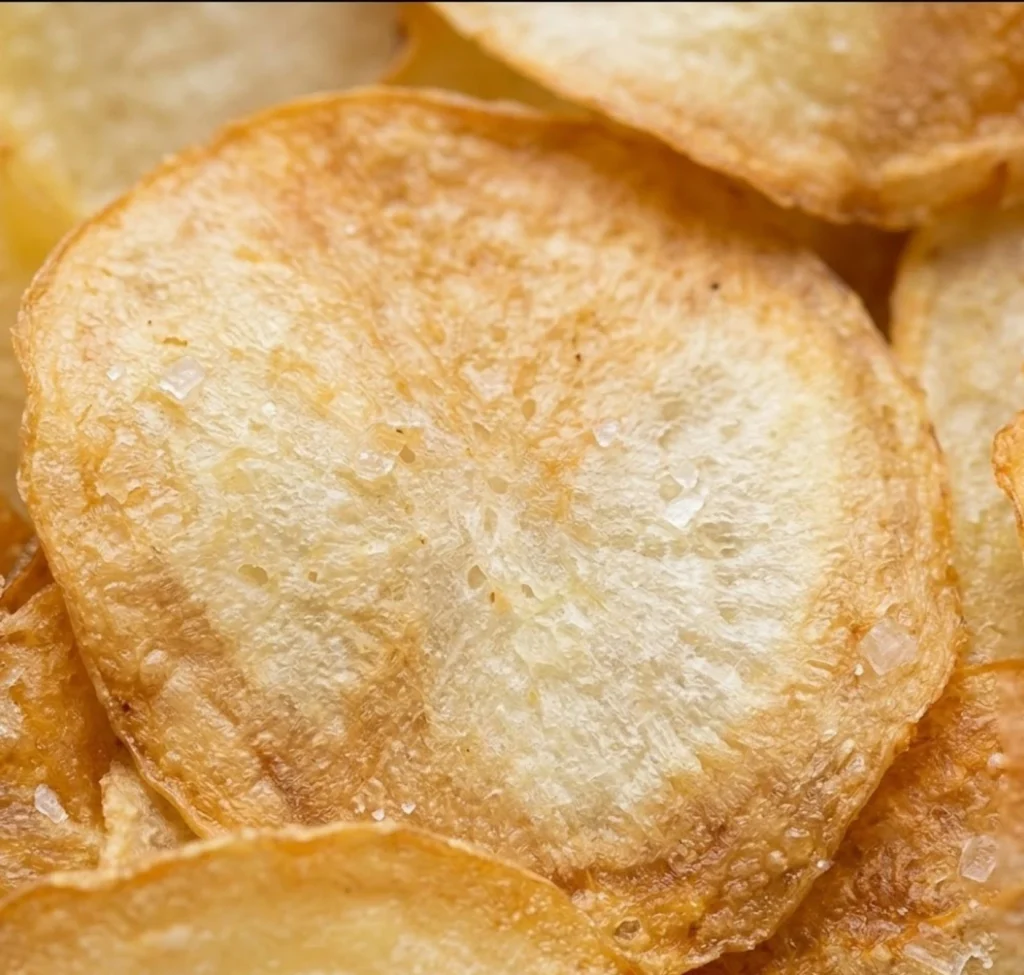
If someone told you that you could make light, crispy, golden potato chips with absolutely nothing but potatoes, you’d probably assume something was missing from the recipe.
No oil. No salt. No flour. No seasoning. Just one single ingredient sitting in your pantry right now potatoes. That’s the whole list. And yet, somehow, the result is a perfectly thin, crunchy, satisfying chip that will make you question every store bought bag you’ve ever opened.
This recipe is one of those rare finds that feels almost too good to be true, until you actually make it and pull that tray out of the oven.
Whether you’re eating clean, watching what goes into your food, managing dietary restrictions, or simply looking for a fun kitchen project with your kids, this is the snack recipe that earns a permanent spot in your rotation.
Why Just One Ingredient?
In an era of ingredient lists that require a dictionary and a specialty grocery run, there’s something deeply satisfying about a recipe that strips everything back to the absolute minimum.
No binding agents, no added fats, no preservatives just pure potato, transformed by heat and technique into something genuinely crispy and delicious.
The magic here lies in what happens to a potato when it’s cooked, pressed, and then slowly dried out in the oven. The natural starches in the potato act as the binder.
The moisture trapped inside the potato creates the structure. And the low, slow oven heat draws that moisture out gradually, leaving behind a chip that is golden, light, and satisfyingly crunchy without a single drop of oil.
It’s not a gimmick. It’s just really smart cooking.

Ingredient
- Potatoes — that’s it. Russet potatoes work beautifully for this recipe due to their high starch content, which helps the chips hold their shape and crisp up well. Yukon Gold potatoes are another excellent option if you prefer a slightly creamier, buttery flavor profile in your chip.
Step by Step Instructions
Step 1: Boil the Potatoes
Start by peeling your potatoes and boiling them until they are completely tender all the way through not just softened on the outside, but fully cooked and yielding when pierced with a fork.
This typically takes about 20 to 25 minutes depending on the size of your potatoes. You want them well done here, almost slightly overcooked, because the more moisture you can work out of them in the next step, the crispier your final chips will be.
Drain them thoroughly and let them sit for a few minutes to allow excess steam to escape.
Step 2: Press Through a Colander
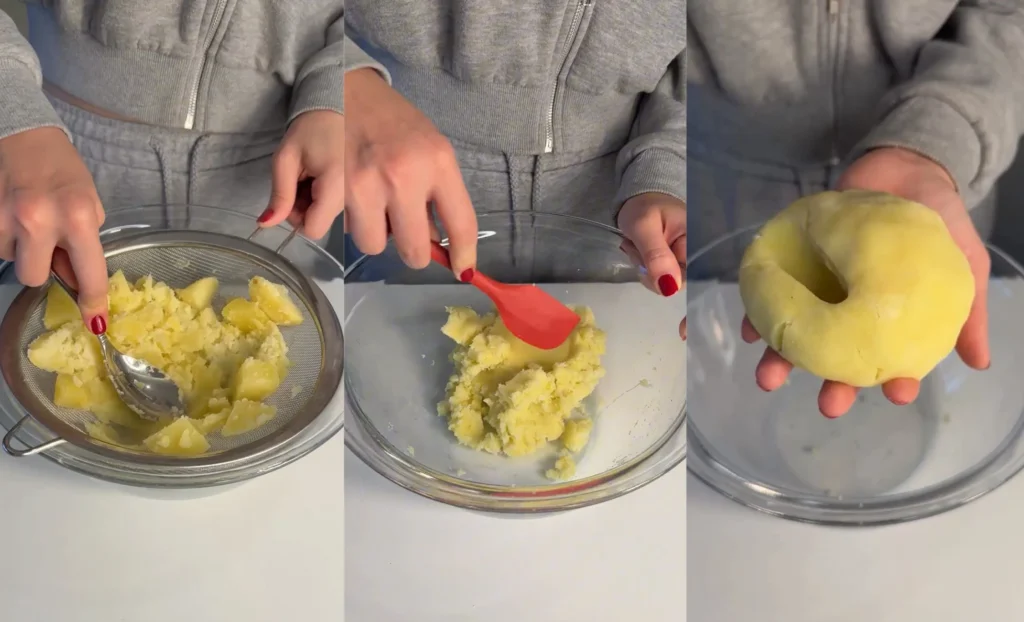
Here is where the magic begins. While the potatoes are still warm, press them through a fine mesh colander or a standard kitchen colander using the back of a large spoon or a spatula.
Push the potato flesh through the holes, working in batches if needed. What comes out the other side is a soft, smooth, almost dough-like potato mixture no lumps, no chunks, just a uniform, pliable paste. No additional ingredients are added at this stage. The potato is doing all the work entirely on its own.
Step 3: Transfer to a Piping Bag
Scoop the warm potato mixture into a piping bag. If you don’t have a piping bag on hand, a large zip-lock freezer bag with one corner snipped off works perfectly as a substitute. Make sure the mixture is smooth and free of any air pockets before you begin piping.
Step 4: Pipe onto a Lined Baking Sheet
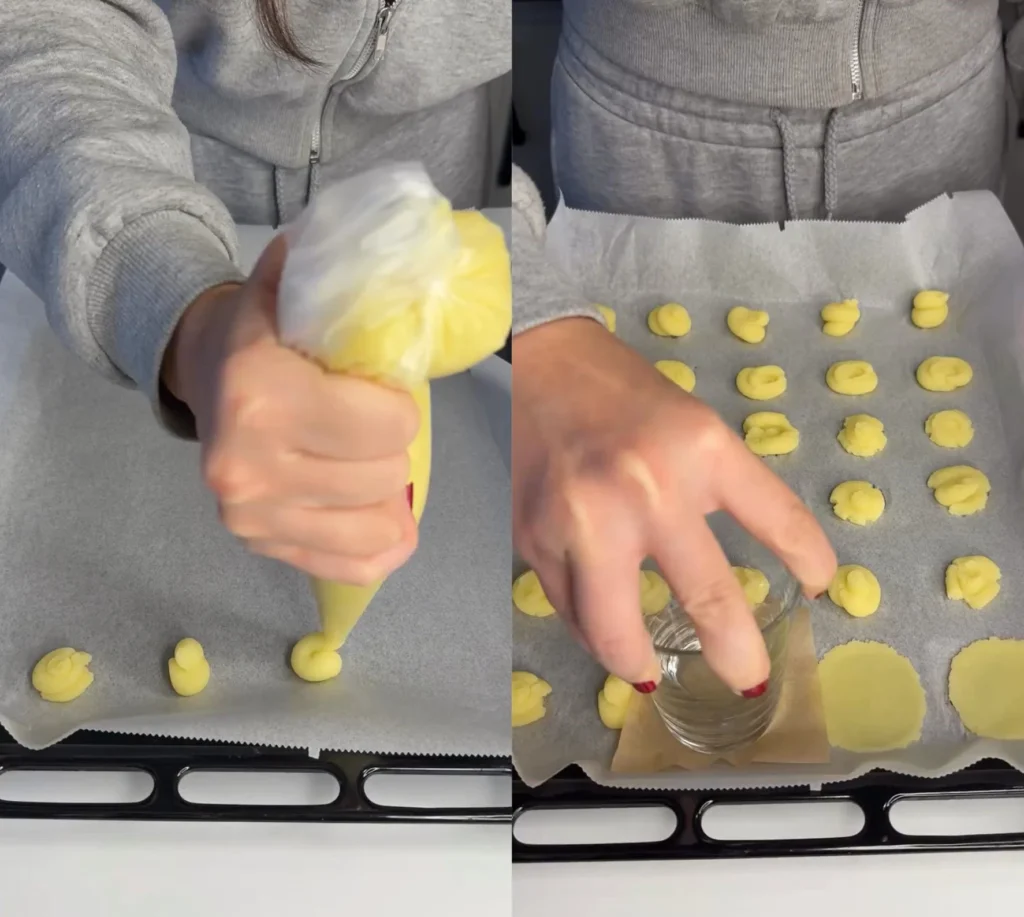
Line a large baking sheet with parchment paper. Pipe the potato mixture onto the parchment in your desired shapes small rounds or circles work particularly well for a classic chip look.
Pipe enough mixture to form a small mound, then use a flat bottomed glass and a small square of parchment paper placed on top to gently press each mound down into a thin, even round.
The thinner you press them, the crispier they will bake up. Aim for uniform thickness across all your chips so they bake evenly.
Step 5: Bake Low and Slow
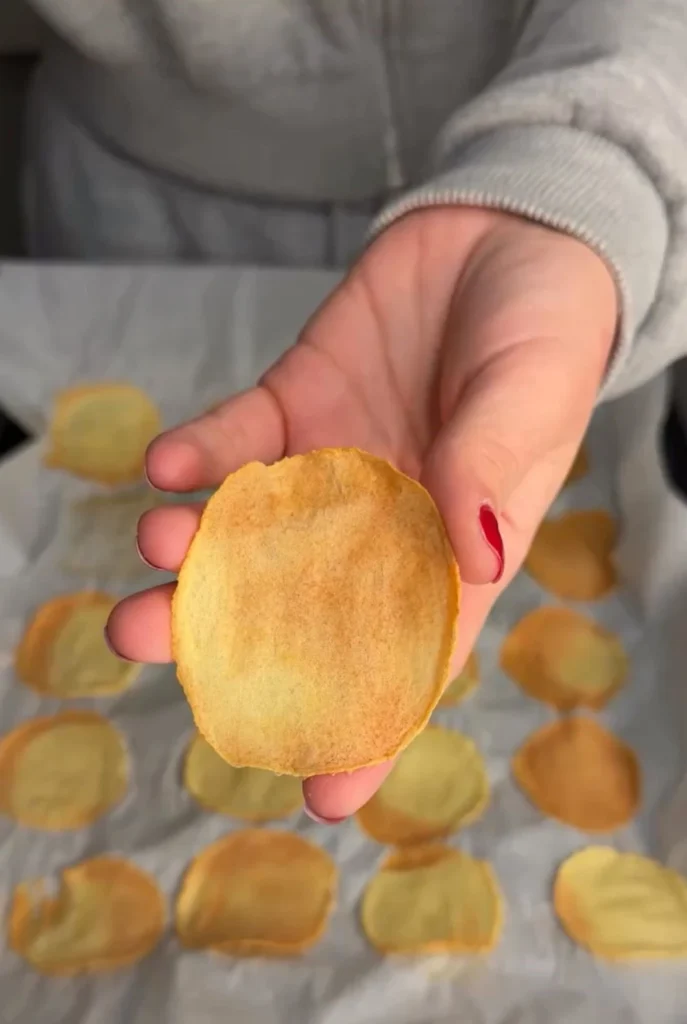
Place the baking sheet into a preheated oven set to 325°F, using both top and bottom heat if your oven supports that setting.
Bake for approximately 30 minutes, keeping a close eye on them toward the end. You are looking for the chips to turn a light, even golden color across the surface. They should look set and dry, with edges that are just starting to lift slightly from the parchment.
Step 6: The Secret to Extra Crispiness
Once the chips have turned golden, do not take them out of the oven. Instead, turn the oven completely off and leave the chips inside for an additional 10 to 15 minutes with the oven door closed.
This is the most important step in the entire recipe and the secret that separates a perfectly crispy chip from a soft, disappointing one.
The residual heat gently finishes drying out any remaining moisture in the chips without the risk of burning them, leaving you with an extraordinary crunch that holds up even as they cool. Remove from the oven after the resting time, let them cool on the pan for a few minutes, and enjoy.
Tips for Perfect Results Every Time
Use starchy potatoes rather than waxy varieties. Russets are the gold standard for this recipe because their high starch and lower moisture content gives you a crispier result with less effort. Waxy potatoes like red potatoes retain more moisture and may result in a chewier texture rather than a crisp chip.
Press the mixture as thin as possible when shaping your chips. The thickness of the pressed round directly determines how crispy the final chip will be thinner always means crispier.
Don’t skip the resting step. Turning off the oven and leaving the chips inside for that final 10 to 15 minutes is what takes these from good to genuinely great. It’s a passive step that requires zero effort and makes all the difference.
Let your chips cool completely before eating if you want maximum crunch they continue to crisp up slightly as they cool to room temperature.

1 Ingredient Potato Chips: The Simplest Snack You’ll Ever Make
Ingredients
- Potatoes — that’s it. Russet potatoes work beautifully for this recipe due to their high starch content which helps the chips hold their shape and crisp up well. Yukon Gold potatoes are another excellent option if you prefer a slightly creamier, buttery flavor profile in your chip.
Instructions
- Boil the Potatoes: Peel 3 pieces Russet potatoes (or Yukon Gold) and boil until completely tender all the way through — slightly overcooked is perfect. Drain well and let steam escape for a few minutes.
- Press Through Colander: While still warm, press the boiled potatoes through a fine-mesh colander or standard kitchen colander using the back of a spoon. Work until you get a smooth, lump-free, dough-like paste. Do not add any other ingredients.
- Fill the Piping Bag: Scoop the smooth potato mixture into a piping bag. No piping bag? A zip-lock freezer bag with one corner snipped off works perfectly.
- Pipe & Shape: Line a baking sheet with parchment paper. Pipe small mounds onto the sheet. Place a piece of parchment on top of each mound and press flat with a glass — as thin as possible for maximum crispiness.
- Bake at 325°F: Bake in a preheated oven at 325°F (160°C) using top and bottom heat for 30 minutes
- , until chips turn light golden and edges begin to lift from the parchment.
- The Crispy Secret — Rest in Oven: Once golden, turn the oven OFF. Leave chips inside with the door closed for 10–12m 30s
- . This step is essential — residual heat removes remaining moisture for an extraordinary crunch. Do not skip this!
- Cool & Serve: Remove from oven and let chips cool on the pan for a few minutes — they crisp up further as they cool. Serve as-is, or lightly dust with salt, garlic powder, or smoked paprika while still warm.
The recipe requires absolutely no added oil, salt, or any other ingredient to work. The chips are made entirely from potato. That said, if you’d like to season them, you can lightly dust them with salt, garlic powder, onion powder, or smoked paprika right after they come out of the oven and before they fully cool. The surface is slightly tacky when warm, so light seasonings will stick well.
Russet potatoes are the top recommendation for this recipe due to their high starch content and relatively low moisture. Yukon Golds also work well and produce a chip with a slightly richer flavor. Avoid waxy potato varieties like red potatoes or fingerlings, as their higher moisture content makes it harder to achieve a truly crispy result.
Absolutely. A potato ricer works even better than a colander for this step because it produces an exceptionally smooth, lump-free potato paste. Either tool gets the job done, but a ricer gives you slightly more control over the texture.
There are two likely culprits. First, the chips may have been pressed too thick before baking aim for the thinnest layer possible. Second, the resting step inside the turned-off oven may have been skipped or cut short. That residual drying time is critical for achieving the crunch. Also make sure your potatoes were fully drained and allowed to steam off excess moisture before pressing them through the colander.
Yes. These chips store well in an airtight container at room temperature for up to two days. To refresh their crunch if they soften slightly, pop them back into a 300°F oven for five to eight minutes and let them cool again before serving.
Because the recipe contains nothing but potato, these chips are naturally gluten-free, dairy-free, vegan, and oil-free. They are a great snacking option for people managing a wide range of dietary restrictions or simply looking to eat more whole, minimally processed foods.
Absolutely. You can pipe the mixture into strips, squares, or any shape you like. Thin strips bake up like rustic potato crackers, which are equally delicious and great for dipping.
Two to three medium-sized russet potatoes will yield a generous single tray of chips, which makes a solid snack for two to three people. Scale up the quantity freely depending on how many you are serving the method stays exactly the same regardless of batch size.
Notes
Prep Time: 10 minutes | Cook Time: 30 minutes | Rest Time: 10–15 minutes | Total: ~55 minutes
Best Potato Pick: Russet potatoes are ideal — high starch, low moisture = crispiest chips. Yukon Gold works too for a slightly richer flavor. Avoid waxy varieties like red potatoes.
Thinner = Crispier: Press each chip as flat as possible before baking. Thickness is the #1 factor in final crunch.
Storage: Keep in an airtight container at room temperature for up to 2 days. Re-crisp in a 300°F oven for 5–8 minutes if needed.
Diet-Friendly: Naturally gluten-free, dairy-free, vegan, and oil-free.