If you have a sweet tooth and an appreciation for the intricate world of Indian desserts, there is one dish that stands in a league of its own.
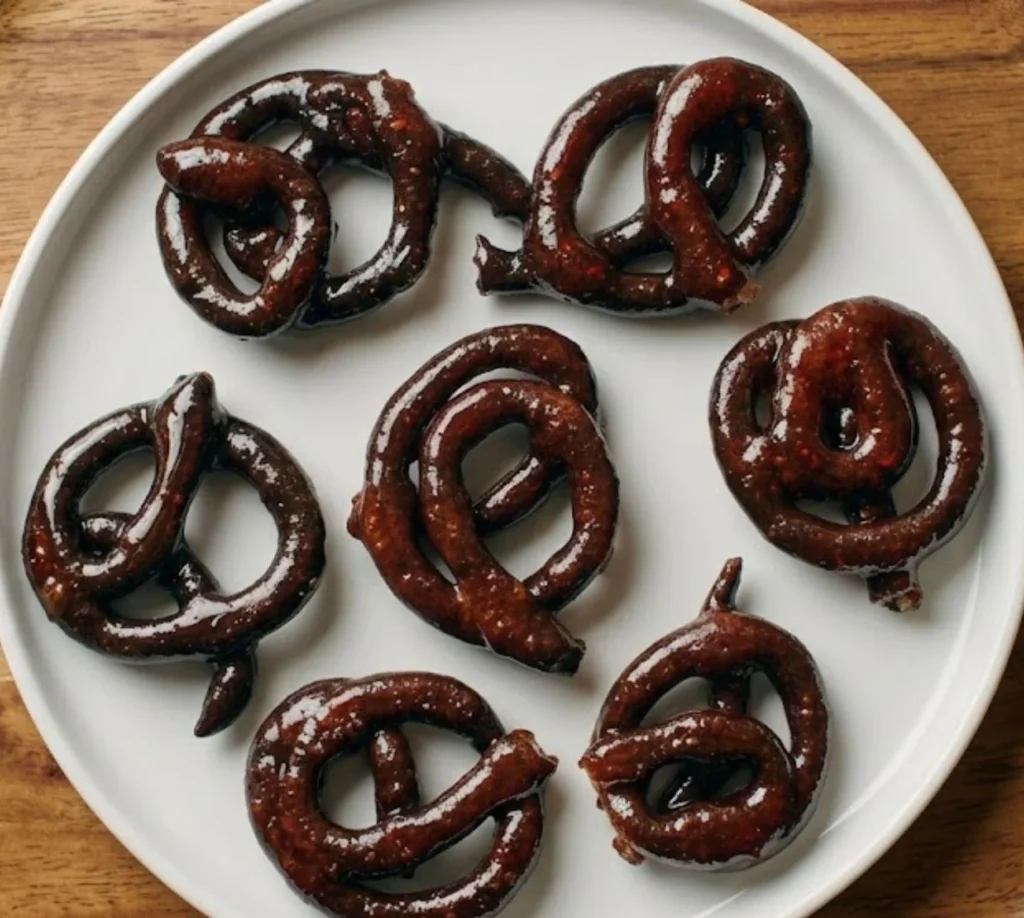
It’s not just a sweet; it’s a life changing culinary experience. We’re talking about Mawa Jalebi often referred to as the “Black Jalebi” due to its deep, caramelized hue.
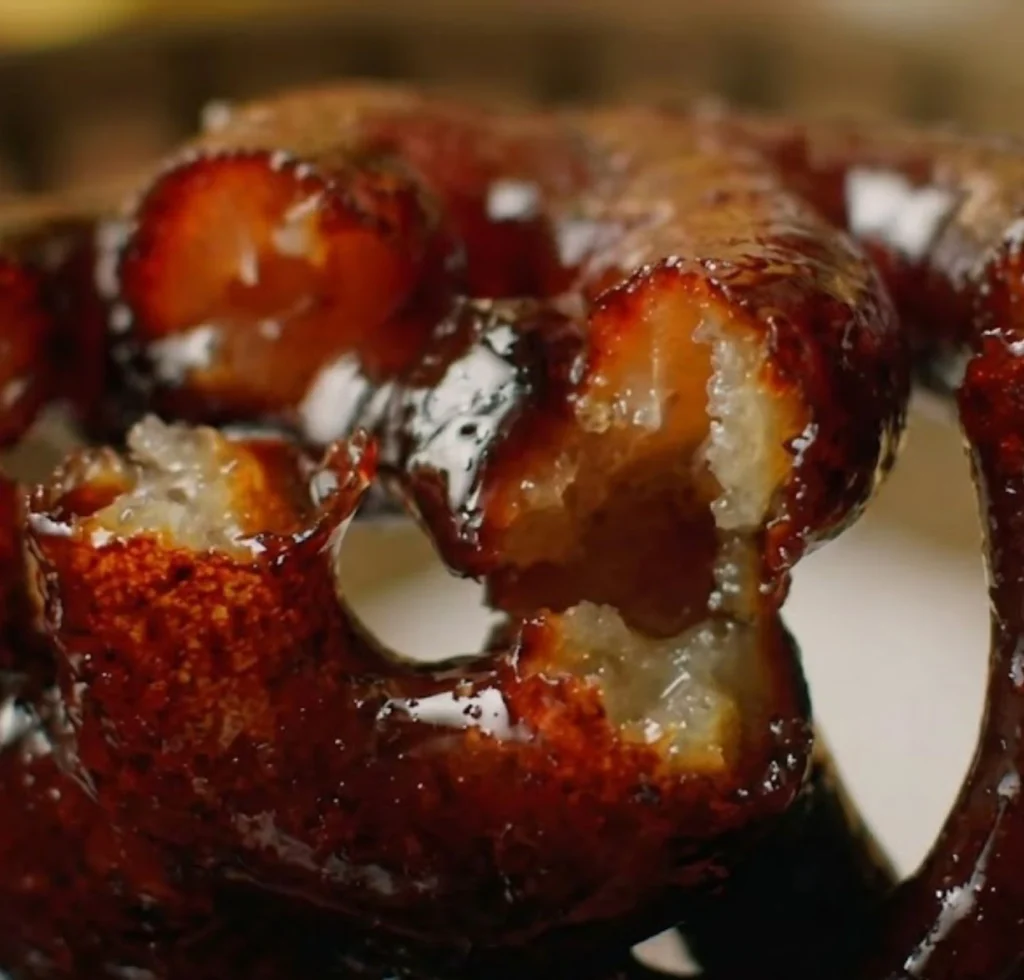
Imagine a dessert that is a cross between a traditional crispy Jalebi and a soft, juicy Gulab Jamun. It has a perfectly crisp exterior that gives way to a melt in your mouth, milk solid center. This regional specialty from Central India is so famous that people wait in long lines just for a single warm bite.
In this blog, we’re going to break down exactly how to recreate this masterpiece in your own kitchen. Whether you’re a seasoned pro or a curious beginner, this step by step guide will ensure your Mawa Jalebis turn out juicy, crispy, and absolutely unforgettable.
What Makes Mawa Jalebi Unique?
Unlike the regular bright orange jalebis made from fermented flour batter, Mawa Jalebi uses Mawa (Milk Solids) as its primary ingredient. This gives it a rich, creamy flavor profile.
Because milk solids caramelize much faster and more deeply than flour, these jalebis are fried to a dark chocolate brown color, earning them the nickname “Black Jalebi.”
Ingredients Breakdown
To make perfect Mawa Jalebi, you only need a handful of high quality ingredients. We’ve adjusted the names to help you find them in your local US grocery stores or Indian specialty markets.
1. For the Sugar Syrup
Granulated Sugar: 500 grams (approx. 2.5 cups)
Water: 250 ml (approx. 1 cup)
Lemon Juice: 1 teaspoon (this prevents the syrup from crystallizing)
- Note: Unlike other desserts, this syrup is kept simple without cardamom or saffron to let the mawa flavor shine.
2. For the Jalebi Batter
Mawa / Khoya (Milk Solids): 250 grams (approx. 9 oz). Look for “Full Cream/Buffalo Milk Mawa” for the best texture.
Whole Milk: 60 ml (approx. 1/4 cup). You may need a tablespoon more or less depending on the moisture in your mawa.
Cornstarch (Corn Flour): 50 grams (approx. 1/3 cup). This provides the binding and the crispy exterior.
3. For Frying
Ghee (Clarified Butter) or Neutral Oil: Enough to fill a flat bottomed pan to a 1 inch depth. Ghee provides the best traditional flavor.
Step By Step Master Method
Phase 1: Preparing the Simple Syrup
The syrup for Mawa Jalebi needs to be thin. If it’s too thick, the jalebis won’t soak it up and will remain dry inside.
In a pot, combine the sugar and water. Heat on high until the sugar is completely dissolved.
Once it reaches a boil, let it simmer for exactly one minute. We aren’t looking for “string” consistency here.
Stir in the lemon juice and remove from heat.
Transfer to a heat proof bowl and let it cool to room temperature (or slightly lukewarm).
Phase 2: Crafting the Mawa Batter
Soften the Mawa: Place the mawa in a stainless steel pan over very low heat. Use a spatula to break it down and press it until it becomes soft and pliable. Crucial Tip: Do not cook or brown the mawa at this stage; we just want to melt it.
Add Milk: Gradually add the milk in three batches. Whisk or stir until the mawa becomes a smooth, flowing paste. The exact amount of milk depends on your mawa’s moisture aim for a thick, “dropping” consistency.
The Binder: Turn off the heat. Add the cornstarch in three batches, mixing thoroughly after each addition to ensure there are no lumps.
The Secret Smoothness: Once mixed, pass the entire batter through a fine mesh sieve into a bowl. This removes any tiny lumps of mawa or starch and guarantees a professional, silky texture.
Rest: Let the batter rest for 10 minutes. This helps it set slightly, making it easier to pipe.
Phase 3: Piping and Frying
The Setup: Use a flat-bottomed non-stick frying pan. Fill it with about 1 inch of oil or ghee. Heat to exactly 311°F (155°C).
Pipe the Shapes: Transfer the batter to a piping bag with a 1 cm (approx. 0.4 inch) hole cut at the tip. Mawa jalebis are traditionally thicker than regular ones. Pipe in a spiral shape, starting from the center and moving outward.
Low and Slow: Fry on very low heat. Mawa browns quickly, so you must be patient to ensure the inside cooks through.
The Color: Fry until the bottom is a deep, dark brown. Flip carefully and fry the other side. The goal is a “Black Jamun” color dark but not burnt!
Phase 4: The Soak
Immediately lift the hot jalebis out of the oil and drop them into the lukewarm sugar syrup.
Press them down gently to ensure they are fully submerged.
The 10 Minute Rule: Unlike regular jalebis that are dipped for seconds, Mawa Jalebi needs to soak for 10 minutes. This allows the dense milk solids to fully absorb the syrup.
Remove and place on a wire rack or sieve to let the excess syrup drip away.
Pro Tips for Success
Temperature Control: If your oil is too hot, the jalebi will turn black on the outside but remain raw and doughy inside. Keep that flame low!
The Syrup Test: If your jalebis aren’t soaking up the syrup, your syrup is likely too thick. Add a tablespoon of warm water to the syrup to thin it out.
The Sieve Step: Never skip straining the batter. A single lump can clog your piping bag and ruin the shape of your jalebis.

Guide to Mawa Jalebi: The Decadent “Black Jalebi” of Central India
Ingredients
- The Jalebi Batter:
- 250 g Mawa / Khoya Full-fat Milk Solids
- 50 g Cornstarch Corn Flour
- 60 ml Whole Milk adjust slightly for consistency
- Ghee or Neutral Oil for deep frying
- The Simple Syrup Chashni:
- 500 g Granulated Sugar
- 250 ml Water
- 1 tsp Lemon juice
Instructions
- Prepare the Syrup: Combine sugar and water in a pot. Heat until dissolved, boil for exactly 1 minute, then add lemon juice. Transfer to a bowl and let it cool until lukewarm.
- Soften the Mawa: Place mawa in a pan over very low heat. Mash and press with a spatula until it melts into a soft, smooth paste. Do not brown it.
- Incorporate Milk: Gradually add milk in three batches, whisking constantly until you have a smooth, thick, flowing consistency.
- Bind with Starch: Turn off the heat. Fold in the cornstarch in three batches. Mix thoroughly until no white streaks remain.
- The Sieve Secret: Pass the warm batter through a fine-mesh sieve into a bowl. This ensures a silky, lump-free texture for perfect piping.
- Load Piping Bag: Let the batter rest for 10 minutes to set. Transfer to a piping bag with a 1cm (0.4 inch) round tip or nozzle.
- Set Up Frying: Heat 1 inch of oil/ghee in a flat-bottomed pan to 155°C (311°F). Maintain a low flame throughout the process.
- Shape the Jalebi: Pipe spirals starting from the center outward. Mawa jalebis should be slightly thicker than flour-based ones.
- Low & Slow Fry: Fry patiently on one side until it reaches a deep, dark chocolate-brown color. Flip and fry the other side briefly until even.
- The Long Soak: Immediately drop the hot jalebis into the lukewarm syrup. Press down to submerge and let them soak for 10 minutes to allow the dense centers to absorb the sugar.
- Drain and Serve: Remove from the syrup and place on a wire rack or sieve to drain excess liquid.
- Pro Tip: Serve warm with a dollop of unsweetened, thickened milk (Rabri) for the ultimate experience.
Absolutely! Most Indian grocery stores sell frozen or refrigerated Khoya. Just make sure to thaw it completely and follow the “melting” step in the pan to get the right consistency.
This usually happens if there isn’t enough cornstarch or if the batter is too thin. Ensure you measure the cornstarch accurately to provide the necessary binding.
Yes! Mawa Jalebis stay crispy on the outside and juicy on the inside for a long time. You can serve them warm or at room temperature. Many people actually prefer them cold the next day!
Since this recipe uses cornstarch (which is naturally gluten-free), it is a great option for those avoiding wheat. In some regional variations, Arrowroot powder (Tikhur) is used as a substitute for cornstarch, especially during fasting periods.