When you think of a classic South Indian breakfast, the first image that usually comes to mind is a plate of snowy white, fluffy Idlis.
But what if we told you that you could elevate this traditional staple into something even more nutritious, earthy, and strikingly unique?
Enter the Finger Millet Steamed Cakes (Ragi Idli). This isn’t just a healthy alternative; it’s a culinary masterpiece that brings the ancient goodness of millets to your modern breakfast table.
Made with a perfectly fermented batter of finger millet (ragi), parboiled rice, and lentils, these idlis are surprisingly soft, moist, and packed with a distinct nutty flavor.
Whether you’re a fitness enthusiast or simply someone looking to expand your breakfast repertoire, this guide will show you how to master the art of making super soft Ragi Idlis from scratch.
So let’s dive into the world of millets!
Why Choose Ragi (Finger Millet)?
In the world of superfoods, Ragi is a champion. It is naturally gluten free, rich in calcium, and has a low glycemic index, making it an excellent choice for sustained energy.
By fermenting the millet with lentils, we unlock even more nutrients and create that signature soft, spongy texture we all love in an idli.
Ingredients Breakdown
To get that perfect “melt-in-your-mouth” texture, the ratio of grains to lentils is key. Here is what you will need:
1. The Grains & Legumes
Finger Millet (Ragi Whole Grain): 1 cup. Look for whole ragi grains for the most authentic texture.
Parboiled Rice (Idli Rice): 1 cup. This is specifically processed to help with fluffiness. You can find “Idli Rice” at most Indian grocery stores, or use high-quality short-grain parboiled rice.
Split Skinless Black Gram (Urad Dal Gota): 1/2 cup. This provides the “body” and protein for the fermentation.
Fenugreek Seeds: 1/2 teaspoon. These are tiny but mighty they act as a natural fermentation catalyst.
2. The Texture Secrets
Flattened Rice (Poha/Rice Flakes): 1/4 cup. Adding soaked rice flakes is a pro-tip that ensures the idlis stay moist and soft even after they cool down.
Ice-Cold Water: For grinding. This prevents the blender blades from heating up the batter, which can “kill” the natural yeast needed for fermentation.
Sea Salt: To taste.
The Master Cooking Method
Making idli is a labor of love that requires patience, specifically for the fermentation process. Follow these steps for guaranteed success:
Phase 1: Washing and Soaking
Grains: In a large bowl, combine the Finger Millet and Parboiled Rice. Wash them under cold water 2-3 times until the water runs relatively clear.
Lentils: In a separate bowl, wash the Urad Dal and Fenugreek Seeds.
Soak: Fill both bowls with plenty of water and let them soak for 7 to 8 hours (or overnight). This softens the grains for a smooth grind.
Phase 2: Grinding the Batter
Prep the Rice Flakes: About 10 minutes before grinding, wash the Rice Flakes and let them soak in a little water.
Grind the Grains: Drain the water from the ragi and rice. Add them to a high power blender. Add just enough ice-cold water to cover the grains. Pulse and grind until you achieve a very fine, smooth paste. Pour this into a deep pot.
Grind the Lentils: Drain the urad dal and fenugreek. Add them to the blender along with the soaked rice flakes. Add a splash of ice-cold water and grind until the mixture is frothy, light, and completely smooth.
Combine: Pour the lentil paste into the pot with the ragi rice paste.
Phase 3: Aeration and Fermentation
Whisk: Use a whisk (or your clean hand!) to mix the two batters together for 2-3 minutes. This incorporates air, which is vital for a light idli.
The Wait: Cover the pot with a lid.
In Summer: Let it ferment in a warm corner for 8 hours.
In Winter/Colder Climates: Place it inside an oven (turned off) with the light on for 12 to 14 hours.
The Result: The batter should have risen significantly and smell slightly tangy and fermented. You’ll see tiny air bubbles throughout the mixture.
Phase 4: Steaming the Idlis
Season: Add salt to the fermented batter. Fold it in gently in one direction. Do not over-mix, or you’ll lose all that beautiful air!
Prep the Steamer: Add water to your steamer. Pro-tip: Add a squeeze of lemon juice to the water to prevent your pot from darkening. Let the steam build up.
Grease and Fill: Lightly grease your idli molds with a neutral oil. Fill each mold about 3/4 full with the batter.
Steam: Place the molds in the steamer. Cover and steam on medium-high heat for 12 to 15 minutes.
The Test: Insert a toothpick into the center of an idli. If it comes out clean, they are done!
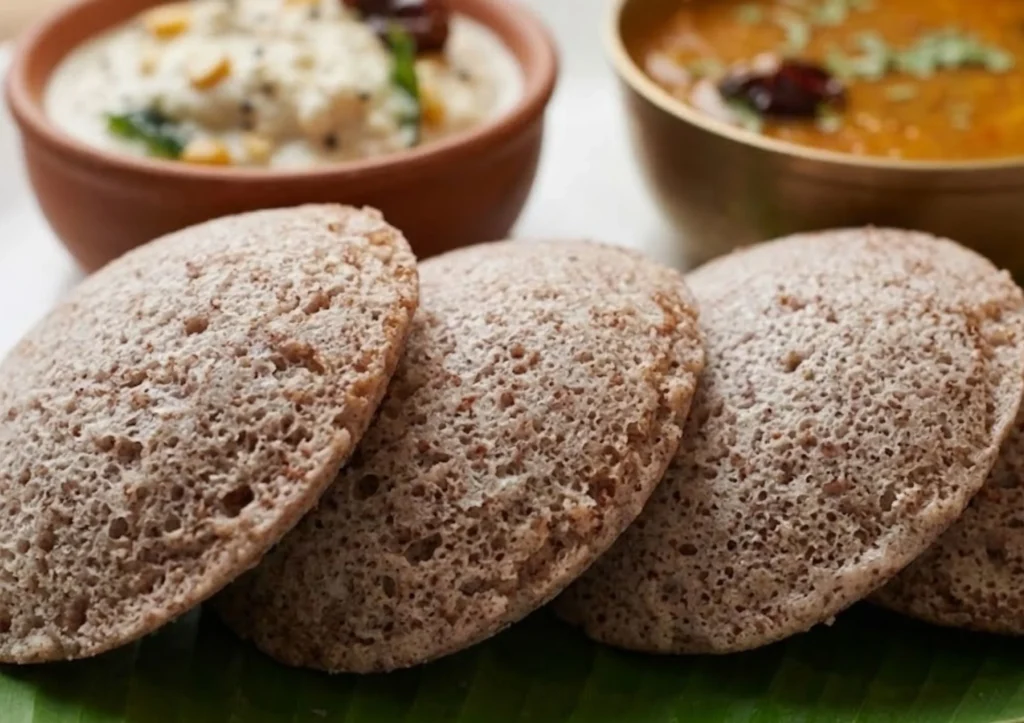
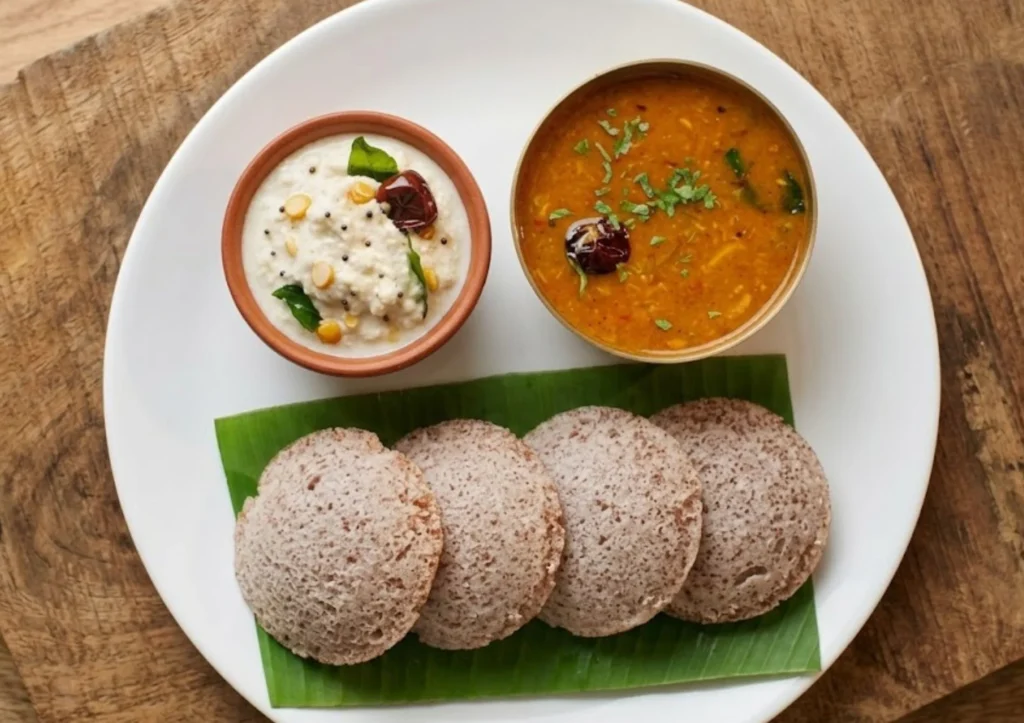
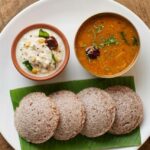
Serving Suggestions
Wait for 2-3 minutes before scooping the idlis out of the molds (this ensures they don’t stick). Serve these steaming hot with:
Coconut Chutney: The cool, creamy coconut perfectly balances the earthy ragi.
Vegetable Sambar: A spicy lentil stew that is the traditional companion to idli.
Molagapodi (Gunpowder): A dry spice mix with a drizzle of sesame oil for an extra kick.
Guide to Super Soft Finger Millet Steamed Cakes: A Hearty Millet Breakfast
Ingredients
- The Grain & Lentil Mix:
- 1 cup Finger Millet Whole Ragi grains
- 1 cup Parboiled Rice Idli Rice
- 1/2 cup Split skinless Black Gram Urad Dal
- 1/2 tsp Fenugreek seeds
- Texture Boosters:
- 1/4 cup Flattened Rice Poha/Rice flakes
- Ice-cold water for grinding
- Sea salt to taste
- 1 tsp Neutral oil for greasing molds
Instructions
- Soak the Base: Wash ragi and rice together until the water is clear. In a separate bowl, wash the lentils and fenugreek seeds. Soak both in plenty of water for 7–8 hours.
- Hydrate Rice Flakes: 10 minutes before grinding, wash the rice flakes and soak them in just enough water to soften.
- Grind the Grains: Drain the ragi and rice. Blend with ice-cold water until you achieve a very fine, smooth paste. Transfer to a deep pot.
- Grind the Lentils: Blend the lentils, fenugreek, and soaked rice flakes with a splash of ice-cold water until the mixture is frothy, light, and doubled in volume.
- Aerate the Batter: Combine both mixtures. Whisk vigorously with a whisk or clean hand for 3 minutes to incorporate air.
- Ferment: Cover and let the batter sit in a warm, dark place.
- Summer: 8 hours.
- Winter: 12–14 hours (inside an oven with the light on).
- Season: Once the batter has risen and smells tangy, add salt. Fold gently in one direction to keep the air bubbles intact.
- Prepare Steamer: Add water to your steamer (and a squeeze of lemon to prevent pot staining). Bring to a boil until steam builds up.
- Steam: Grease idli molds lightly with oil. Fill each cavity 3/4 full. Steam on medium-high heat for 12–15 minutes.
- The Clean Test: Insert a toothpick; it should come out clean. Let the molds cool for 2 minutes before scooping out the idlis with a wet spoon.
- Serve: Pair hot with coconut chutney or a spicy vegetable lentil stew (Sambar).
Usually, this is due to under fermentation. Ensure the batter has doubled in volume before steaming. Also, make sure you didn’t skip the Rice Flakes, as they are crucial for moisture.
Yes, you can mix ragi flour into the ground urad dal batter. However, using whole grains that are soaked and ground together results in a much smoother and softer texture.
The fermented batter stays fresh in the refrigerator for up to 3-4 days. You can also use this same batter to make crispy Ragi Dosas (crepes) or Ragi Uttapams (savory pancakes)!
Blenders generate a lot of heat. If the batter gets too warm during grinding, it can alter the fermentation process or make the lentils less frothy. Cold water keeps everything at the right temperature for the “good bacteria” to thrive later.